


The Nougatine is not a confectionery so difficult to make if you have the ingredients! Glucose syrup, fondant and chopped almonds. You can use slivered almonds to obtain a slightly finer nougatine. The glucose syrup prevents the whole thing from crystallizing. The nougatine can be shaped as you wish if the cutting tools are oiled.
Recipe of the nougatine:
-360g chopped or slivered almonds
-300g of glucose syrup
-500g of white fondant
45g of half-salt butter
Start by baking the almonds in the oven for 10 minutes at 150°C. Stir regularly. On the picture you can see that they are barely toasted. (well the flash doesn’t help!)

Put the glucose syrup and the fondant in a saucepan over low heat. The fondant will melt. FYI the glucose syrup is super thick, it’s kind of fun to see! It was actually used mixed with something else to serve as a monster slime in the movie Alien!

The mixture will start to boil, you can stir from time to time.

Let it caramelize. The caramel should be dark brown because the almonds and butter will lighten it!

Add the colored almonds and mix well.

Then add the salted butter.

And mix well, always on soft fire until the nougatine takes off a little from the bottom of the pan.

Pour on an oiled marble, or a silpat (siliconized carpet) or on a sheet of siliconized paper on a heat resistant surface!

Roll out with an oiled roller and cut the nougatine into the desired shape with an oiled knife.

It is absolutely necessary to preserve the nougatine in a hermetic box because moisture is fatal to it! You can make nougatine ice cream cups and cake display stands!


A great classic prepared with fresh mangoes. If you have an ice cream maker! But I also propose a version with blender and frozen mangoes without the ice cream maker!
Recipe for one liter of sorbet:
-2 fresh mangoes, or 750g of mango flesh
-250g of cane syrup (or a third of the weight of mango flesh!)
-the juice of half a lemon
Start by washing the mangoes well.

Cut the mangoes on both sides of the pit and scoop out the flesh directly with a spoon, then scoop out all that remains around the pit. Place this flesh in a blender with the sugar cane syrup and lemon juice.


Mix and put immediately in an ice cream maker.

Place in jar and store in freezer for at least 3 hours before serving.

To obtain a 100% healthy ice cream, buy cut mangoes from Picard in 450g packages. Cut them into pieces. Place 0% mango yogurt and a few pieces of mango in a blender. Turn on the blender and add the mango pieces as you go. Sweeten with aspartam, it’s up to you. Once all the mangoes are mixed, serve immediately, it is a real delight without any scruples!

Mango Sorbet
A great classic prepared with fresh mangoes. If you have an ice cream maker! But I also propose a version with blender and frozen mangoes without the ice cream maker!
Tried this recipe?Let us know how it was!

The Basque cake appeared in the 17th century in Cambo. The first versions were filled with fruit jam, including the famous black cherry of Itxassou. At the end of the 19th century the version with cream appeared. In Basque “etxe-ko biskotx-a” means the cake of the house! I propose here a recipe of almond cream perfumed with amber rum. For the black cherry, simply replace the cream filling with jam! Recipe dedicated to the little Margot!
Cake batter:
-1 egg + 3 yolks
-300g of flour
-220g of soft butter
-30g of almond powder
-200g of sugar
-1 pinch of salt
Almond cream:
-230g of whole milk
-3 egg yolks
-90g of sugar
-20g of whole milk powder
-25g of butter
-20g of cornstarch
-40g of almond powder
-20ml of amber rum
-1 vanilla bean or a pinch of vanilla powder
Start by preparing the cream.
Boil the milk with the vanilla bean split in half.

Using an electric whisk , mix the yolks, sugar and whole milk powder until they turn white.

Add cornstarch and vanilla powder if using instead of the bean.

Whisk well and add the hot milk.

Return to low heat and cook until the cream boils.

Add butter, rum and almond powder. Mix well and remove from heat.

Put the cream in a bowl and put a piece of cling film directly on it, the contact with the cream will prevent it from drying out as it cools! When the cream is at room temperature, store it in the refrigerator.

Now prepare the cake batter. Place soft butter and sugar in a bowl and mix well.

Add the egg and yolks.

And finally the flour and almond powder. You may notice that I don’t use yeast. I wanted as a reference the delicious cake of Pariès, which obviously does not use any! The cake keeps more of its crispness by inflating less.

Make a ball, place it in a film and refrigerate for one hour.

Bernard’s advice:
To roll out the dough without making a mess, I recommend putting a ball of dough on a piece of parchment paper, crushing it a little and then placing a second piece of paper on top. The dough is now between two sheets and can be rolled out without adding flour, the work table and the rolling pin will remain clean!
Place the dough between the sheets in a cool place to set
Roll out the dough a little, then peel off the sheets one by one like a decal.

Preheat the oven to 190°C. Roll out two thirds of the dough between the two sheets to a thickness of about 5-6 mm. For the cake in the picture I used an 18 cm diameter pie circle, but I still have enough dough for a smaller cake. You can easily make a larger cake up to 24cm!

Foncer (put the dough in…) a mold with removable edge or a pie circle as on the picture.
Don’t forget to grease the molds before casting them! I use the fat bomb as I explained in the canelés recipe.

Spread the cream on the dough.

Spread the last third of the dough as before and close the cake like a pie. Cut off excess dough. Draw designs on the dough, from Basque crosses to simple lines!

Bake for 40 minutes at 190°C. Remove the cake from the pan and place it on a rack.


I recommend to let the cake dry at least one day before eating it!

For the version with black cherry jam from Itxassou, just put it in place of the almond cream! For once I bought something ready-made! The jam jar!


The almond and orange dumplings are small cakes that go perfectly with mint tea. They are very tasty with their taste of almond, orange and orange flower. A one-way ticket to Rabat at Café Maure!
Recipe for 4 people:
-250g almond powder
-100g of caster sugar
-1 egg
-the zest of a whole untreated orange
-a quarter packet of baking powder
-orange blossom
-slivered and/or chopped almonds
-sugar ice
Preheat the oven to 180°C.
Put the almond powder, caster sugar and yeast in a bowl.

Add egg and orange zest.

Start mixing and add orange blossom. Add just enough orange blossom to form a ball of dough.

Pour chopped or slivered almonds or both onto plates. Take a ball of dough the size of a cherry and roll it in the almonds.

Once all the balls are rolled in almonds, place them on a baking sheet lined with parchment paper.

Then sprinkle them with powdered sugar with a tea strainer. Place in the oven and cook for about 15 minutes.

Put them to cool on a rack. Serve them an hour later with a mint tea!


Financiers are delicious little cakes that were created around 1890 by the pastry chef Lasne, near the Paris Stock Exchange. They are shaped like gold bars and were named that way to appeal to the wealthy client in the corner, the stock market financier. It was an immediate success! And we understand why! I propose here a variation with pistachio.
Recipe for 40 small pistachio financiers:
-4 egg whites
-50g of flour
-40g of almond powder
-115g of sugar
-85g of soft butter
Preheat oven to 220°C.
Mix all ingredients except butter in a bowl. Mix well to incorporate the pistachio paste.


Melt the butter in a saucepan until it foams.

Add it directly to the almond paste and mix well.


Pour the dough into mini-financier moulds, then bake directly in the oven for 15 to 20 minutes (depending on the power of the oven).

They shouldn’t be overcooked, just a little cracked on top and lightly browned! If they are not consumed during the day (which is rare!), in this case keep them in an airtight box.


The farofa is for the pure followers of Brazilian cuisine. The first time I ate it, in São Paulo, I must admit I was not thrilled! Then I went crazy about it! Farofa is a roasted cassava flour that is eaten everywhere in Brazil. The recipes are endless because you can put anything you want in them. In general the farofa is part of the composition of the feijoada, the national dish of Brazil, but also accompanies perfectly the grilled meat in the churrascarias. But knowing my passion for farofa, Janine was kind enough to prepare some for me as a starter! Here is his recipe!
Recipe for 4 people:
-300g of manioc flour “torrada” available in Brazilian grocery stores
-2 shallots, finely chopped
-a small smoked sausage cut into pieces
-6 dried apricots
-a large knob of butter
-a good pinch of fleur de sel
-2 plantain bananas
Cut bananas into pieces and place in a lightly greased oven dish. Bake at 180°C for 10-15 minutes.
Brown the butter in a pan, add the shallots. Cook them without really coloring them. Add the dried apricots cut into small pieces and the sausage. Let it brown for a few minutes then add the cassava flour over low heat. You have to keep stirring to let the flour toast without burning it.
Serve immediately with banana pieces.
Janine also prepared a delicious dish for her dinner. Escondidinho”, that is to say a kind of shepherd’s pie but in a Brazilian version! A manioc puree (so very sweet and divine!) with an interior made of dried meat (a speciality from there!) finely sliced onions, a hint of fresh chilli and parsley, all gratinated with cheese. I hope Janine will give us her recipe soon!


The pistachio paste is like the hazelnut paste and the praline, a culinary base in pastry. It takes a little longer to make than the others, especially the grinding which takes almost 30 minutes. But the result is worth the effort. With this dough we will be able to make pistachio mousseline, macaroons, crème brûlée, financiers etc…
Recipe:
250g of raw pistachios
125g of sugar
35g of water
60g almond powder
1 tablespoon of oil
a few drops of bitter almond extract
Start by toasting the pistachios on a baking sheet for 15 minutes at 150°C.

Once the pistachios are toasted, place them in a bowl.

Heat the sugar over low heat with the water.

When the syrup is at 121°C pour it directly on the roasted pistachios.


Mix well to coat all the pistachios with syrup.

The sugar will crystallize, it’s perfectly normal!

Once the pistachios have cooled, place them in the bowl of a blender with the spoonful of oil, 4 drops of bitter almond extract and the almond powder.

Turn on. It’s going to take a while to get a dough-like consistency, but it still works. So patience!!! It is best to turn off the unit from time to time to avoid overheating! Here are the pictures of the different stages the pistachios go through!


Once the dough is ready, put it in an airtight box and cool it. The dough keeps for a long time. Anyway, you can tell by the smell and the color.


Hazelnut paste is a specialty of Piedmont in Italy. It is not consumed as is, but like the praline, is the basis of many recipes. It only takes a few minutes to make this delicious sweet dough, which will be used for pralines, gianduja, hazelnut creams, cakes, cookies. You can also put a spoonful in a coffee to sweeten it, the coffee will have a tasty flavor of roasted hazelnuts!
Recipe for 400 grams of hazelnut paste.
-200g of roasted and peeled hazelnuts (not salted!!)
-200g of powdered sugar
If you don’t have roasted and peeled hazelnuts in the shop next door, you can buy hazelnuts and put them in the oven at 180°C for 10 minutes . Then put them in a clean cloth and rub them well against each other. They will then peel themselves. If they are not all of them, nothing to be alarmed about! If you crush them, you will only see fire.

Weigh the hazelnuts and powdered sugar.

Put everything in a blender and run for 5 to 10 minutes until you have a very soft paste. I put all the pictures of the steps the hazelnuts go through. It all depends on the power of the blender of each, it will take more or less time!


Put the hazelnut paste in a jar with a lid and keep in a cool place. It keeps for quite a long time, as long as the hazelnut package says!

You can also make a hazelnut paste without sugar by putting only the roasted and peeled hazelnuts in the blender! The result will be more oily, but can be used for other recipes!


The praline is not eaten as is, it is especially at the base of many recipes of chocolate sweets and desserts. Making the praline is very simple and doesn’t take much time. It can be made with almonds, hazelnuts or both together!
Recipe for 400g of praline:
-240g almonds with skin (or hazelnuts or 50/50)
-160g of sugar
-15g of water
Pour the sugar into a pan. Place over medium heat.

Add water and start boiling.

When the sugar is at 121°C, (without a thermometer you can manage very well, the sugar starts to form thicker and thicker bubbles, the syrup becomes thick too) add the almonds all at once.

Mix well with a wooden spoon to coat each almond with sugar.

At this point, the sugar will sand, which means that it will crystallize again. Always keep mixing.

The sugar will then melt again, this time by caramelizing.

Once all the sugar has caramelized, remove from heat.

Pour the entire contents of the pan onto a heat-resistant silpat or oiled marble.

Let cool completely.

Once this caramel slab is hard, break it into pieces.

You can keep one or more pieces for a cake decoration or to eat it as it is (with a mint tea it is divine!). These pieces must be kept in an airtight box!

Put the rest in a blender. And start with successive pulses.

After a few seconds you will have a praline powder that you can put aside for ice cream or praline creams. Keep this praline in an airtight box!

¨For a praline paste, let the mixer run until you have an almost liquid consistency. It depends on the power of the mixer. Here are the photos of all the successive steps. But do not doubt that we can obtain a paste from dry and hard elements! The longer you leave it in the blender, the more the dough will be ground.


Finally, here is the result after an average of 5 minutes of grinding. Store this praline paste in a clean jam jar in a cool, airtight box.


“Pull me up” or Tiramisu in Italian, lives up to its promise. A spoonful of this creamy, smooth cake and your spirits are instantly lifted! With this recipe, you get a light, airy, deliciously melting and creamy tiramisu, which doesn’t run.
Recipe for 4 to 6 people:
-500g of mascarpone
-2 large eggs (from free range hens please!!!)
-80g caster sugar
-2 tablespoons of powdered sugar
-a few drops of lemon juice (or cream of tartar)
-2 packages of sponge cake
-a cup of strong coffee
-amaretto
-unsweetened cocoa powder
The instructions
Start by separating the yolks from the whites. Put the yolks in a bowl with the caster sugar. Whisk the yolks as much as possible to make them white.

Add the mascarpone and continue to whisk to obtain an airy cream.


In another bowl, whip the egg whites until stiff with the powdered sugar and lemon juice (or cream of tartar for those who have it).


Add these whites to the first mascarpone mixture. Mix gently, lifting the cream so that the egg whites do not fall.


Prepare a strong coffee and add amaretto to it. The amount depends on your taste. But 2 or 3 tablespoons of amaretto for a cup of coffee seems fine to me. Dip the cookies one by one in the coffee for 4 to 5 seconds to soak them well, but do not soak these fragile cakes either.

Place the cookies in a serving dish, holding them tightly. Pour the mascarpone cream on top, spreading well. You can make small tiramisus in small ramekins. I made both, you can see them in pictures in this recipe.


Let stand at least three hours in the refrigerator. At the last moment, sprinkle cocoa with a tea strainer, either in the small ramekins directly or after serving a portion on a plate.

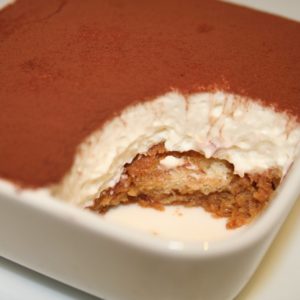
Tiramisu
"Pull me up" or Tiramisu in Italian, keeps its promises. A spoonful of this creamy, smooth cake and your spirits are instantly lifted! With this recipe, you get a light, airy, deliciously melting and creamy tiramisu, which doesn't run.
Tried this recipe?Let us know how it was!