

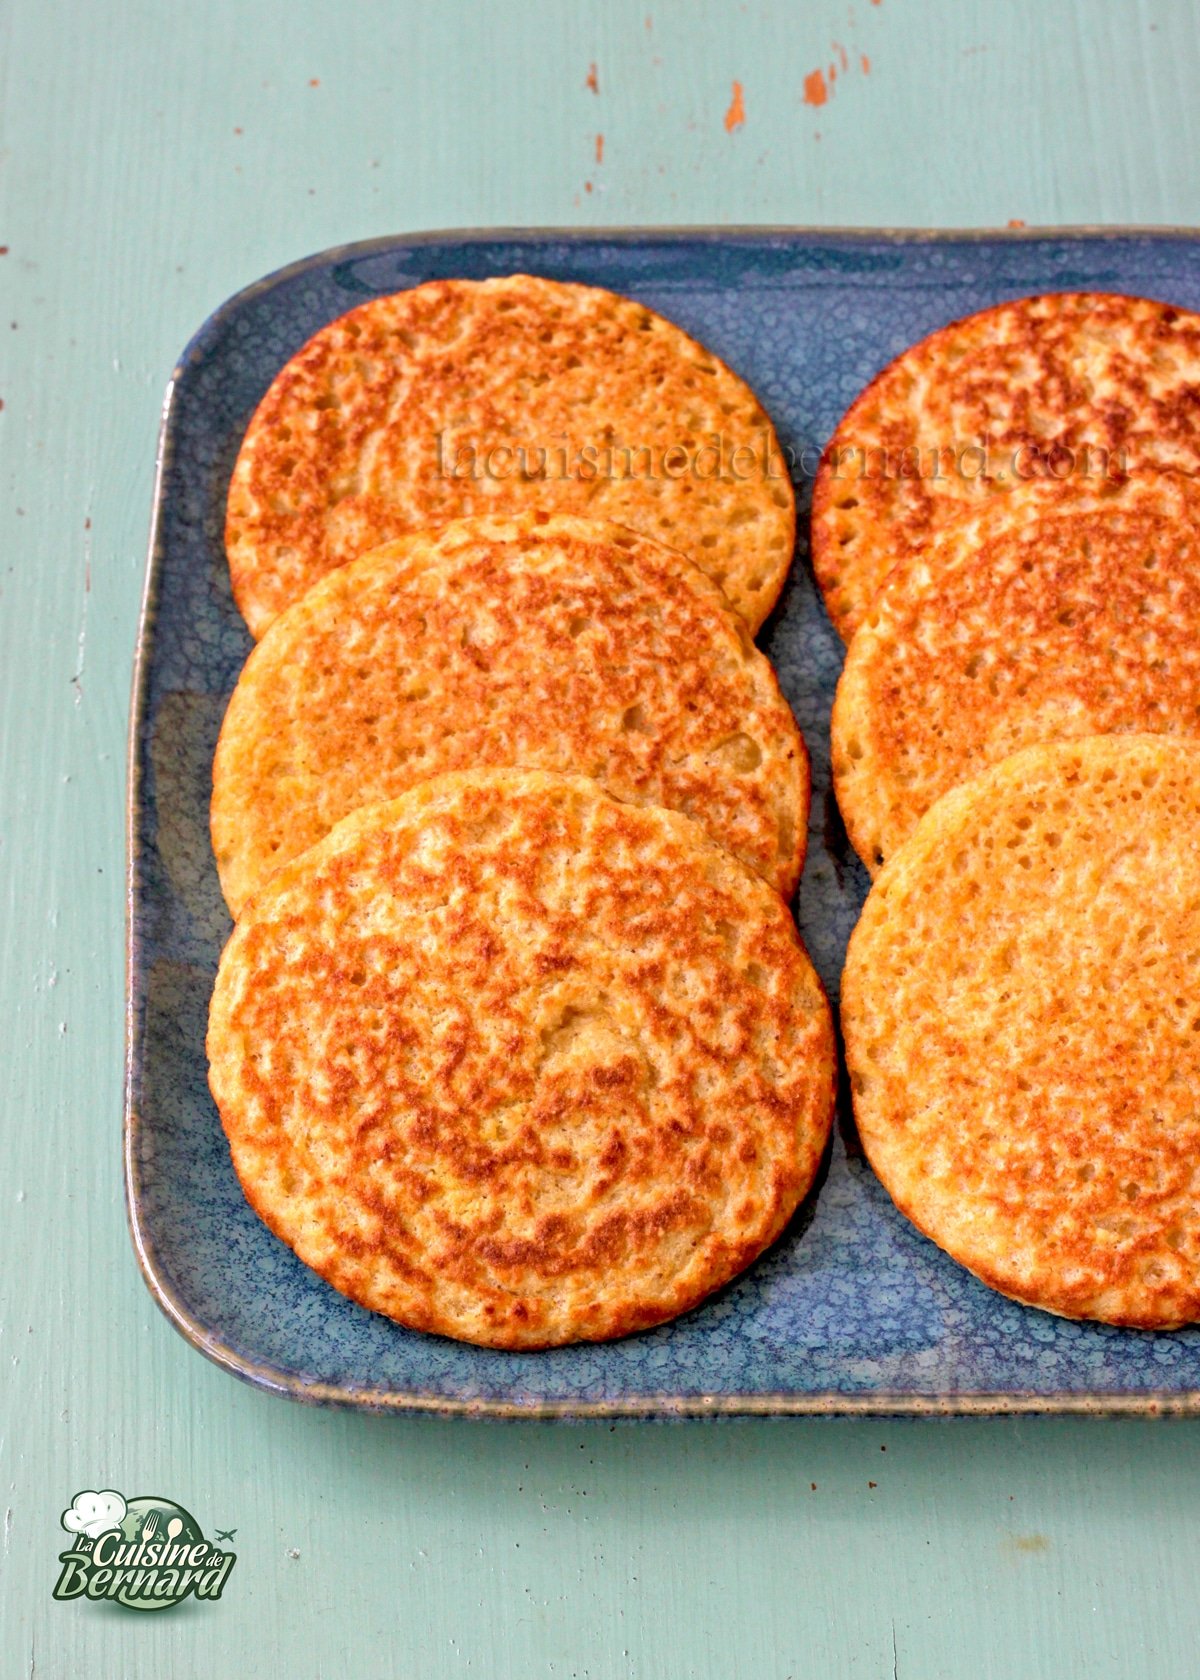
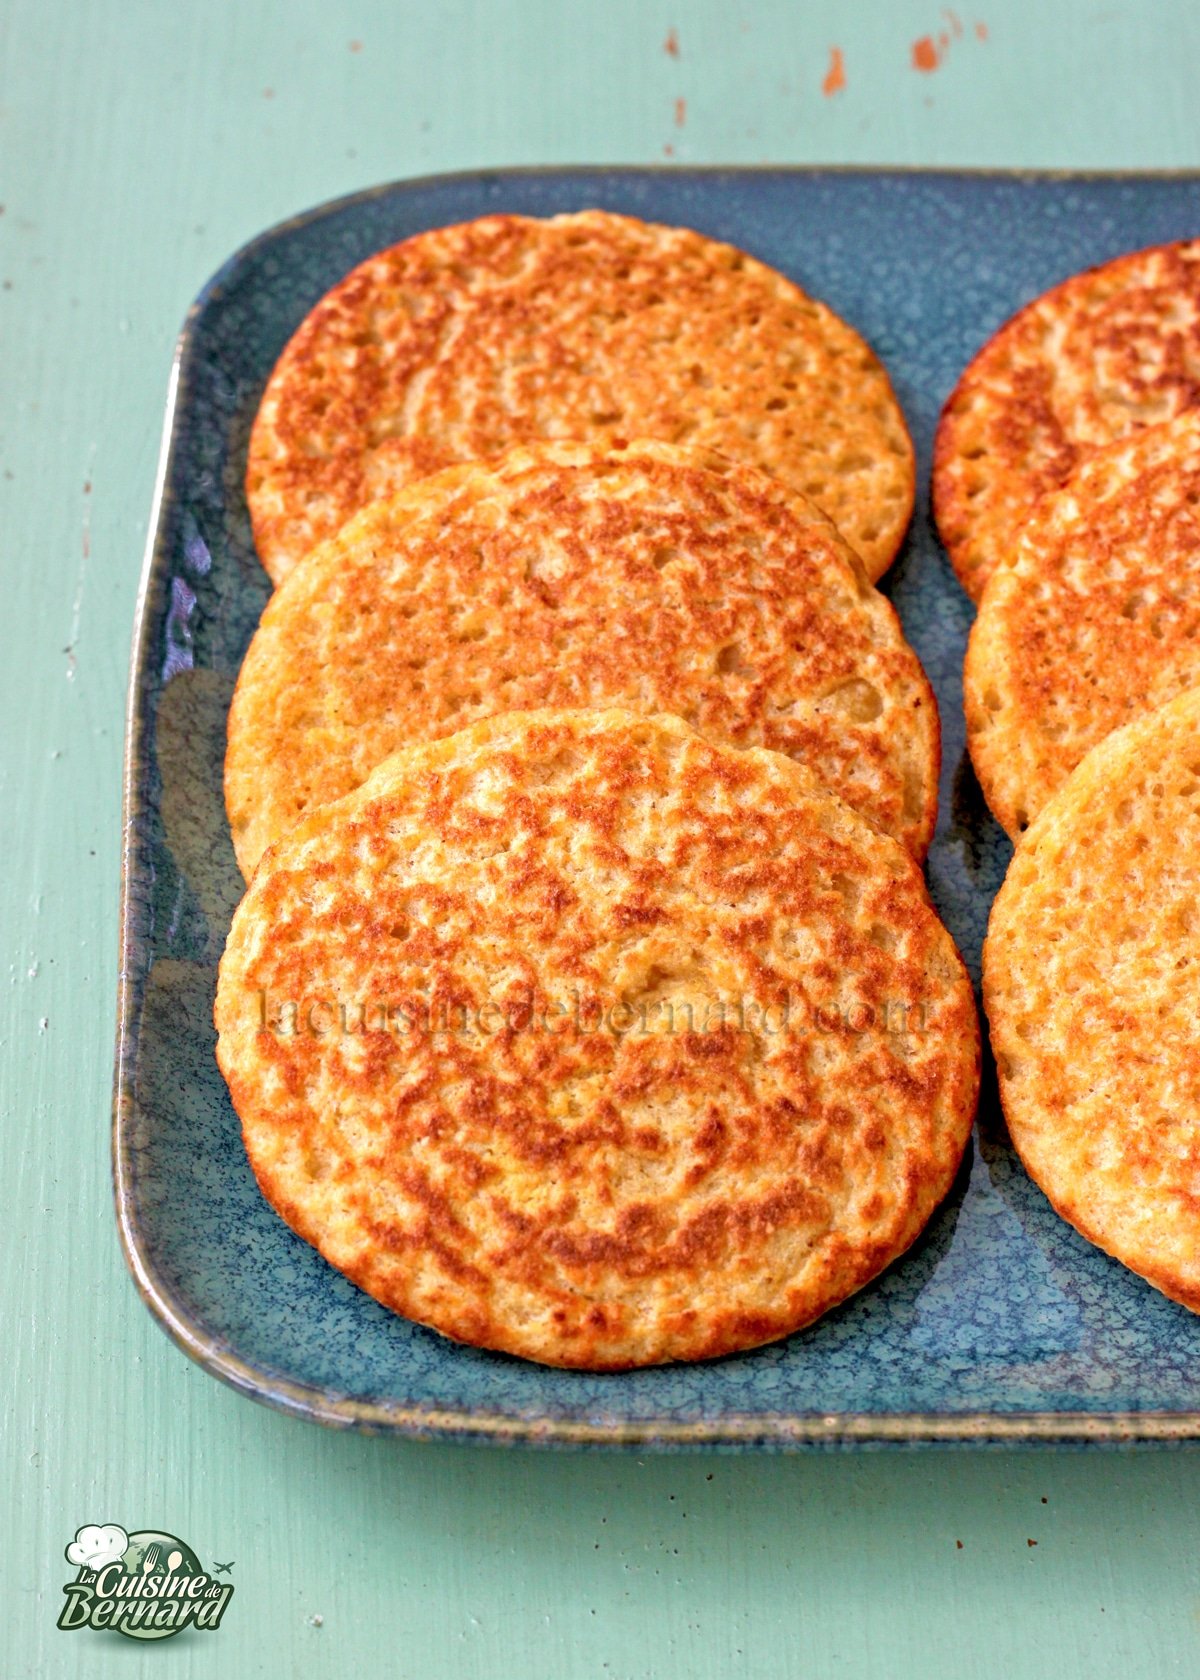
For once, I’m offering you a more balanced recipe than the somewhat decadent dishes or desserts on the blog! I have to say that after writing and shooting my next book (which will be released in mid-March), I have put on a few pounds that I have to lose again, without putting aside the pleasure of cooking and eating well. I suggest these coral lentil patties which have the big advantage of being very quick to make, can be frozen and then reheated in the toaster. I eat 3 for a meal with greens or a good salad. They can also be spread with whipped cream cheese or anything else you like. I prefer to make twice the amount I give you and then take them out of the freezer at the last minute and reheat them in 3 minutes in the toaster.
Recette pour 18 galettes de lentilles corail:
- 250g of coral lentils
- 30g of brown rice flour
- 65g of oat bran
- 210ml of skim milk
- 175ml of water
- 1 large egg
- 1 teaspoon of salt
- 1/2 teaspoon baking powder
- 1/4 teaspoon powdered ginger
- 1/4 teaspoon curry powder
Instructions :
Cook the coral lentils for 2 minutes (that’s all) in boiling water.

Drain them well and put them in a blender with the oat bran and brown rice flour.

Add the egg.

Pour in the spices, water, milk and yeast. Basically all the ingredients! It couldn’t be simpler.

Mix until you have a nice paste.

I’m using my Skeppshult blini pan here (a brand I wrote about years ago!). I just put a tiny bit of oil in the bottom with a brush.

Pour in two tablespoons of batter.

Let them cook well, then gently turn them over to cook the other side.

I had made twice as many, so a total of 36.

They are delicious hot, accompanied by vegetables or a green salad. Even for breakfast they are perfect! In any case, you just have to put them in the toaster for a minute to warm them up.

Coral lentil patties


I’m back from a little trip to Italy and I’m also on the home stretch of my book which will be released in March and I’ll tell you all about it very soon. This has left me with a little less time to post, even though the ideas are piling up! This is the sbrisolona which comes from Lombardy and whose name derives from the word “brisa” which means crumbs. As you can see, it is a kind of large sweet cake to be broken into pieces and shared. It is really delicious for snacking. There are almonds, lemon, a little vanilla and especially fine cornmeal which brings a crunchy texture. I did some testing in my studio to give you the version I like!
Recette pour deux “sbrisolona”:
- 60g raw almonds with skin
- 140g of sugar
- 110g of soft butter at room temperature
- 50g of fine cornmeal
- 190g flour
- 25g of egg yolks
- the zest of half a lemon
- a good pinch of salt
- some almonds for decoration
Instructions :
Place the almonds in a small blender to make a coarse powder.


Place the butter, sugar and almonds in a food processor or bowl.

Blend with food processor or with fingertips.

Add the remaining ingredients and mix until you have a very lumpy dough.


It looks a bit like crumble batter.

Place a 20 cm diameter circle on a baking sheet lined with paper or a silicon mat. Put half of the dough in the circle (we’ll make two) then pack very lightly without insisting. Then place a few almonds on top.

Bake for 25 minutes at 170°C. The top should be golden brown.

Do the same for the second cake. To be enjoyed chilled. You will simply have to break it by hand to share it.

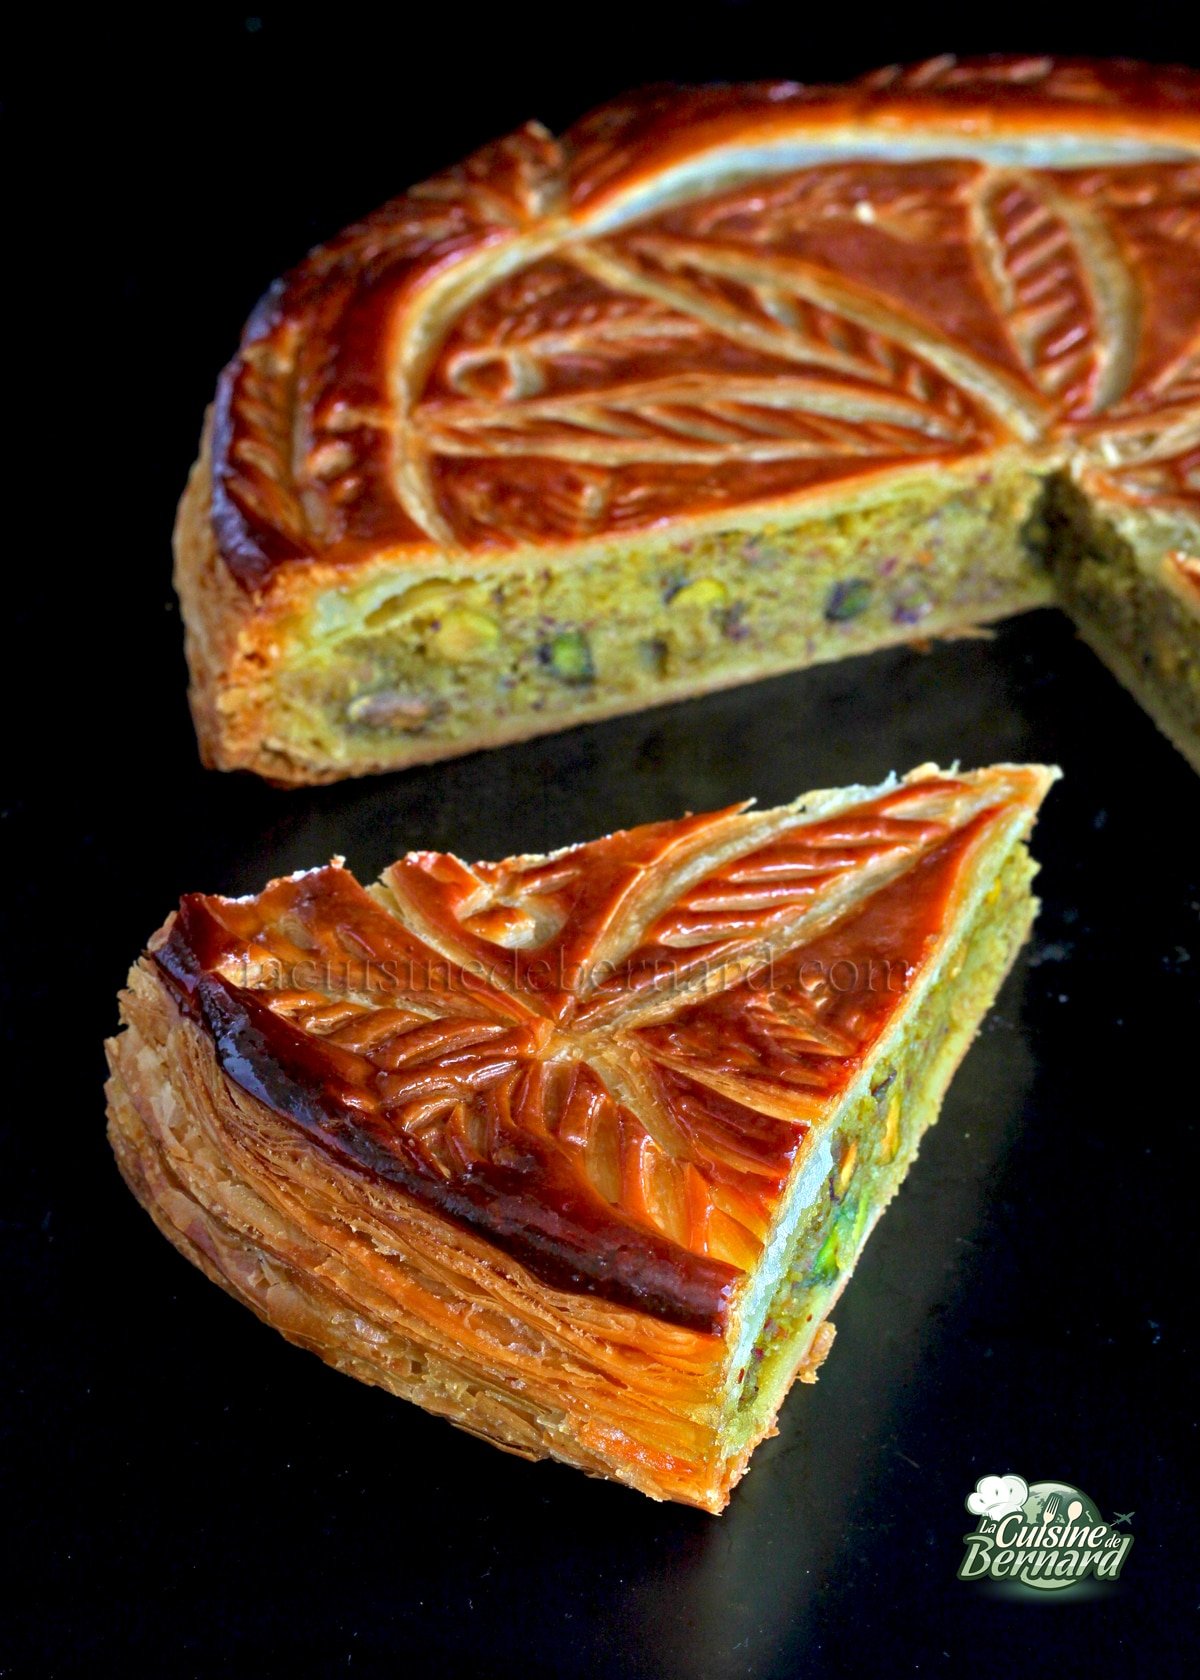
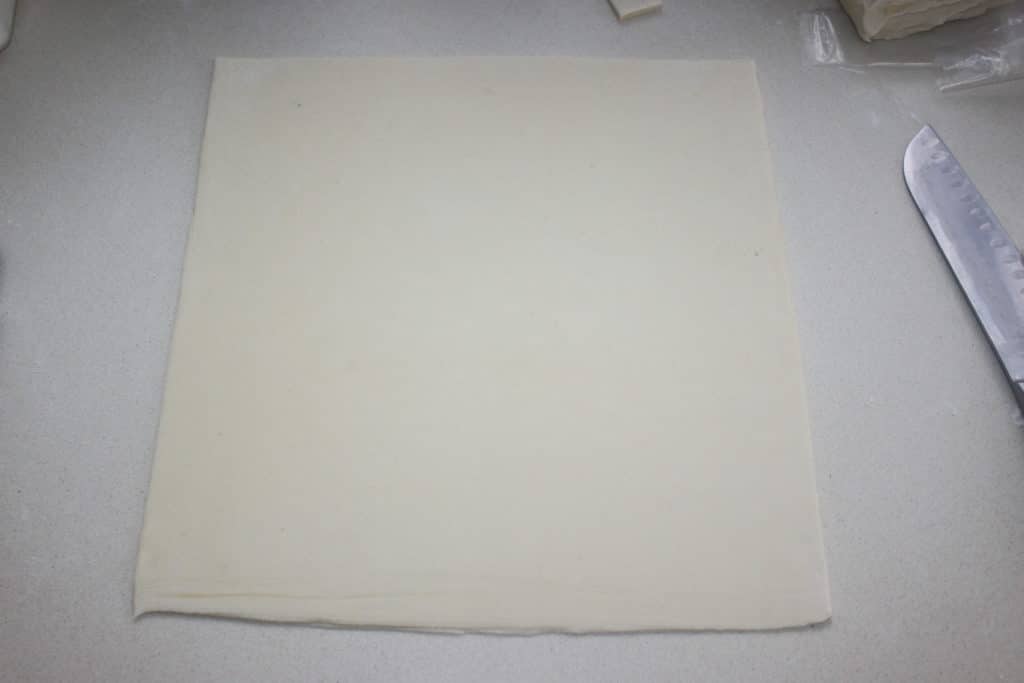
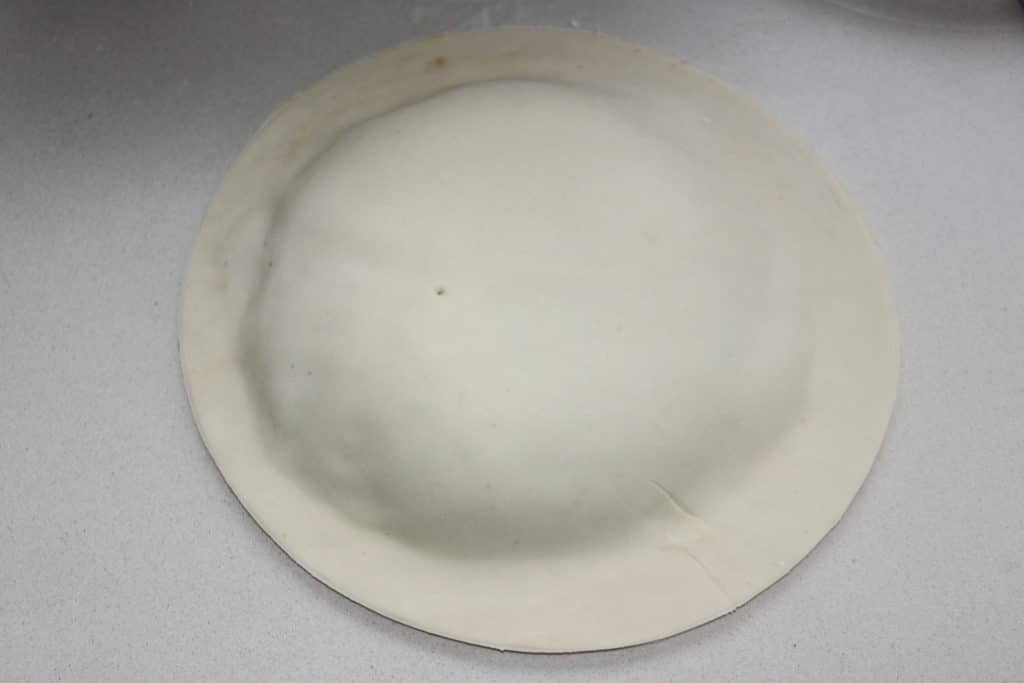
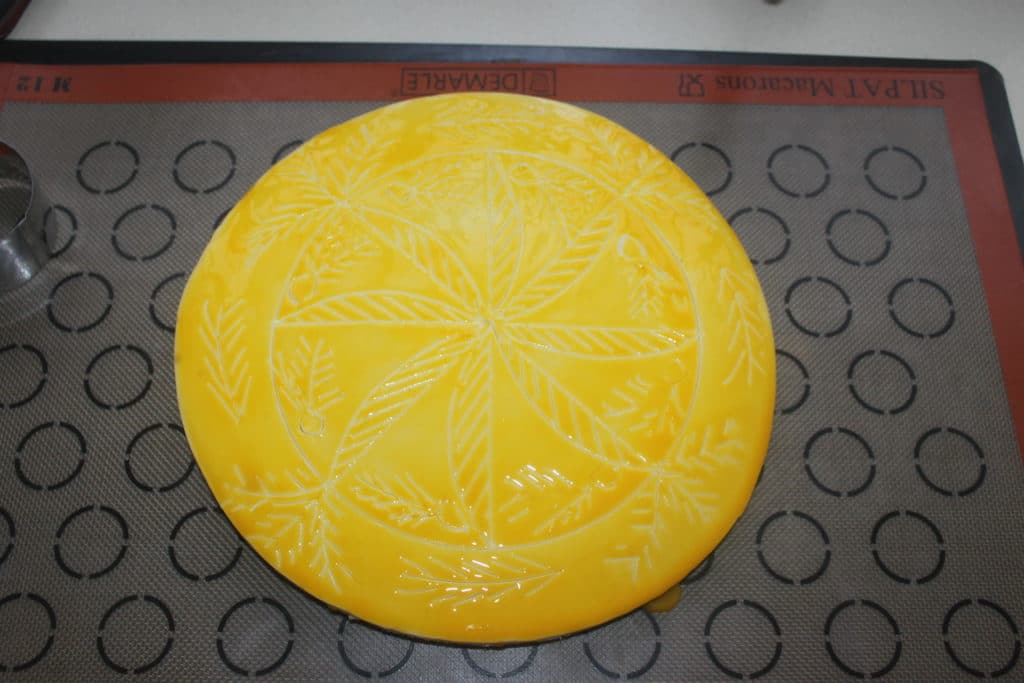
Every year I try to offer you a new galette des rois. This time, I propose a totally decadent and delicious version, with pistachios and orange blossom. A small bomb of flavors and textures. Especially with a homemade inverted puff pastry. I always have some in advance that I vacuum-seal after my puff pastry workshops. I use lots of whole pistachios and they go perfectly with the orange blossom.
Recette pour une galette de 26cm :
- 1 recipe for homemade inverted puff pastry (recipe HERE)
Pastry cream :
- 85ml of semi-skimmed milk
- 20g of butter
- 25g of sugar
- 20g of egg yolk
- 10g of cornstarch
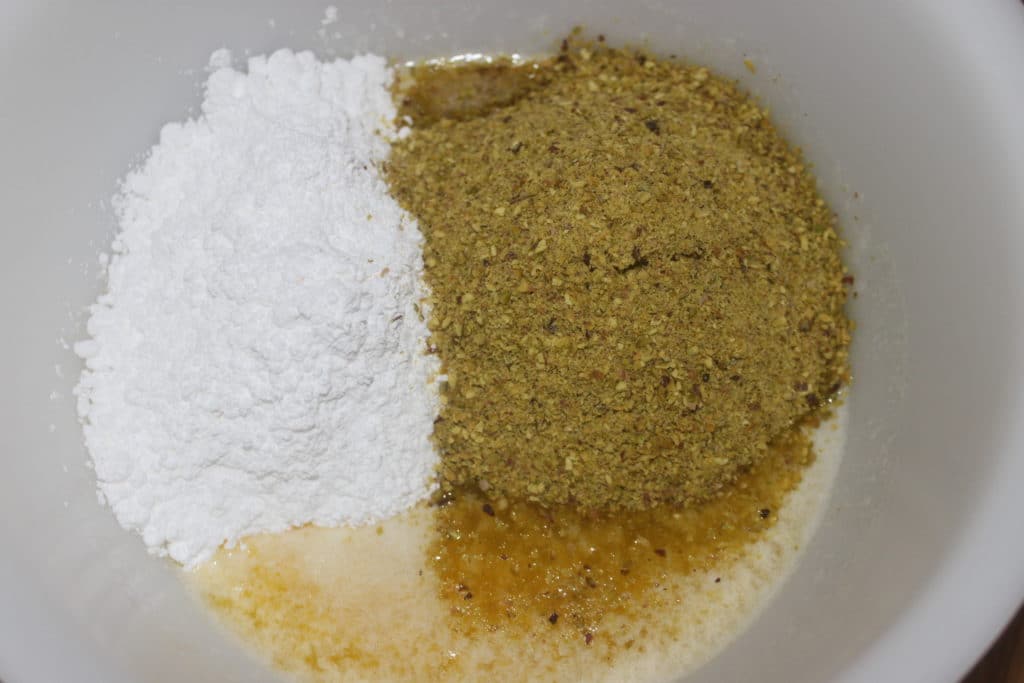
Pistachio frangipane cream with orange blossom :
- 150g of powdered sugar
- 150g of melted soft butter
- 150g of pistachio powder
- 90g of egg
- the entire pastry cream
- 2 tablespoons orange blossom water
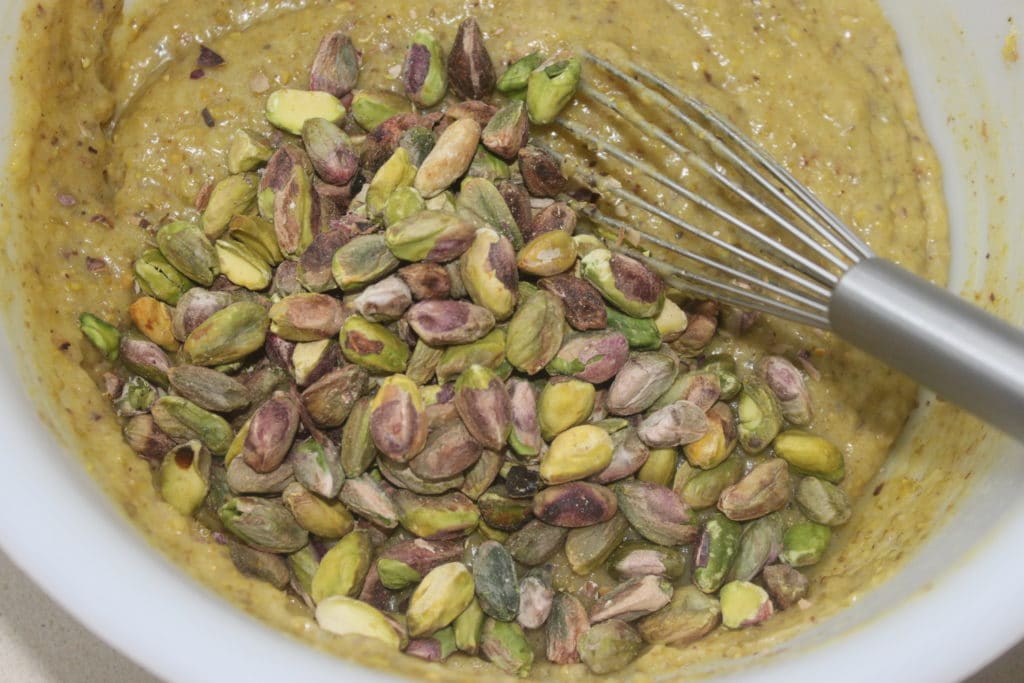
- 100g roasted, shelled and unsalted pistachios
Gilding :
- 1 or 2 egg yolks
Instructions :
Of course, start by making a puff pastry. It’s all there!
Prepare the pastry cream. Mix 20g of sugar (out of the 25), the 20g of yolk and the cornstarch in a bowl.
Boil the milk with the remaining sugar and butter.


When the milk boils, pour a small amount of it over the yolk-cream powder mixture.

Mix well with a whisk.

Pour the mixture back into the pan and bring to a boil, still on low heat, while stirring well in the bottom of the pan.
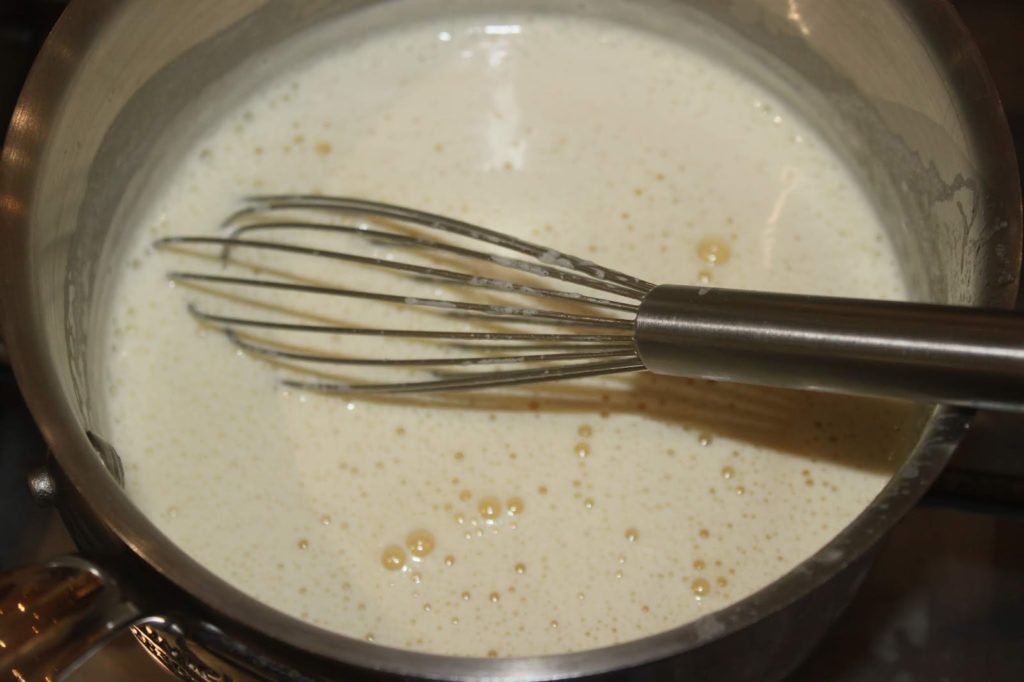
When the cream boils, it is ready. It is necessary to whisk well during the cooking.
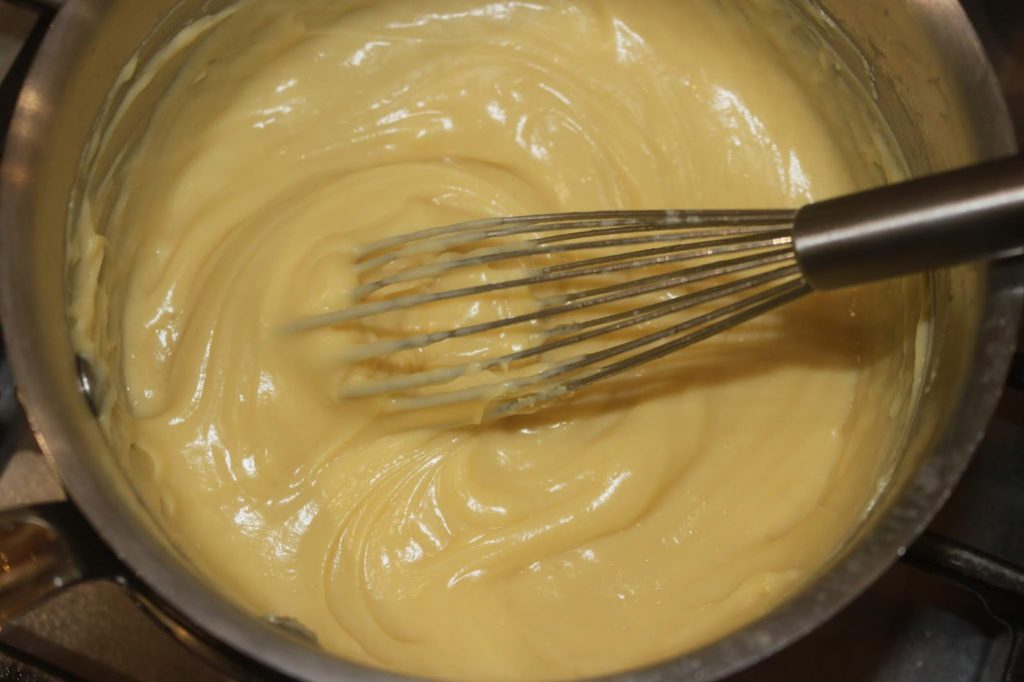
When the cream has thickened (and boiled), pour it into a container and wrap it in cling film. Let cool to room temperature.

Now make the frangipane cream.
Put the melted butter, powdered sugar and pistachio powder in a bowl.
Add my 90g of egg.
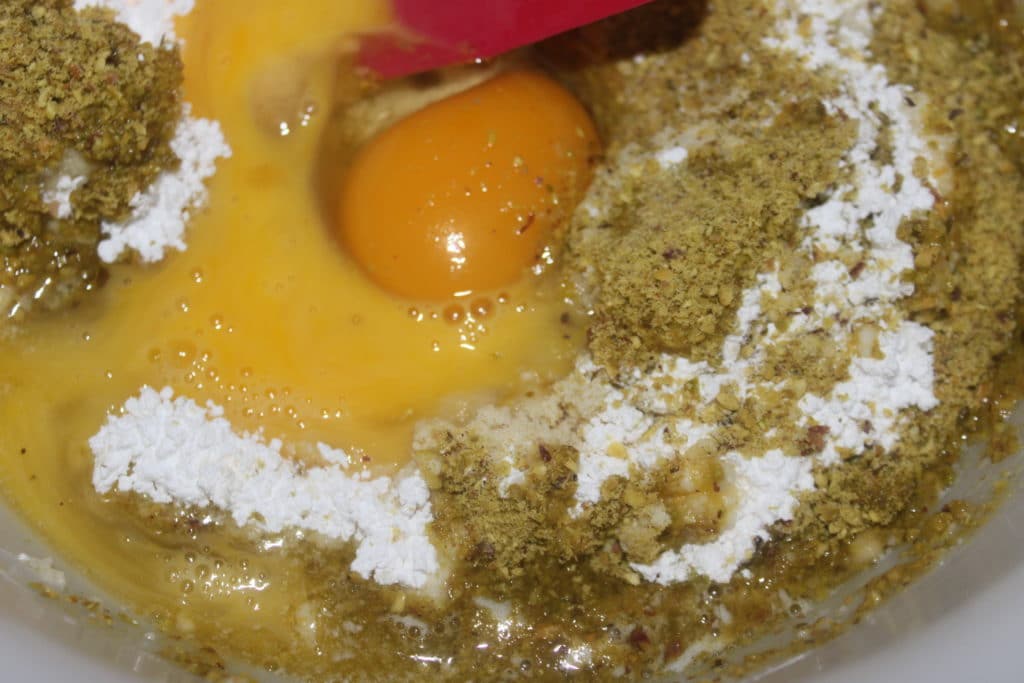
Mix and pour in the cooled custard.
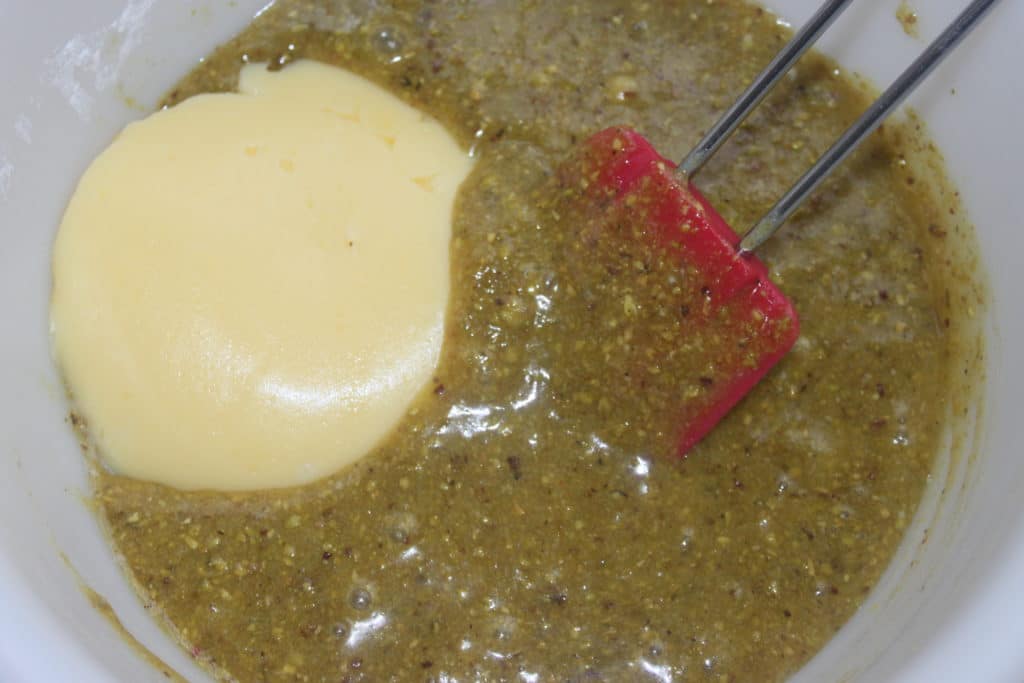
And the orange blossom.
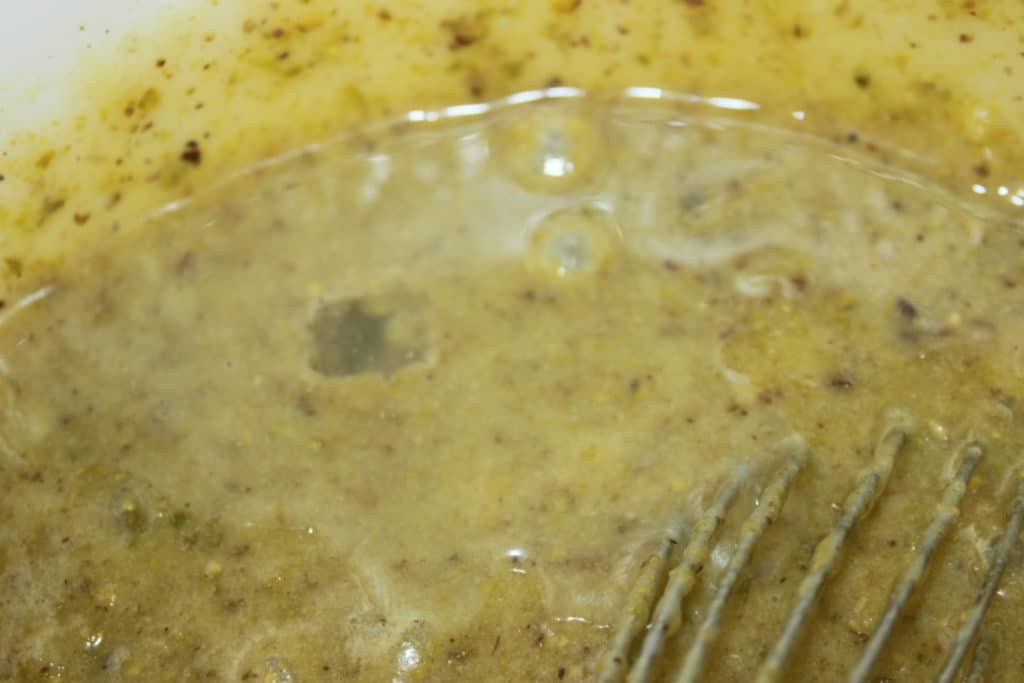
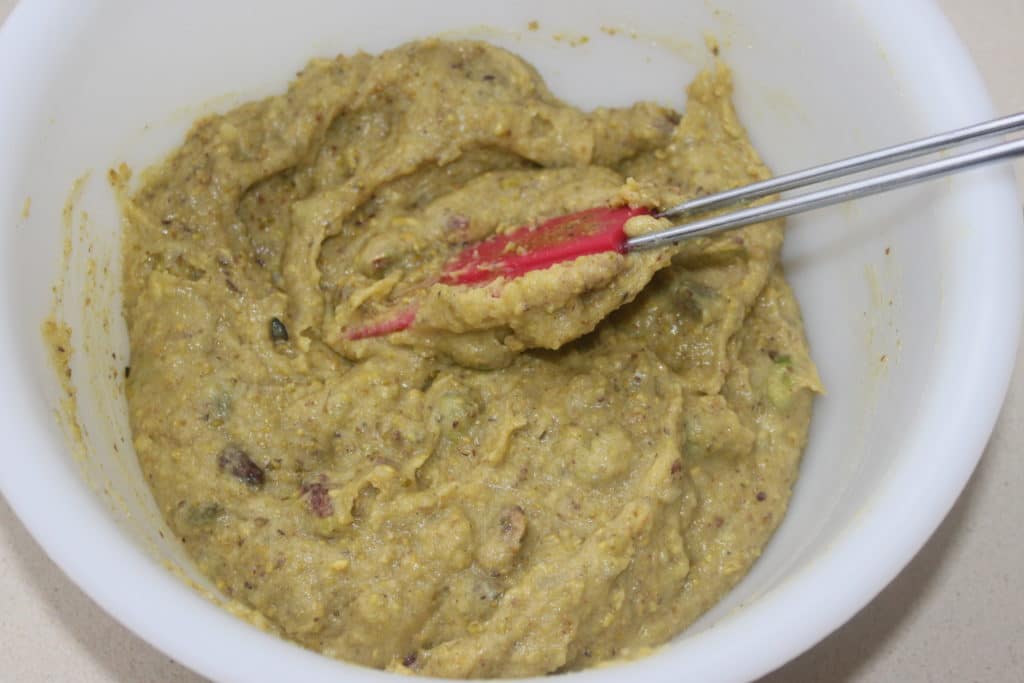
Whisk briskly to incorporate everything, then pour in the unsalted roasted shelled pistachios.
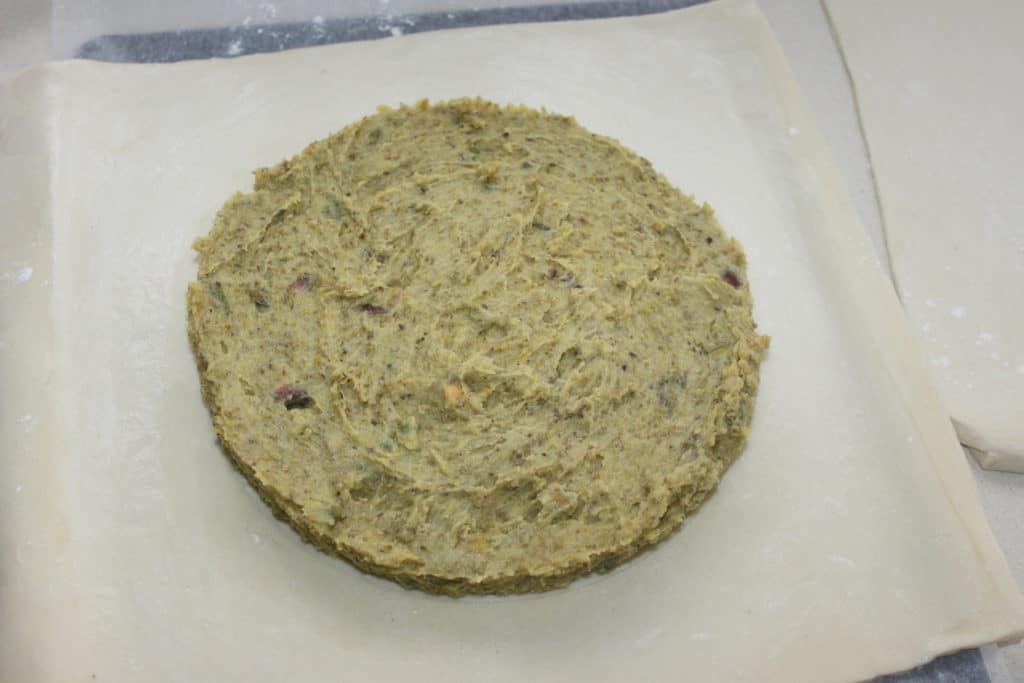
The cream is finished. Place it in a cool place for one hour.
Roll out half of the puff pastry. You can trim the edges to make it easier for you and then it goes back in the cooler. Spread it on 2-3mm thickness. Brush water over the entire surface. This way, you don’t have to worry about it later (it will serve to glue the two doughs together).
Pour all the cream on a 20cm diameter.
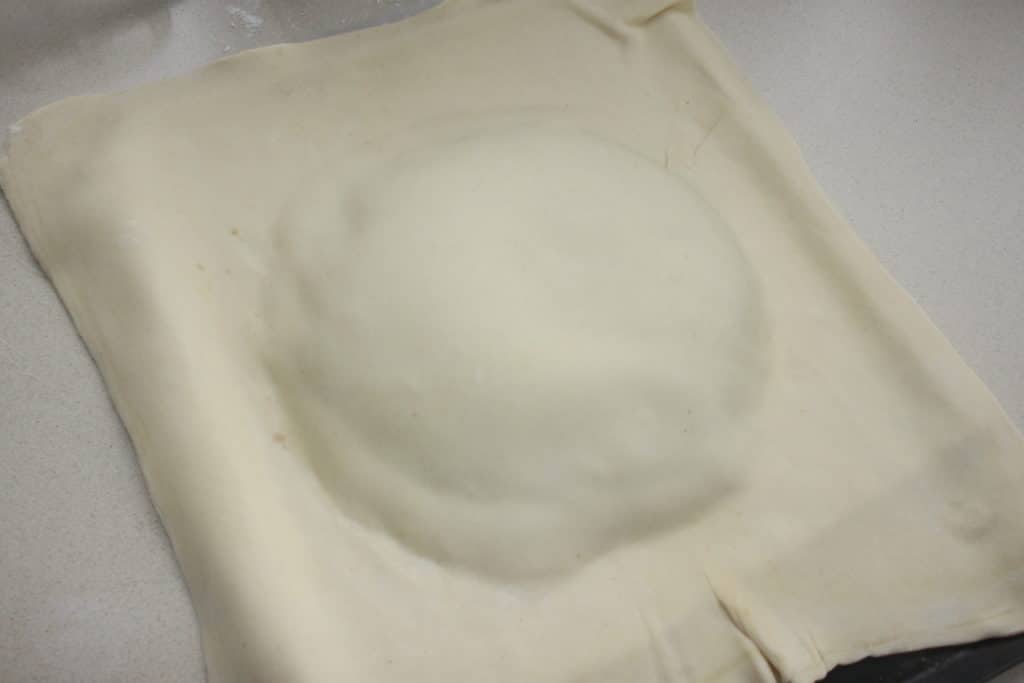
Cover with the other half of the rolled out puff pastry. Wrap the dough around the cream and press it well. Since you had put water all over it, the dough will be well welded. Then leave in the fridge for 30 minutes to firm up the dough.
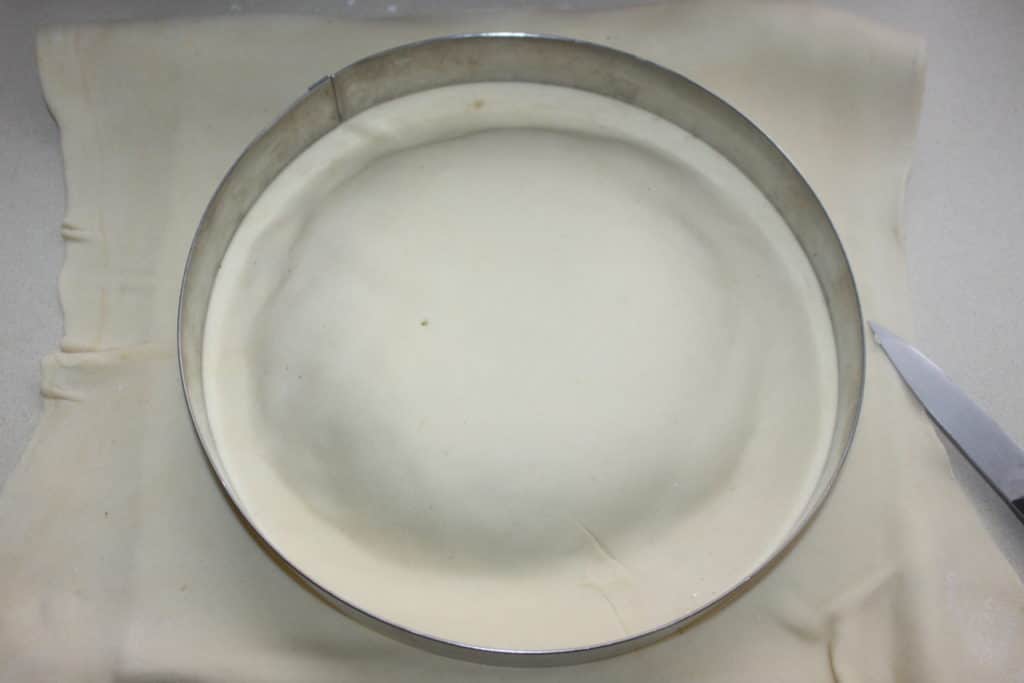
Take a 26cm circle to have a mark then cut the dough with a knife. Do not press the circle into the dough! Cut well with a knife.
Put back in the fridge for 2-3h. The dough becomes hard. Turn the dough over completely (see my recipe for the galette with the turning method HERE!). Brush on egg yolk for gilding. Let dry for 20-30 minutes and then draw the chosen designs with a knife without piercing the dough completely.
Bake at 200°C for 30 minutes with the same method of turning. I block it in the oven so that it remains uniform in its swelling.
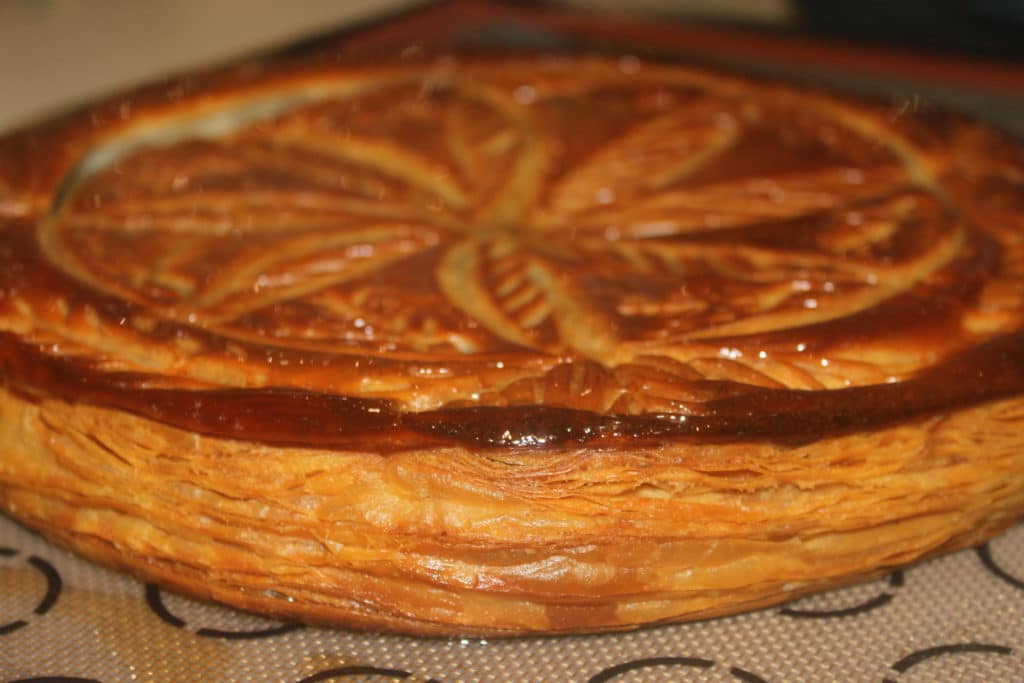
To be enjoyed warm!


Between or after the holidays, you may need a calorie break! So a homemade soup in the evening is pretty good and always good! This time I propose a pumpkin, white bean and lemon confit soup with salt. The whole thing gives a very unusual taste, but quite delicious if the lemon is well dosed. With a little bit of cumin, it becomes particularly tasty. The beans give a nice consistency and creaminess, which makes me go without cream for once!
Recette du VELOUTÉ DE POTIMARRON, HARICOTS BLANCS ET CITRON CONFIT :
- 1 organic pumpkin of 1kg
- 4 tablespoons of olive oil
- 1 onion
- 7 cloves of garlic
- 1.5 to 2 liters of water
- 400g of cooked white beans (canned for example)
- 1 lemon candied in salt or more
- 1/2 teaspoon cumin powder
- salt pepper
Instructions :
For this recipe, take an organic pumpkin, because we will cook it and eat it with the skin.

Open the two and remove the seeds. Cut it into pieces.

Put the chopped onion with the peeled garlic cloves in the olive oil.

Let it brown for 5 minutes.

Add the pumpkin.

Pour in water and cooked white beans.


You can add one or two lemons preserved in salt. I suggest you start with one to see what it tastes like. I just remove the seeds and cut them in half (flesh and skin).

Hop in the soup.

Let it cook for 20 minutes and then blend finely with an immersion blender.

I add a little cumin powder.

Mix well, salt and pepper to taste. Be careful because the lemon is already very salty.

One last mix and that’s it. If the soup is too thick, add water until you reach the desired consistency.

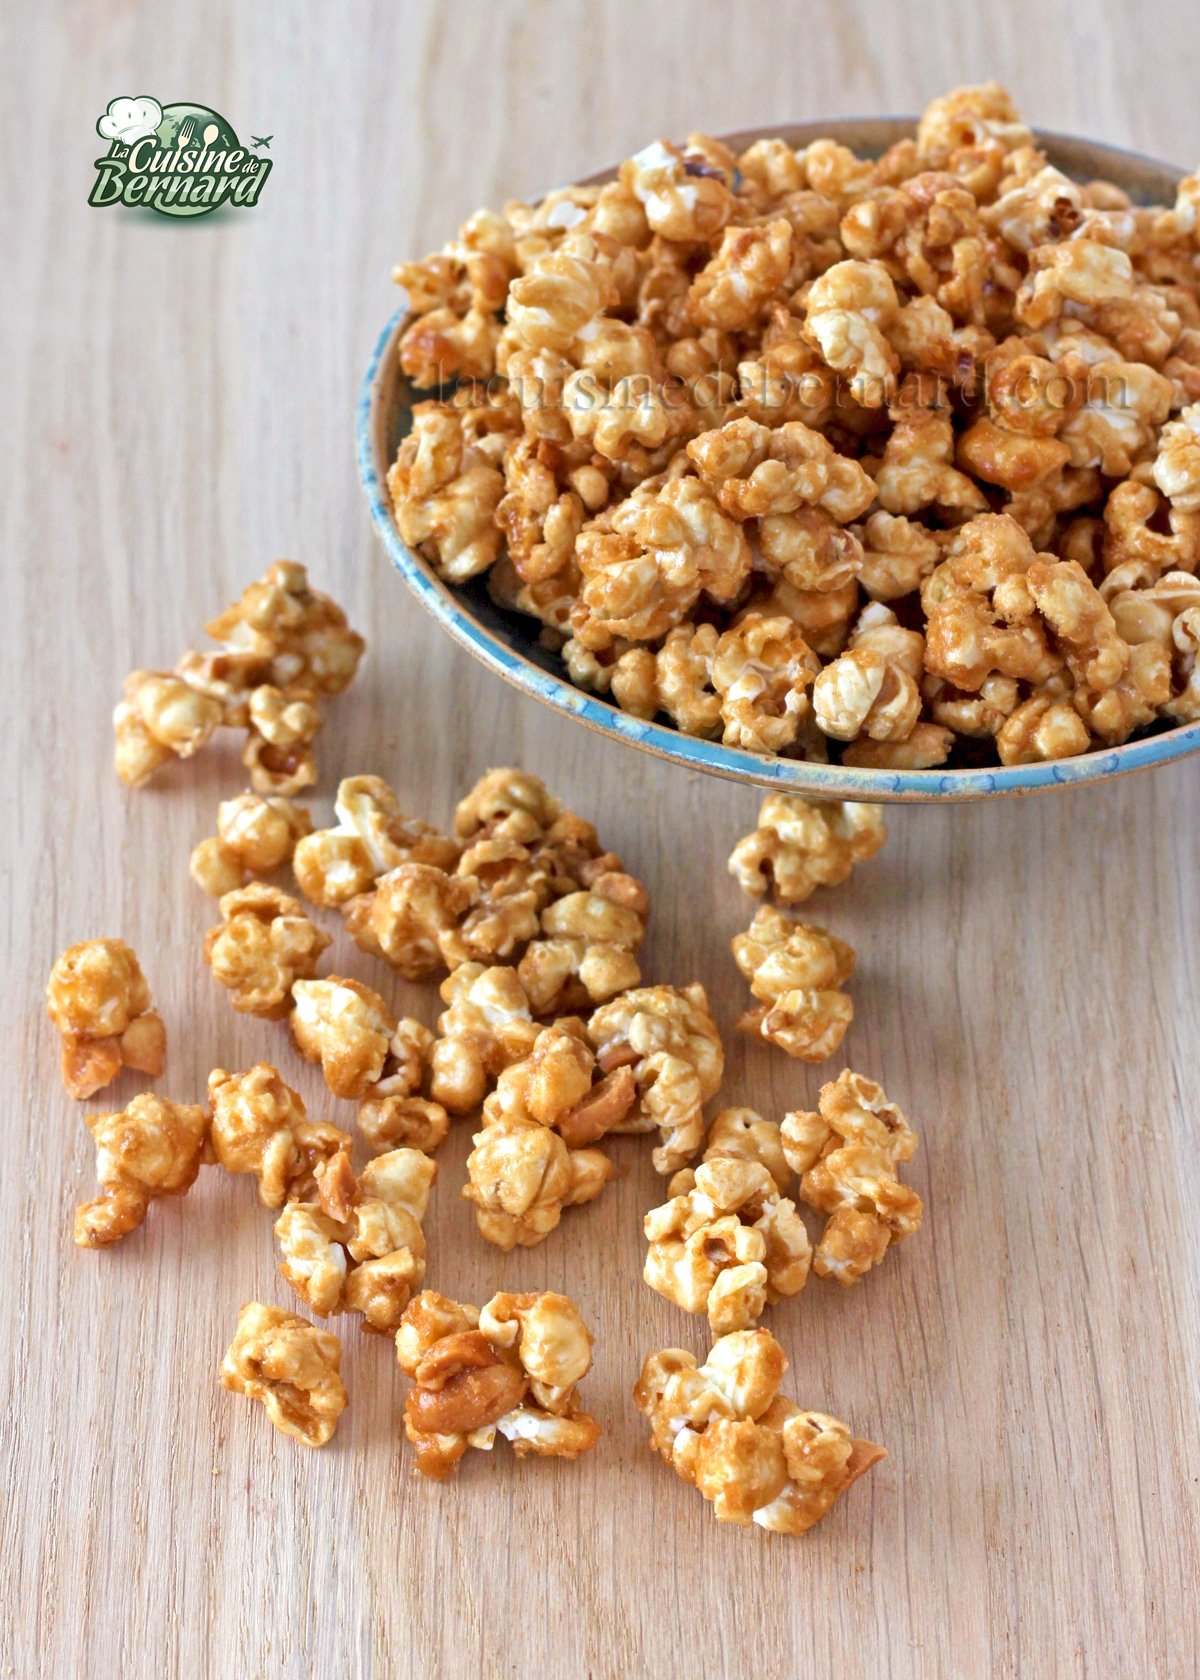
J’adore le pop corn et c’est tellement simple à faire chez soi en plus !! Une casserole avec un couvercle et le tour est joué ! Je l’aime salé ou sucré, mais mon petit pêché mignon est le pop corn au caramel, bien croustillant. Et avec des cacahuètes grillées, c’est alors un petit miracle ! J’ai mis du temps à mettre cette recette au point et j’y pensais depuis un moment. Pour trouver la bonne proportion de maïs et de caramel, puis d’obtenir un pop corn qui ne colle pas du tout aux doigts et qui reste bien croustillant, j’ai dû faire quelques essais. Pour cela, il faudra prendre la température précise du sirop, puis de passer le tout au four à basse température pendant 30 minutes pour bien sécher le caramel. C’est très simple à faire et en plus vous pourrez le conserver pendant près d’un mois ! Bon par contre le régime attendra !!
Recette de POP CORN CROUSTILLANT AU CARAMEL ET CACAHUÈTES :
- 100g de maïs à pop corn
- 3 cuillerées à soupe d’huile
- 100g de cacahuètes grillées non salées
Caramel :
- 80g de beurre demi-sel
- 65g de vergeoise brune
- 185g de sucre semoule
- 75g de sirop de glucose
- 1 cuillerée à café de vanille liquide
- 1/2 cuillerée à café de sel
- 1/4 de cuillerée à café de bicarbonate de sodium
Instructions :
Pour le pop corn, il vous faudra le maïs ! Pesez-en 100g.

Versez l’huile et le maïs dans une grande casserole.

Mélangez bien pour que l’huile enrobe le maïs uniformément.

Mettez un couvercle et faites chauffer sur feu assez soutenu.

Quand le maïs éclate, baissez le feu et secouez la casserole de temps en temps.

C’est prêt quand le maïs n’éclate plus et qu’il se passe au moins 3 secondes entre deux éclatements. Versez dans un grand récipient en ne mettant pas les éventuels grains non éclatés.

Hachez grossièrement les cacahuètes grillées.


Versez-les dans le pop corn.

Pour le caramel, versez tous les ingrédients sauf le bicarbonate dans une casserole.

Faites chauffer sur feu modéré. Vous pouvez mélanger car le sirop de glucose est là pour empêcher le sucre de cristalliser.

Avec un thermomètre, portez le sirop à 117°C.

Coupez le feu puis versez le bicarbonate et mélangez immédiatement.

Versez le tout sur le pop corn et mélangez sans attendre pour disperser le caramel.

Mélangez bien dans le fond où se sont réfugiées les cacahuètes !

Versez le tout sur une grande plaque allant au four recouverte de papier sulfurisé. Mettez au four préchauffé à 120°C pendant 15 minutes. Après ce temps, mélangez bien à la fourchette pour séparer le pop corn.
Le bicarbonate va servir à alléger le caramel et à le rendre très croustillant. Pendant les 15 premières minutes au four, le caramel va fondre un peu, puis les 15 minutes suivantes, vous verrez que le pop corn se sépare tout seul sans effort.

Laissez refroidir quelques minutes avant de mettre dans une boite hermétique (type lock&lock). Vous pourrez les conserver de cette façon près d’un mois. Le pop corn restera parfaitement croustillant ! Sortez les plaids et installez vous devant un film !!


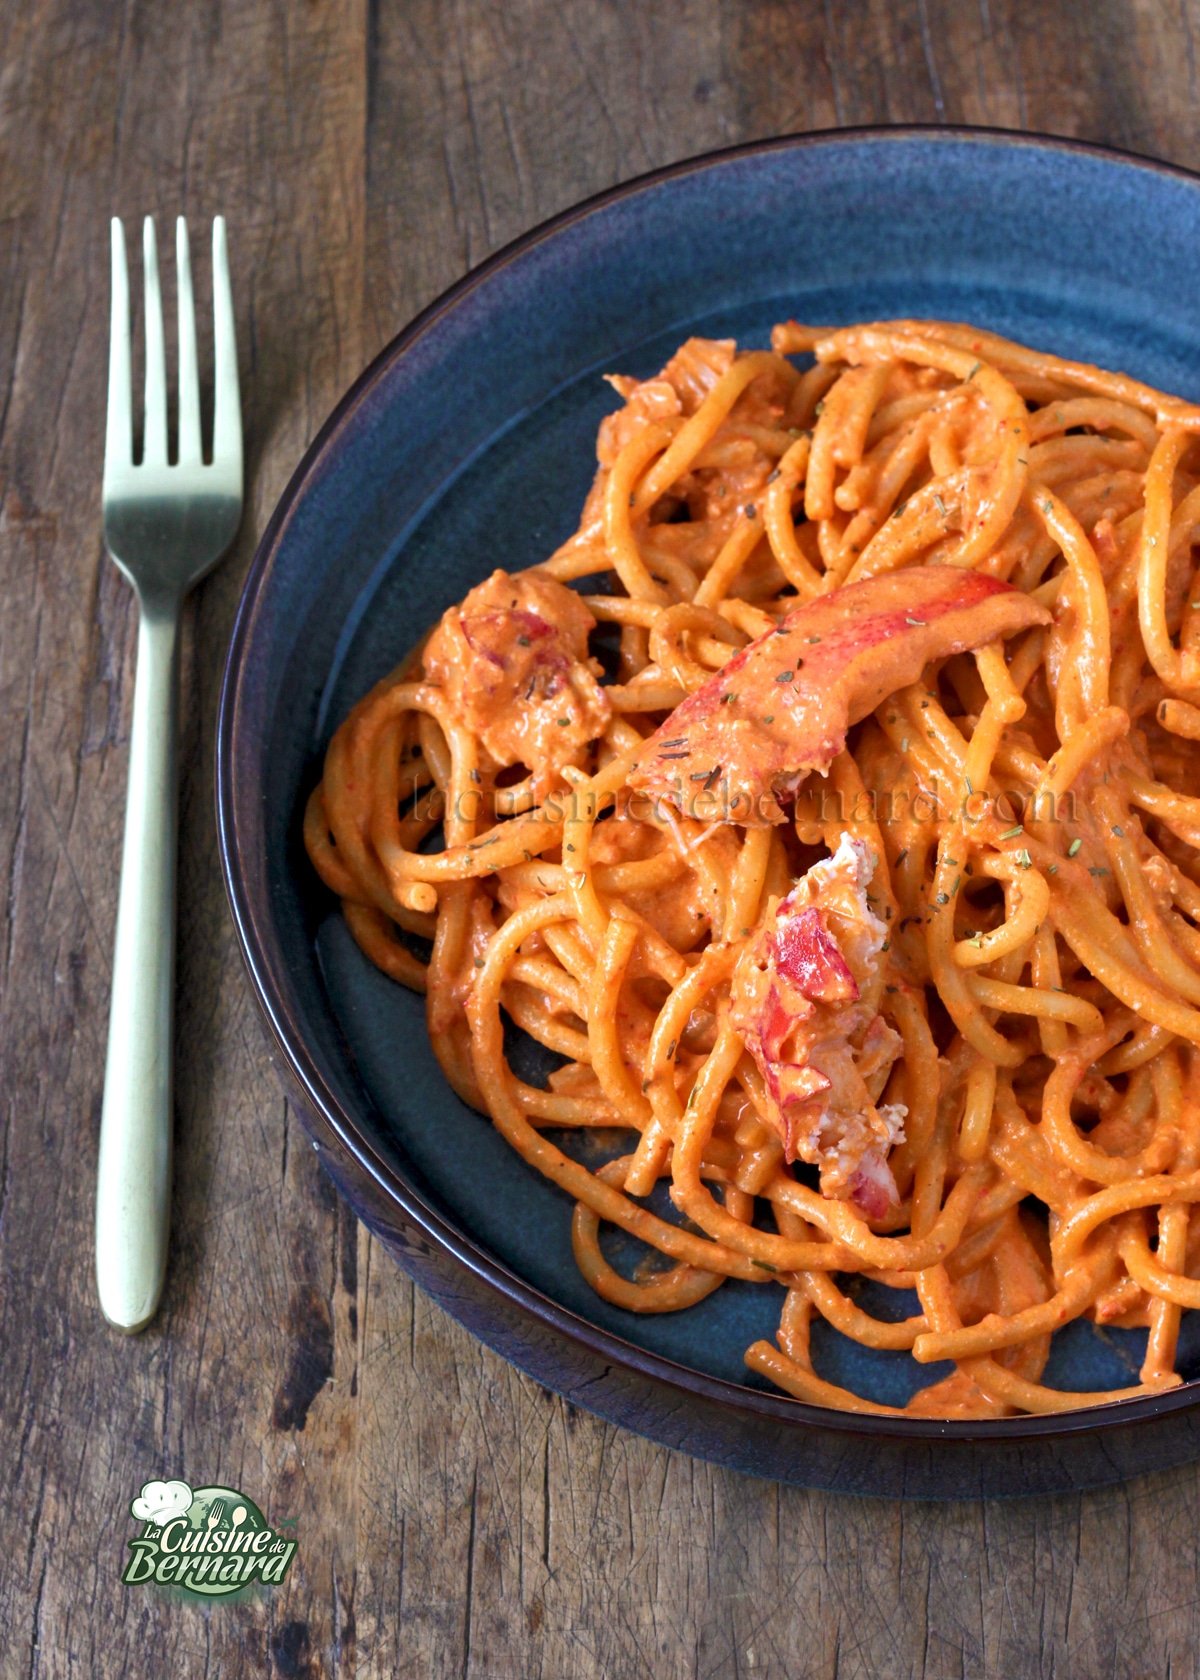
A while ago, I had tasted in a restaurant with friends, pasta with lobster. The name alone made me want to go there, but the bill was quite steep! I thought I’d try my own recipe from my parents’ grilled lobster recipe that I posted a while ago on my cooking blog (recipe HERE). This is a bit of a holiday recipe, as I don’t buy lobster every day. But in the end, when you see that you get 4 generous portions, it is very profitable! I thus start from the grilled lobster, then I continue the preparation by recovering all the possible juices which I make reduce in a sauce with the hallucinating taste. It’s actually frustrating that the photo doesn’t do this dish justice. Well, I made it quickly because I wanted to enjoy this dish which I really enjoyed! But I promise you an absolutely delicious dish, between the taste of the grilled and flambéed lobster and the bisque. The pasta gorges itself with this rich sauce and becomes addictive!
Recette des PÂTES AU HOMARD pour 4 personnes :
- 2 lobsters
- 25g of semi-salted butter for the lobsters
- 100ml full cream
- 20ml of port wine
- 25g of semi-salted butter for the sauce
- 20ml of cognac
- herbs of Provence, salt, pepper
For the sauce:
- 400g of tomato pulp
- 200ml full cream
- 20ml of port wine
- a pinch of herbs de Provence
- salt pepper
- 500g of pasta of your choice cooked 1 minute less than “al dente
Instructions :
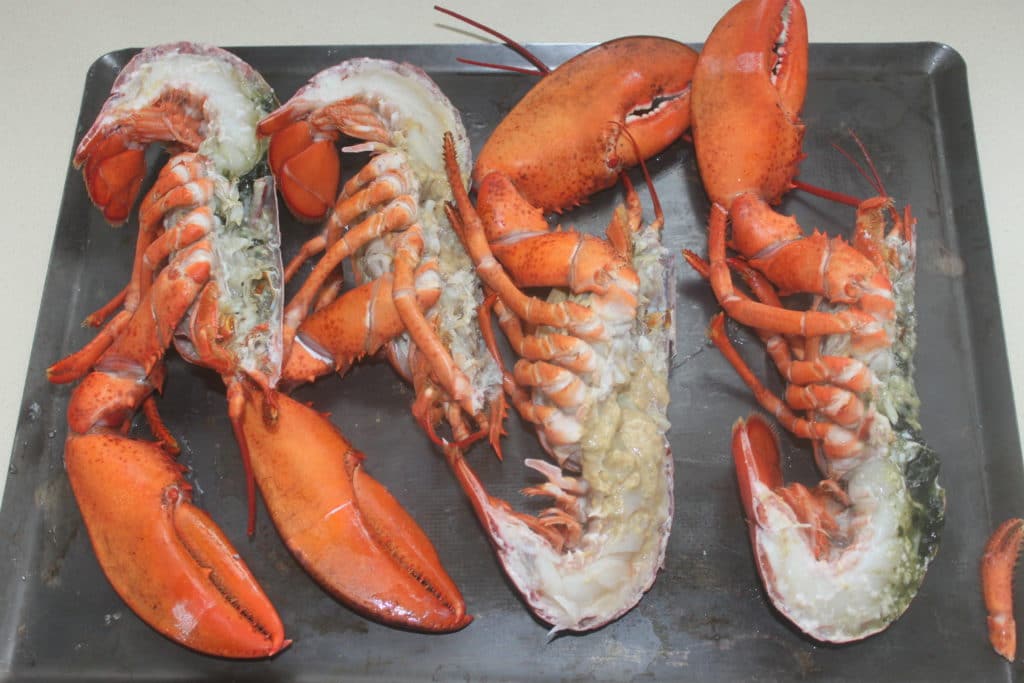
For lobsters, I buy them live and boil them for 2 minutes and no more, just to seize them. Cut them in half. To see all about it, I invite you to see my grilled lobster recipe HERE. I take back the base to go a little further… Place halved lobsters on a baking sheet. Save the juice from the lobsters and place it in a saucepan.
Divide the 25g of butter into 8 portions and place it on the lobster. Add salt and pepper and a little bit of herbes de Provence. Place in preheated oven at 205°C with broiler if possible for 10 minutes.
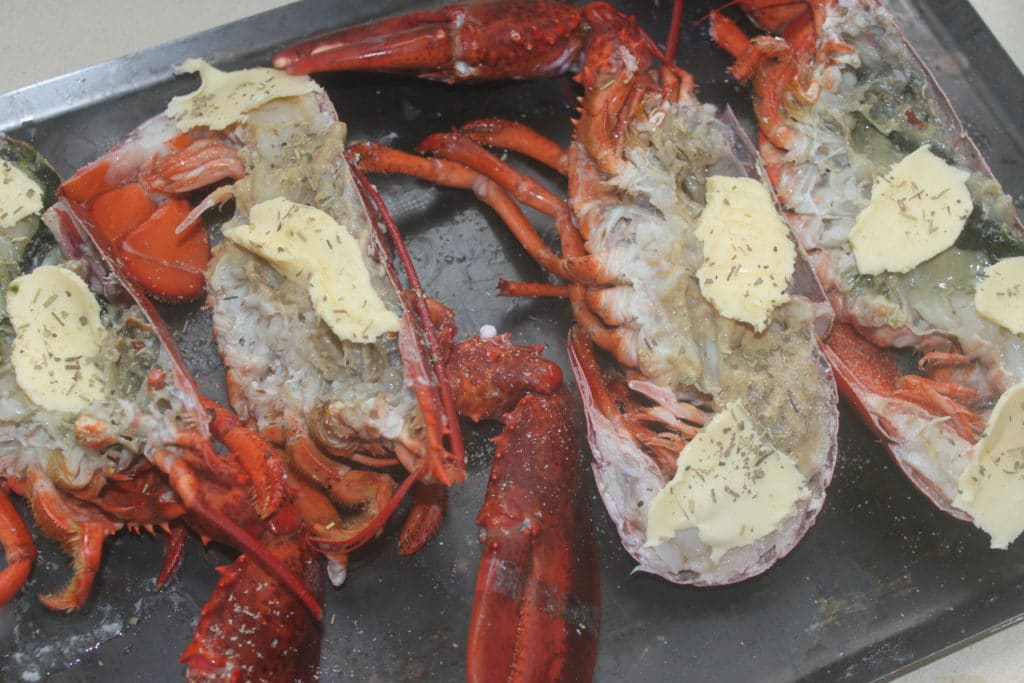
Pour into the pan containing the juice, butter, port and cream.
Boil for two minutes and then pour the sauce into the body and head.
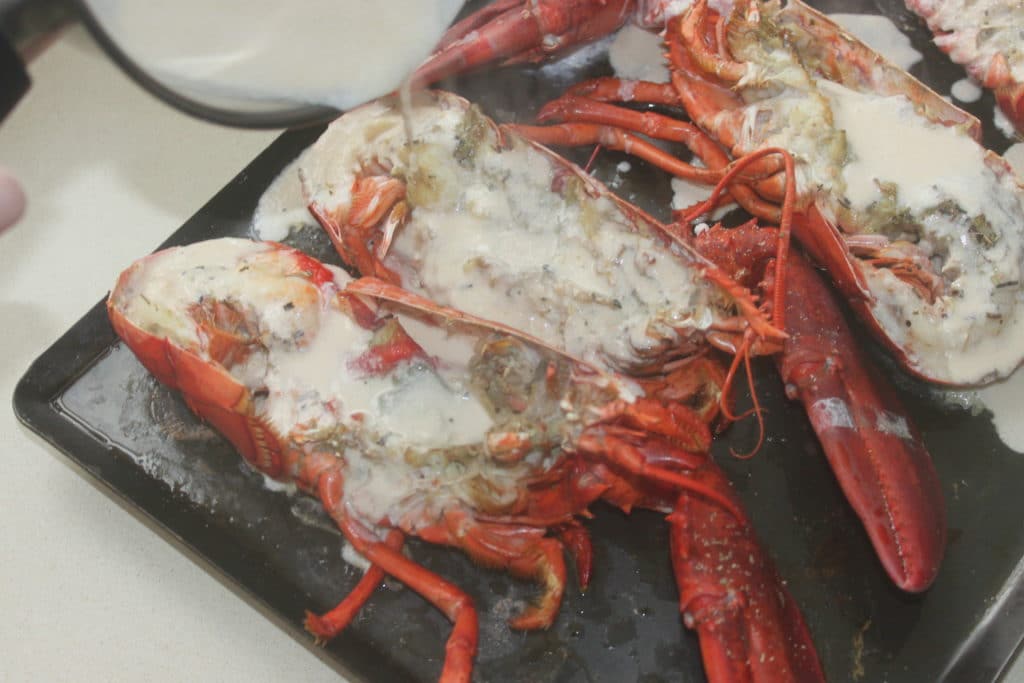
Return to the oven for 3-4 minutes and during this time heat the cognac. Take out the lobsters and pour the coganc that you make flambé.
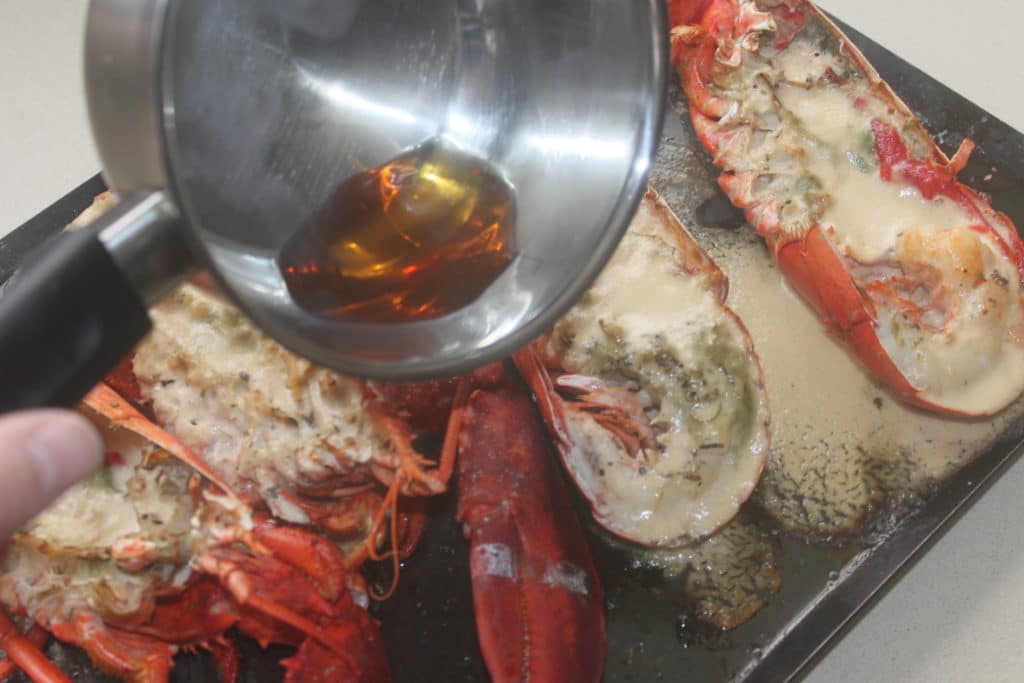
Put the oven this time on grill and place the lobsters on it to brown them slightly (2-3 minutes).
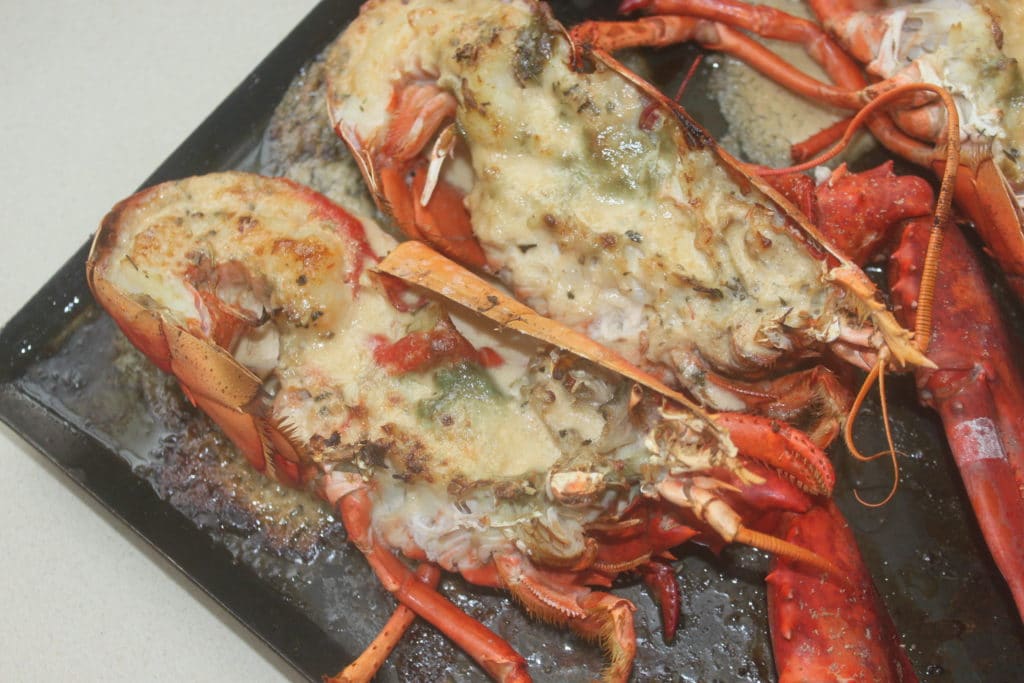
Then let it cool and remove the flesh from the tails.
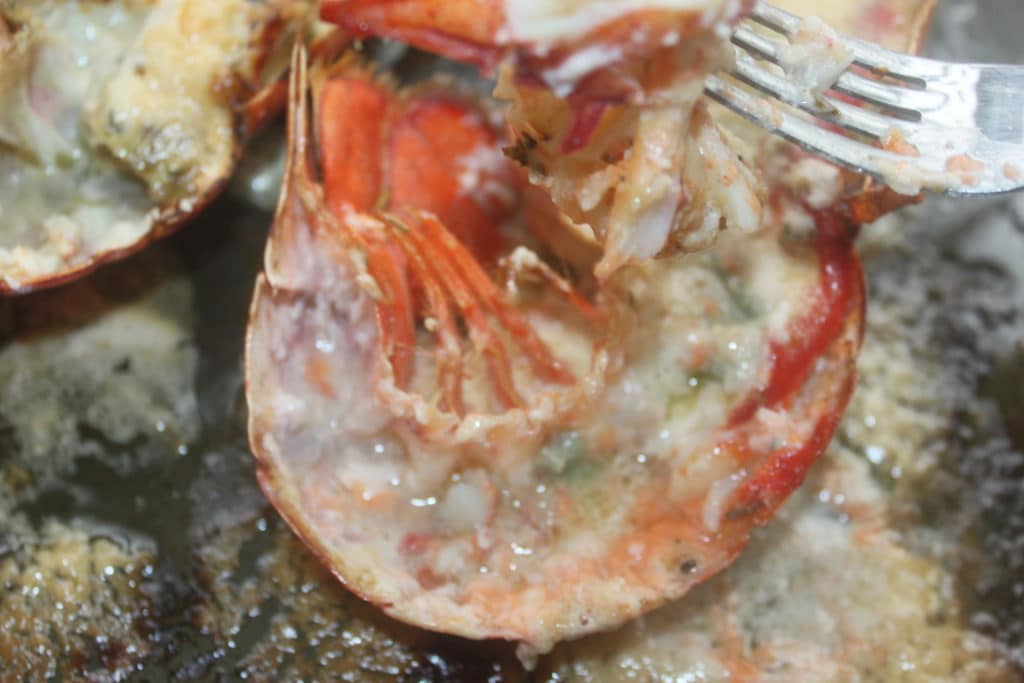
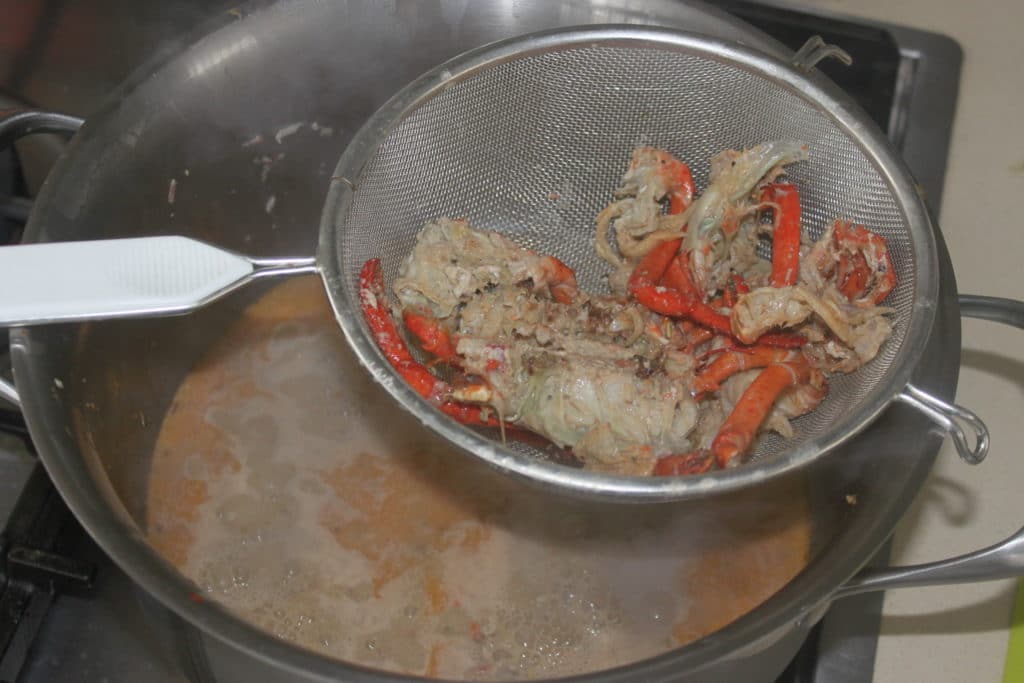
Break off the claws and set all the flesh aside in a container.
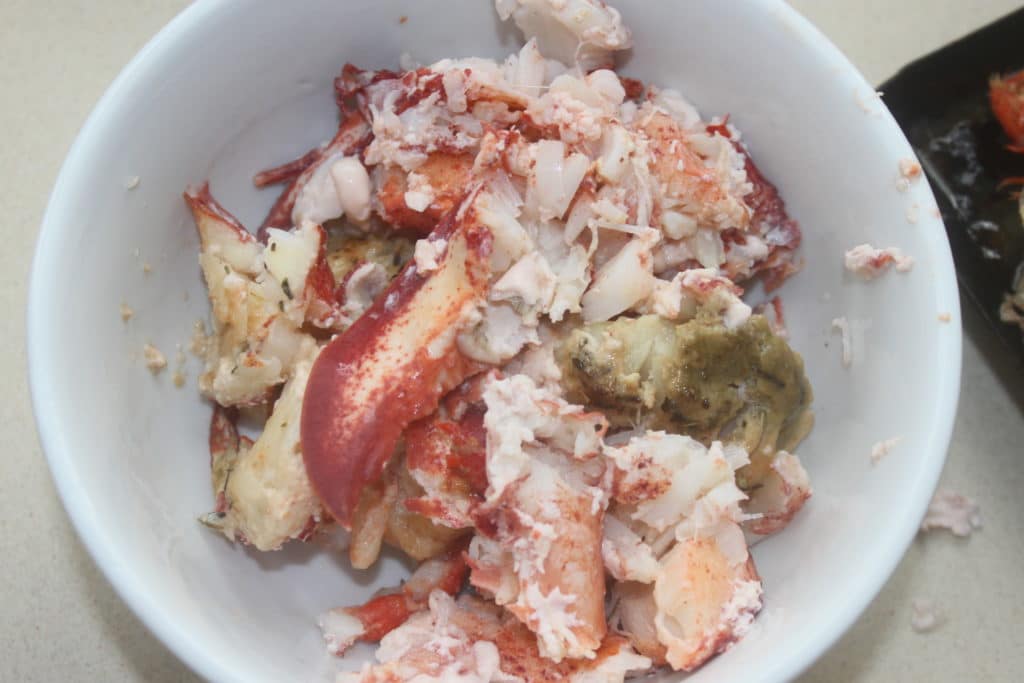
Then scrape the inside of the heads. Everything that can be kept must be kept!
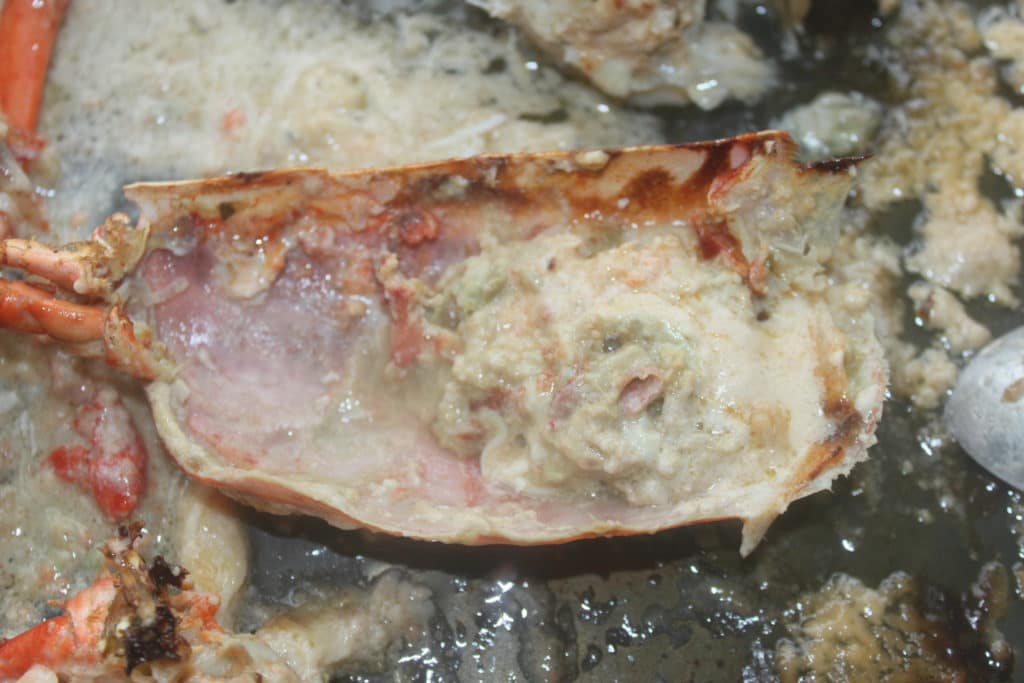
It’s not very appetizing in pictures, but it’s just a delight. I did get everything back from the tails and heads. I just kept the paws here.
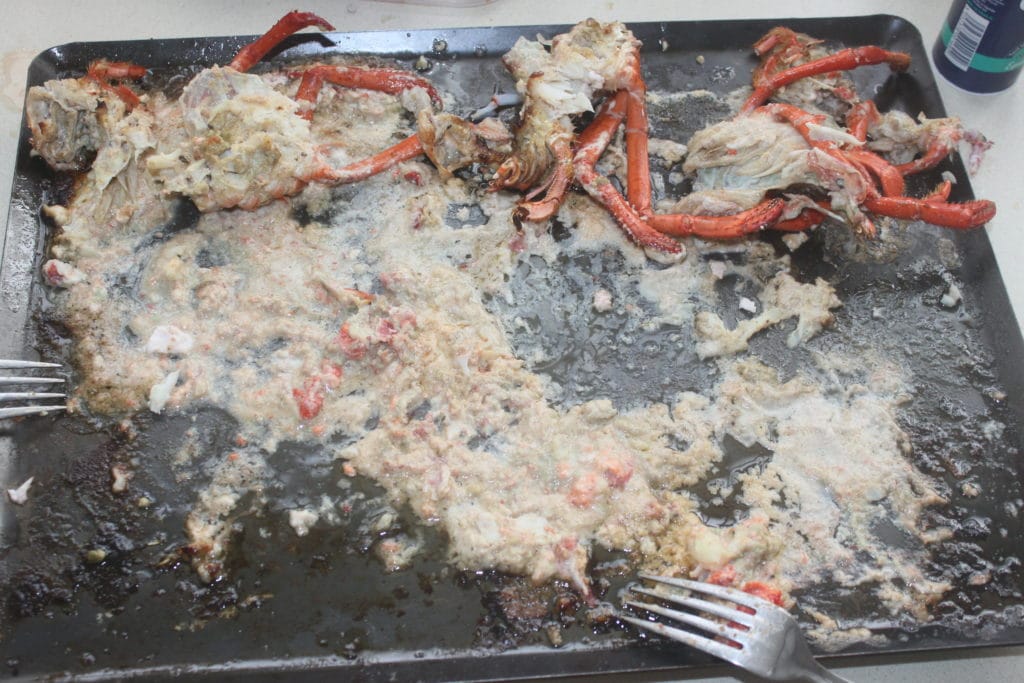
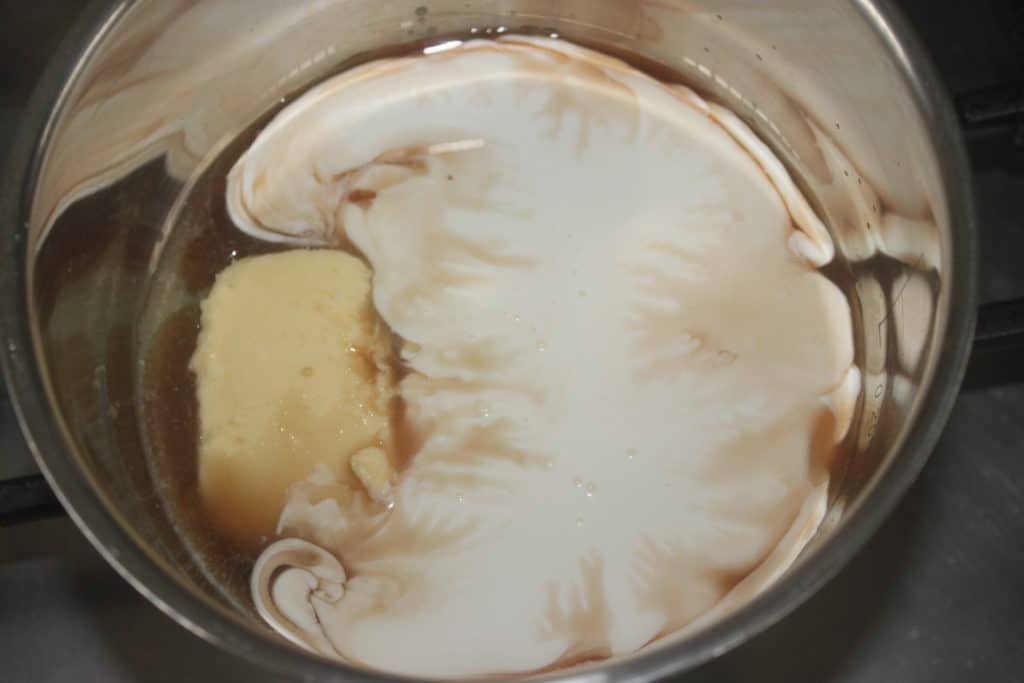
Pour everything into a casserole dish.
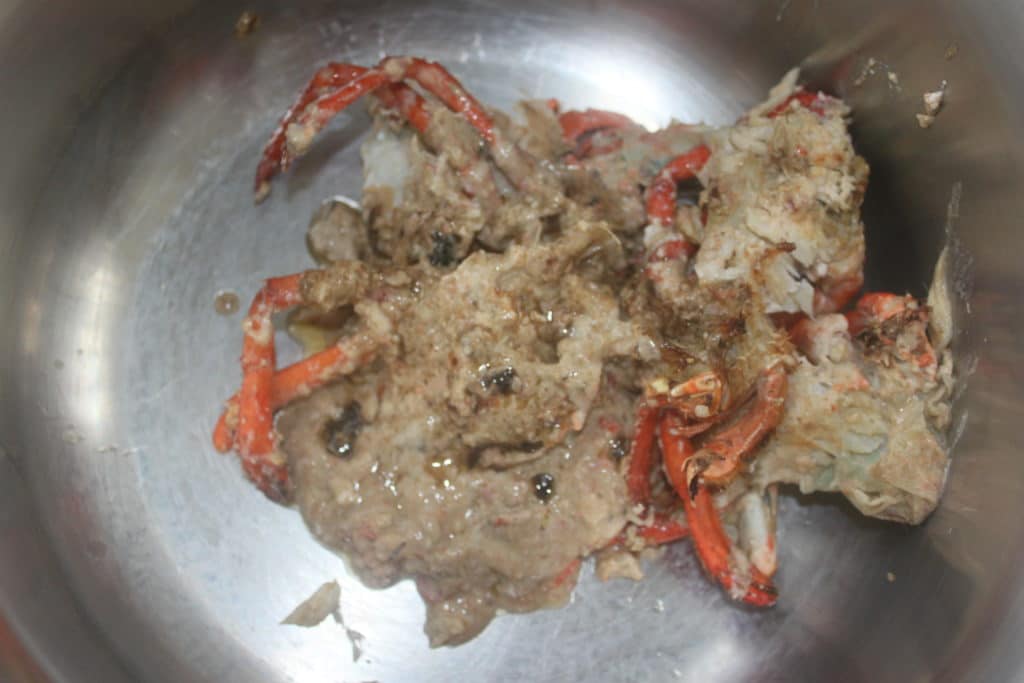
Pour water into the plate to dissolve all the juices and pour this water into the casserole.
I add the equivalent of a good big glass of water to dissolve all the juices. Crush the legs a little and dilute well what is in the body.

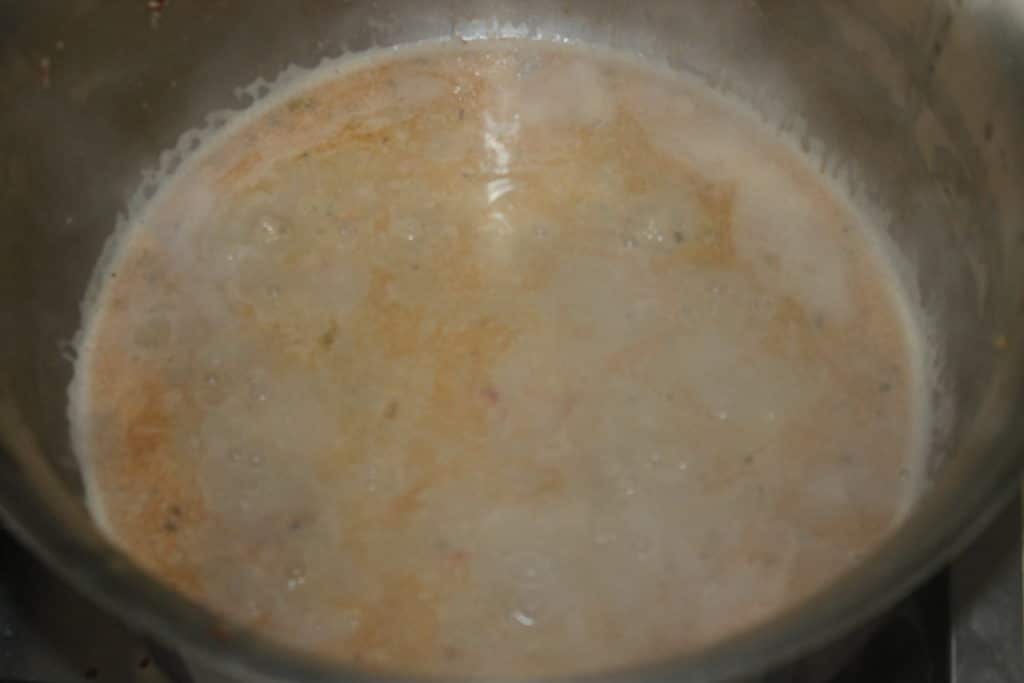
Place the bodies and legs in a sieve, rinse a little with fresh water that you recover in the pot.
And this is the sauce base which is extremely aromatic. Allow to boil to evaporate all the water that has been used to “wash” the bodies and dissolve the juices of the plate.
When the sauce becomes consistent, pour in the 400g of tomato pulp. I have whole peeled tomatoes here, it doesn’t matter.

If so, blend a little to make a smoother sauce.
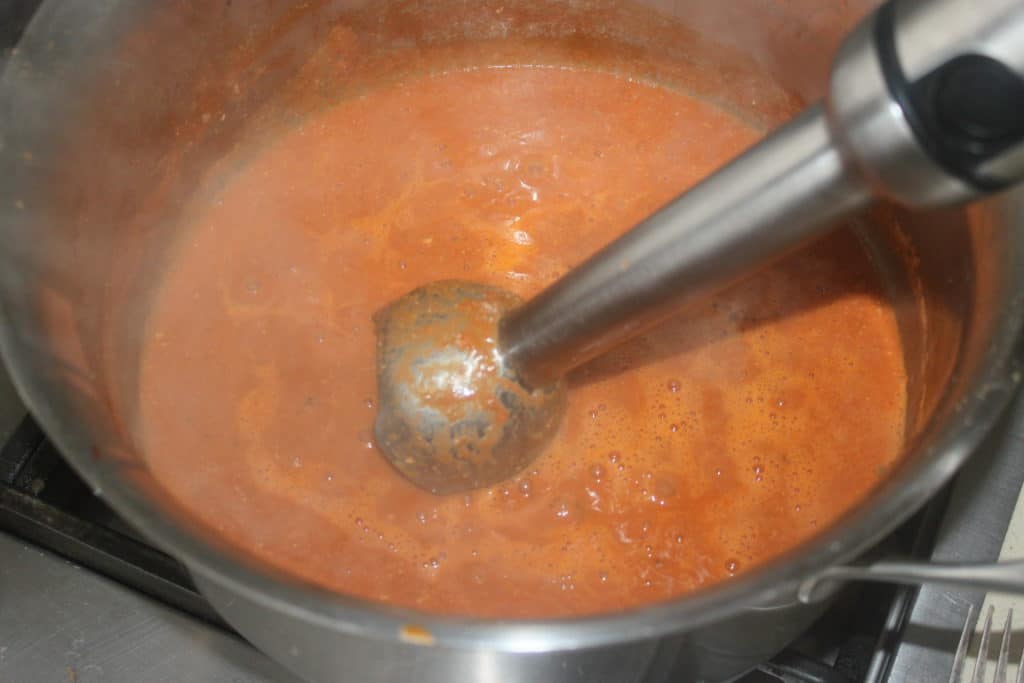
Cook for 5-10 minutes over moderate heat to reduce again. Pour in the port wine, add salt and pepper to taste and a good pinch of herbes de Provence. Pour in the cream as well.
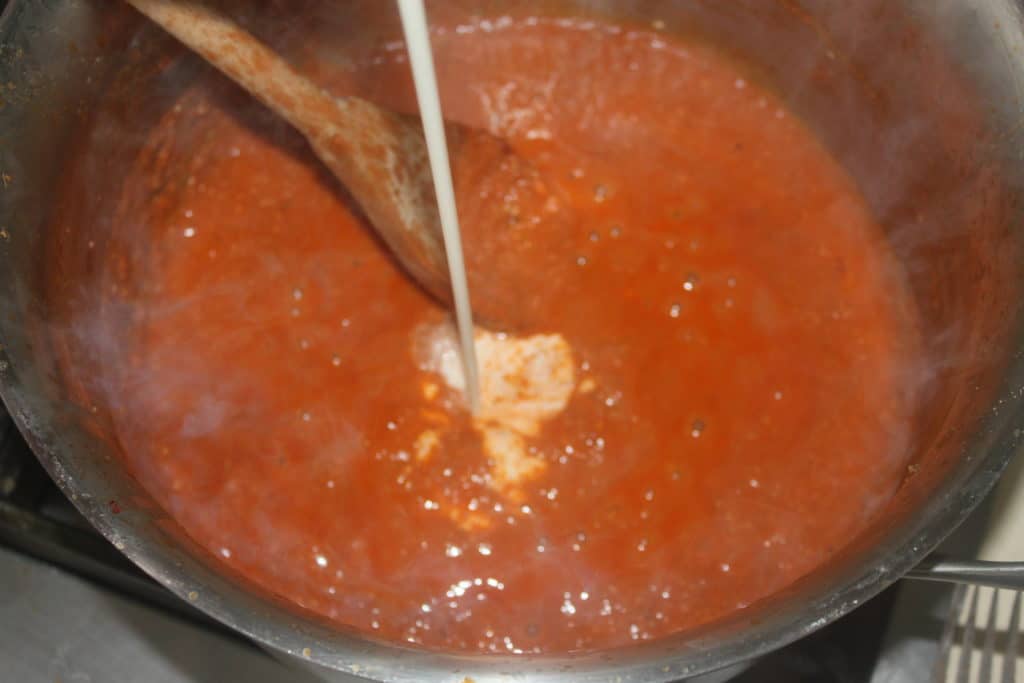
Reduce for another 5 minutes (or more or less) until sauce is well coated. Taste to see, it is an incredible delight !

Choose good pasta that you will cook for 1 minute less than “al dente”.
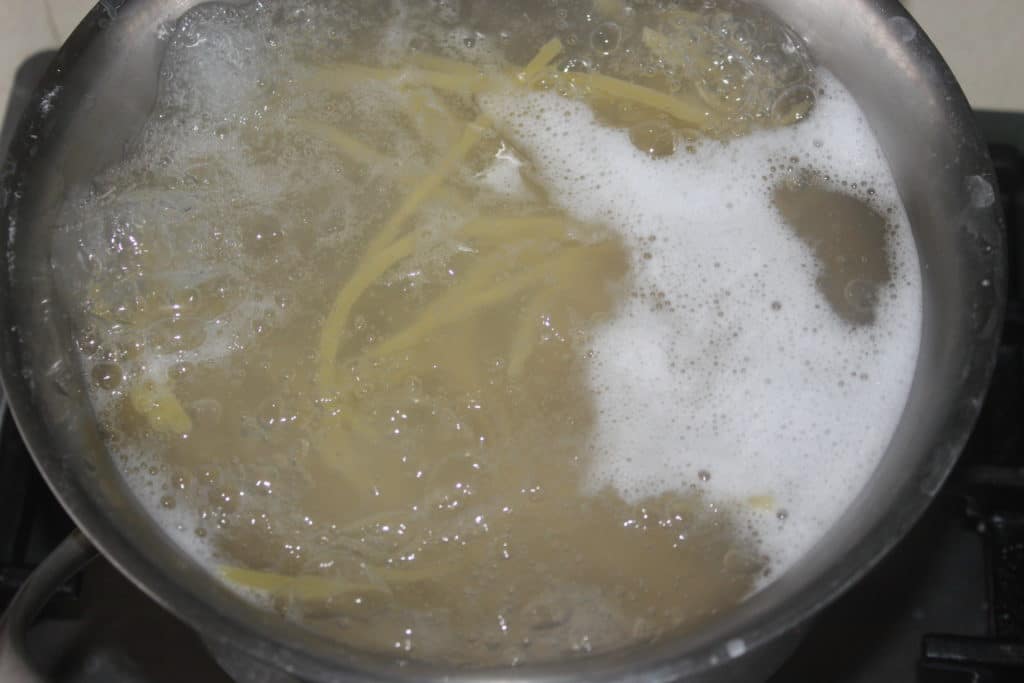
Drain them well. If you don’t eat right away, run them under cold water to stop the cooking process.

When ready, pour back into the sauce.
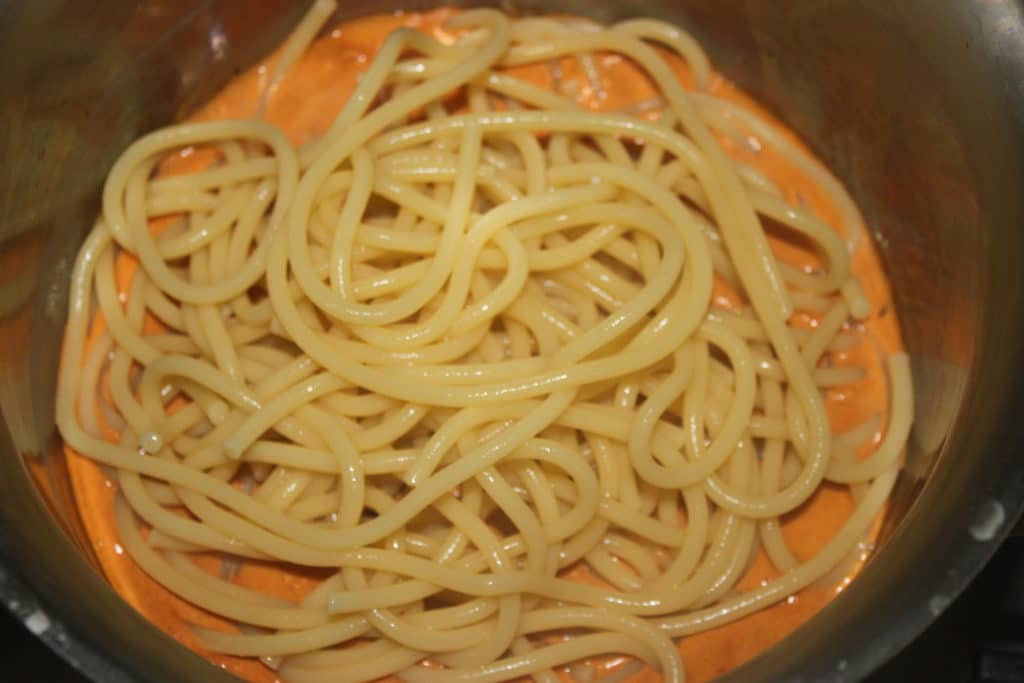
Mix well, cook for 1 or 2 minutes to coat the pasta and finish cooking, then add all the lobster meat.
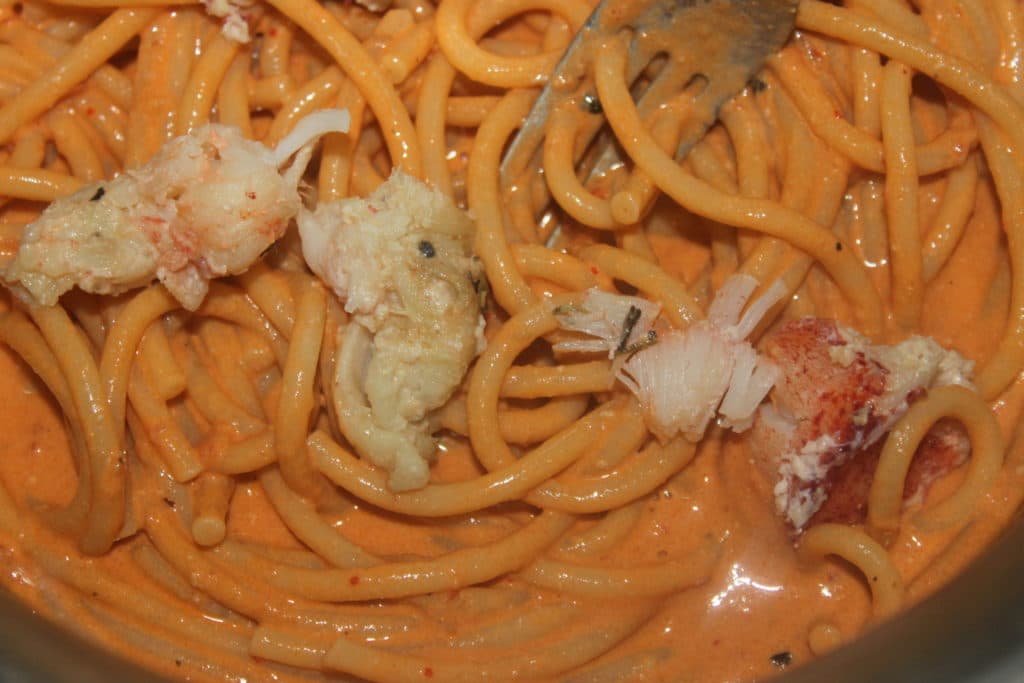
A final mix and serve without delay!


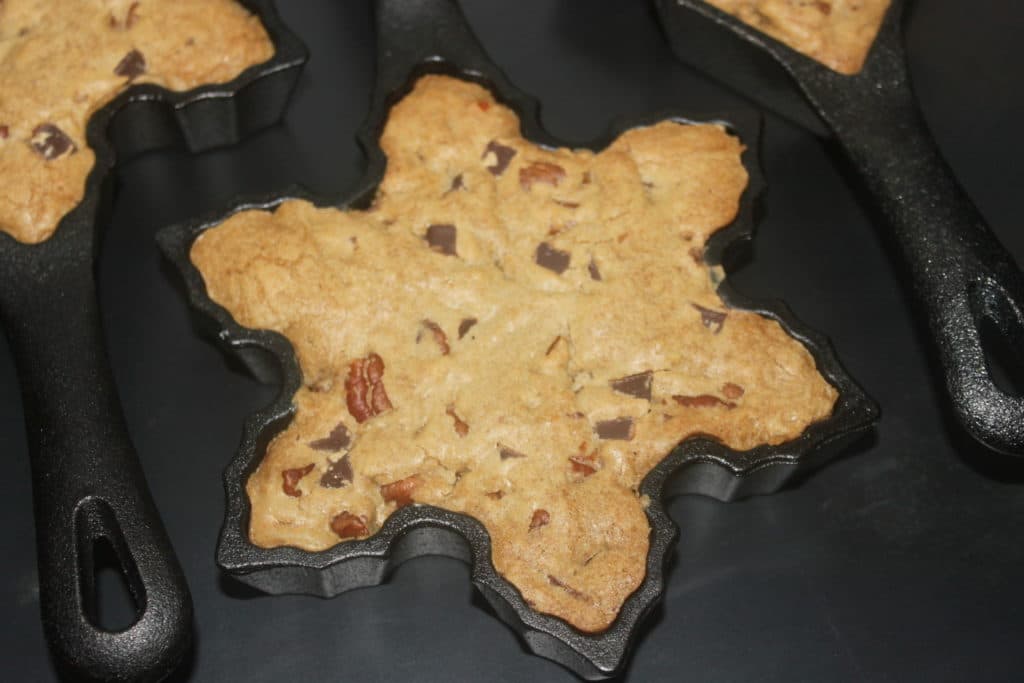
When I came across these molds in the US, I knew right away what I was going to do with them because they are so photogenic. And I know you’re going to ask me where to buy them, but I don’t have a clue, because it was a clearance sale and there was no brand! But don’t panic, you can make this recipe in classic molds, or even without a mold at all, making round cookies! There’s a little maple syrup and spice in there, which will make for some Christmas spirit cakes… I enjoyed them!
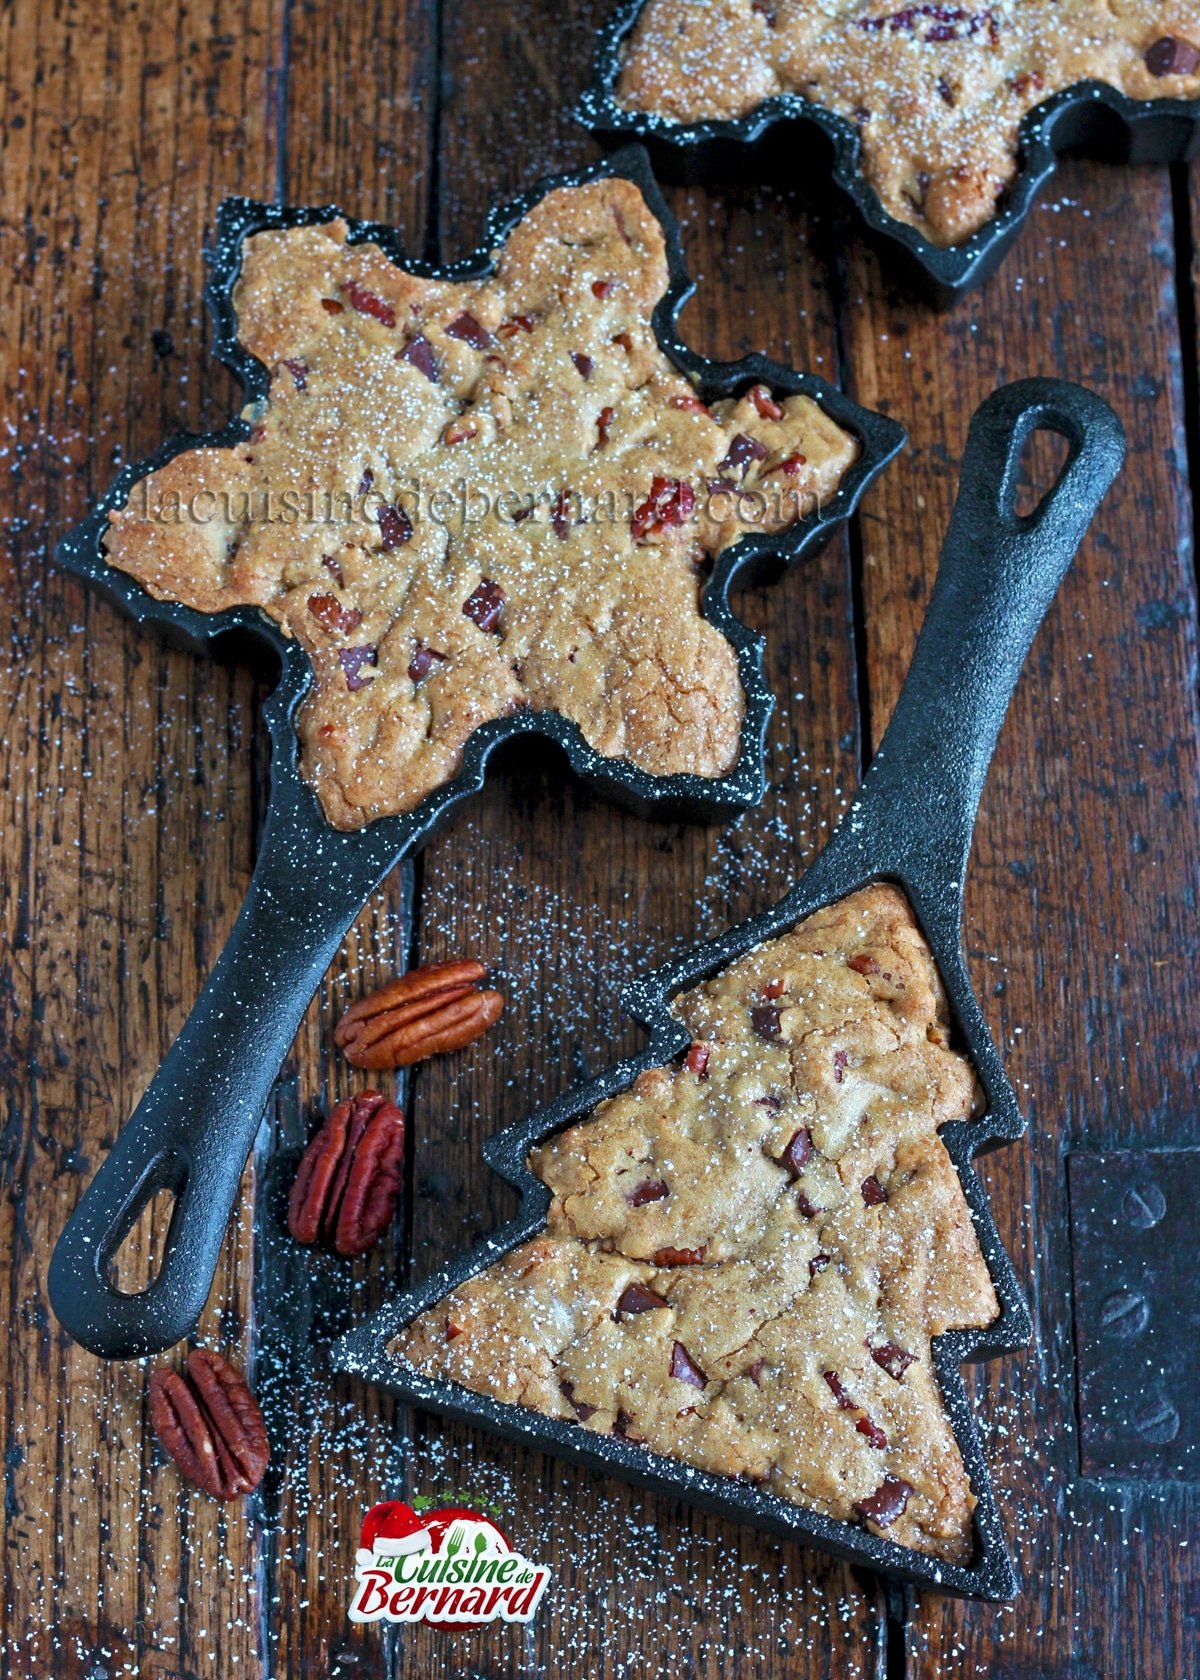
Ingredients of the SPICES AND PEANUT COOKIES :
-
- 100g of brown vergeoise
- 25g maple syrup
- 55g white sugar
- 1/2 teaspoon of liquid vanilla
- 1 egg
- 100g melted semi-salted butter
- 1/2 spoonful of gingerbread spices
- 190g flour
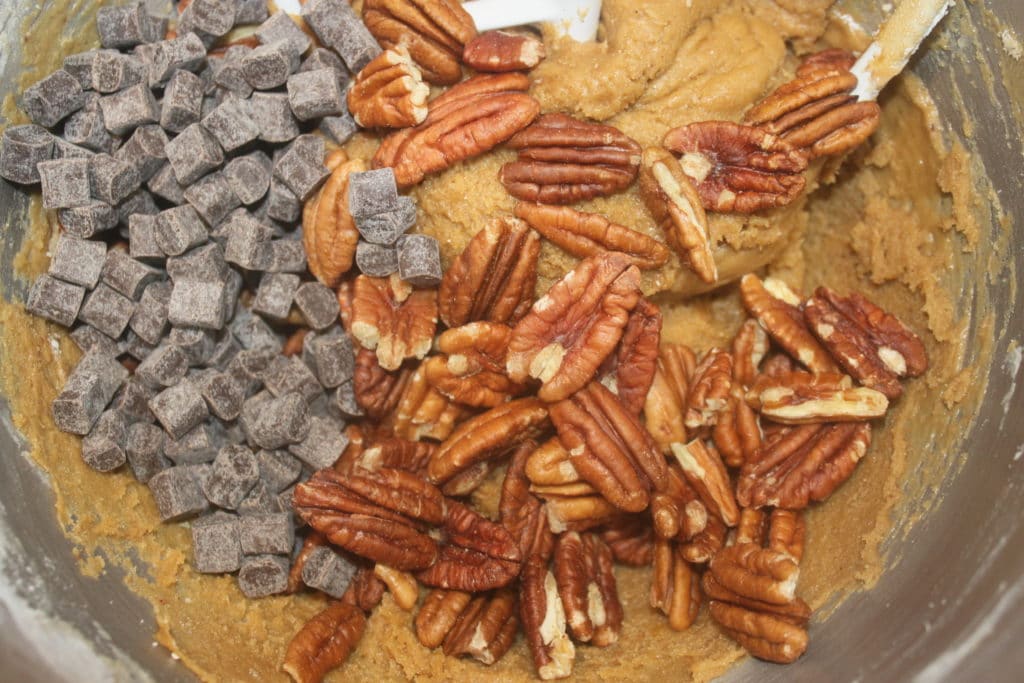
- 100g of pecan nuts
- 75g of chocolate chips
Instructions :
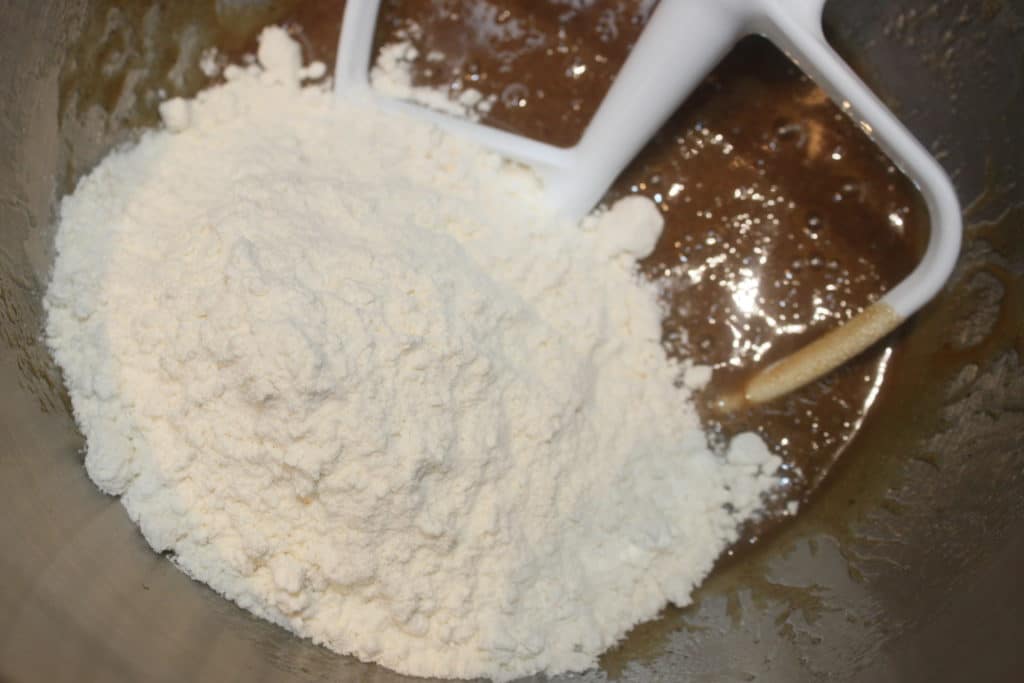
Put the vergeoise, maple syrup and white sugar in a container.
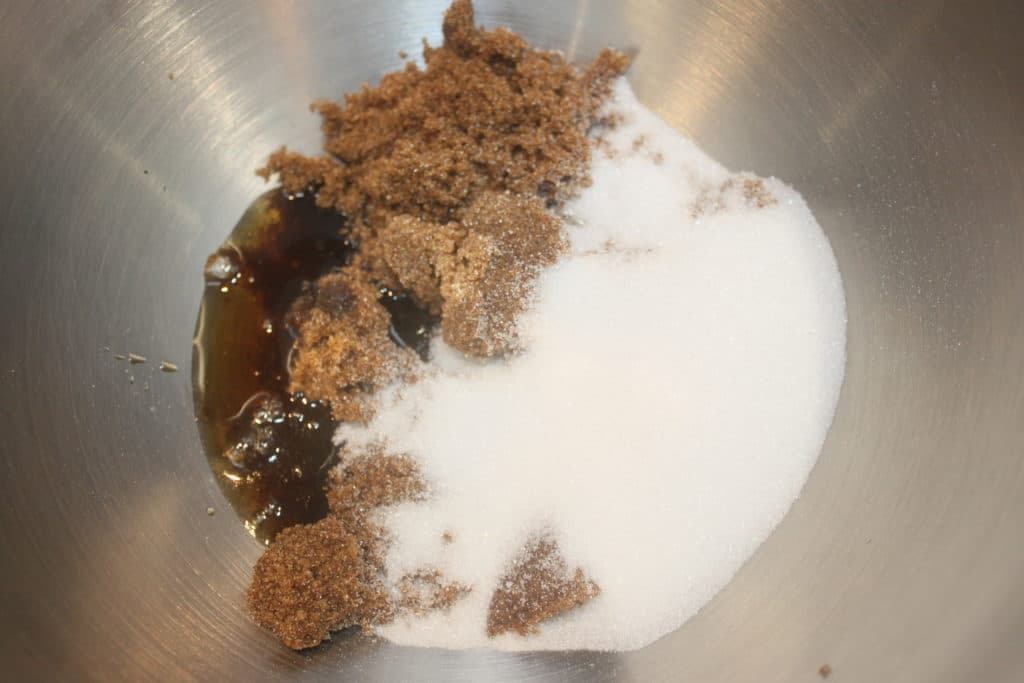
Add the egg and vanilla.

Mix and add the melted butter.
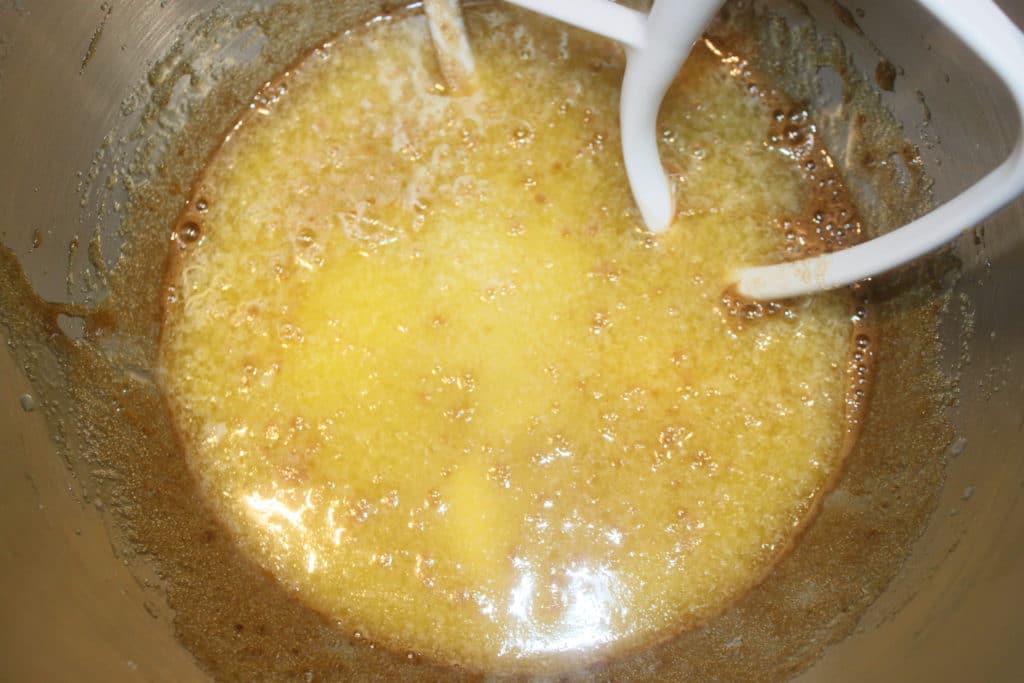
Don’t forget the spices.
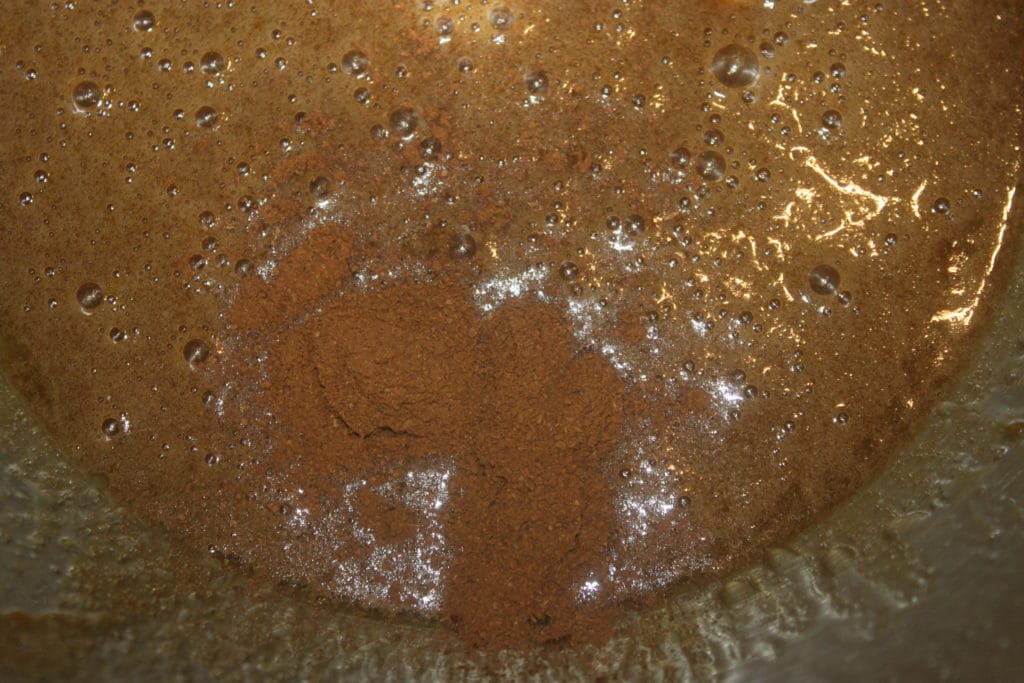
Pour in the flour and mix well.
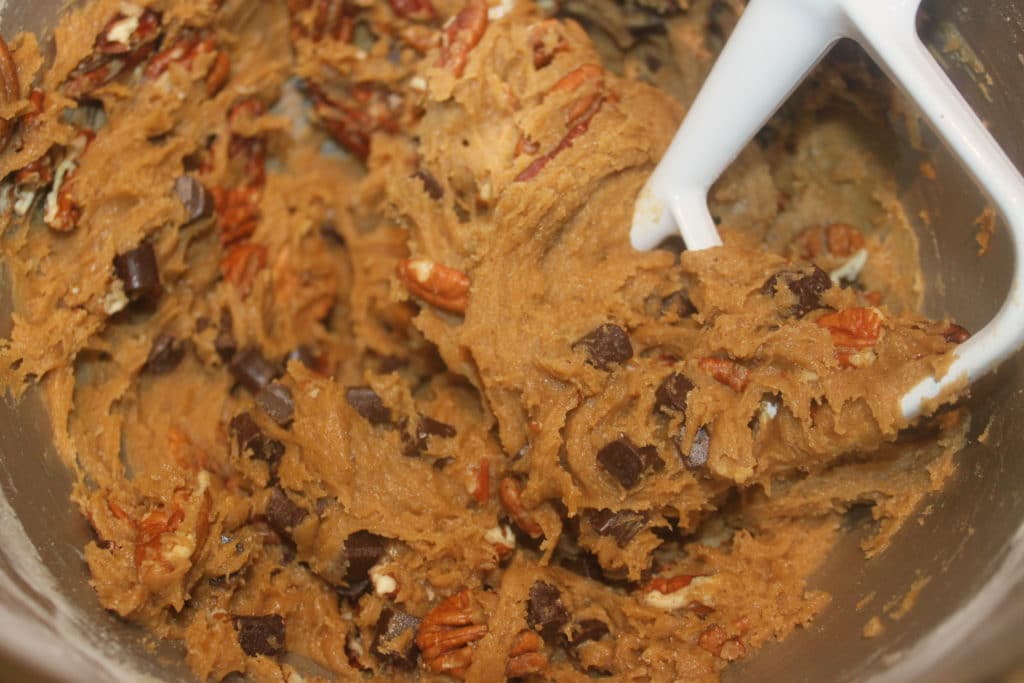
Finish with the pecans and chocolate.
For this recipe, you can make classic cookies any size you want. I used some pretty nice molds that I bought in the US. I couldn’t tell you the brand because they were on sale at a very low price.

Heat the oven to 160°C and bake just until the surface seizes. The edge should brown slightly and that’s it. So for baking time, it can be 12 minutes for a classic cookie to 25 minutes if you put the whole dough in a cake pan.
Let cool and enjoy without delay!

Pecan Spice Cookies
Ingredients
- 100 g brown vergeoise
- 25 g maple syrup
- 55 g white sugar
- 1/2 teaspoon liquid vanilla
- 100 g melted semi-salted butter
- 1/2 spoonful gingerbread spices
- 190 g flour
- 100 g pecan nuts
Instructions
- Put the vergeoise, maple syrup and white sugar in a container.
- Add the egg and vanilla.
- Mix and add the melted butter.
- Don't forget the spices.
- Pour in the flour and mix well.
- Finish with the pecans and chocolate.
- For this recipe, you can make classic cookies any size you want. I used some pretty nice molds that I bought in the US. I couldn't tell you the brand because they were on sale at a very low price.
- Heat the oven to 160°C and bake just until the surface seizes. The edge should brown slightly and that's it. So for baking time, it can be 12 minutes for a classic cookie to 25 minutes if you put the whole dough in a cake pan.
- Let cool and enjoy without delay!
Nutrition


Je reviens d’un petit séjour à Mexico City. Cette recette n’a rien à voir avec ce pays, mais pourtant il y avait ces tartelettes au petit déjeuner de mon hôtel. Le deuxième matin je me suis décidé à demander si il était possible d’avoir la recette. Car je les ai trouvées excellentes. Pas trop sucrées, au bon goût de mandarine et avec une pâte qui ressemblait presque à un sablé breton. Ils ont de tout de suite accepté et le pâtissier m’a donné la recette complète dans ses moindres détails. Et c’est le même délice à la maison qu’à Mexico. Je le remercie donc très chaleureusement. C’est aussi ça la cuisine, partager ses secrets et la magie d’un bon gâteau !
Recette pour 12 grosses tarteletttes de 7,5cm de diamètre sur 4 de hauteur, ou un gros moule de 26cm sur 4cm.
Vous pouvez bien sûr diviser le tout par deux. Vous aurez donc 6 tartelettes ou un moule de 18cm sur 4cm.
Recettes des TARTELETTES AU FROMAGE FRAIS ET MANDARINE :
Pâte :
- 250g de sucre
- 300g de beurre demi-sel
- 100g d’œuf
- 500g de farine
- 5g de baking powder (voir plus bas pour une baking powder maison)
Crème à la mandarine :
- 150g de beurre doux
- 175g de sucre
- 500g de cream cheese
- 45g de maïzena
- le zeste de 6 mandarines
- 150g de jus de mandarine
- 300g d’œuf
Instructions :
Commencez par préparer la pâte. Mettez le beurre et le sucre dans un récipient.

Mélangez jusqu’à avoir une crème. Ajoutez l’œuf.


Terminez avec la farine et la baking powder. Pour faire le baking powder maison, je mets 1 cuillerée à café de bicarbonate de sodium, deux de crème de tartre et une de maïzena. Cela me donne les bonnes proportions pour cette poudre levante. Il faut ensuite peser la quantité nécessaire, dans notre recette : 5g.

Mélangez jusqu’à avoir une pâte homogène.

N’insistez pas plus.

Mettez la pâte sous film étirable puis placez-la au frais.

Pour la crème : mettez le beurre mou et le sucre dans un récipient.
Mélangez puis ajoutez le cream cheese et la maïzena.


Mettez le zeste de 6 mandarines.


Versez les 150g de jus de mandarine.

Mettez le tout dans la crème et cassez-y les 300g d’œufs.

Étalez la pâte et garnissez les moules utilisés. J’ai ici coupé le fond comme à l’emporte-pièce et j’ai ensuite mis une bande de pâte correspondante au pourtour intérieur.


Remplissez les moules de crèmes.

Faites cuire à 190°C jusqu’à avoir une belle coloration. Tout dépend de la taille du moule. Cela peut prendre 30 minutes ou plus.

Laissez tiédir puis dégustez à température ambiante.

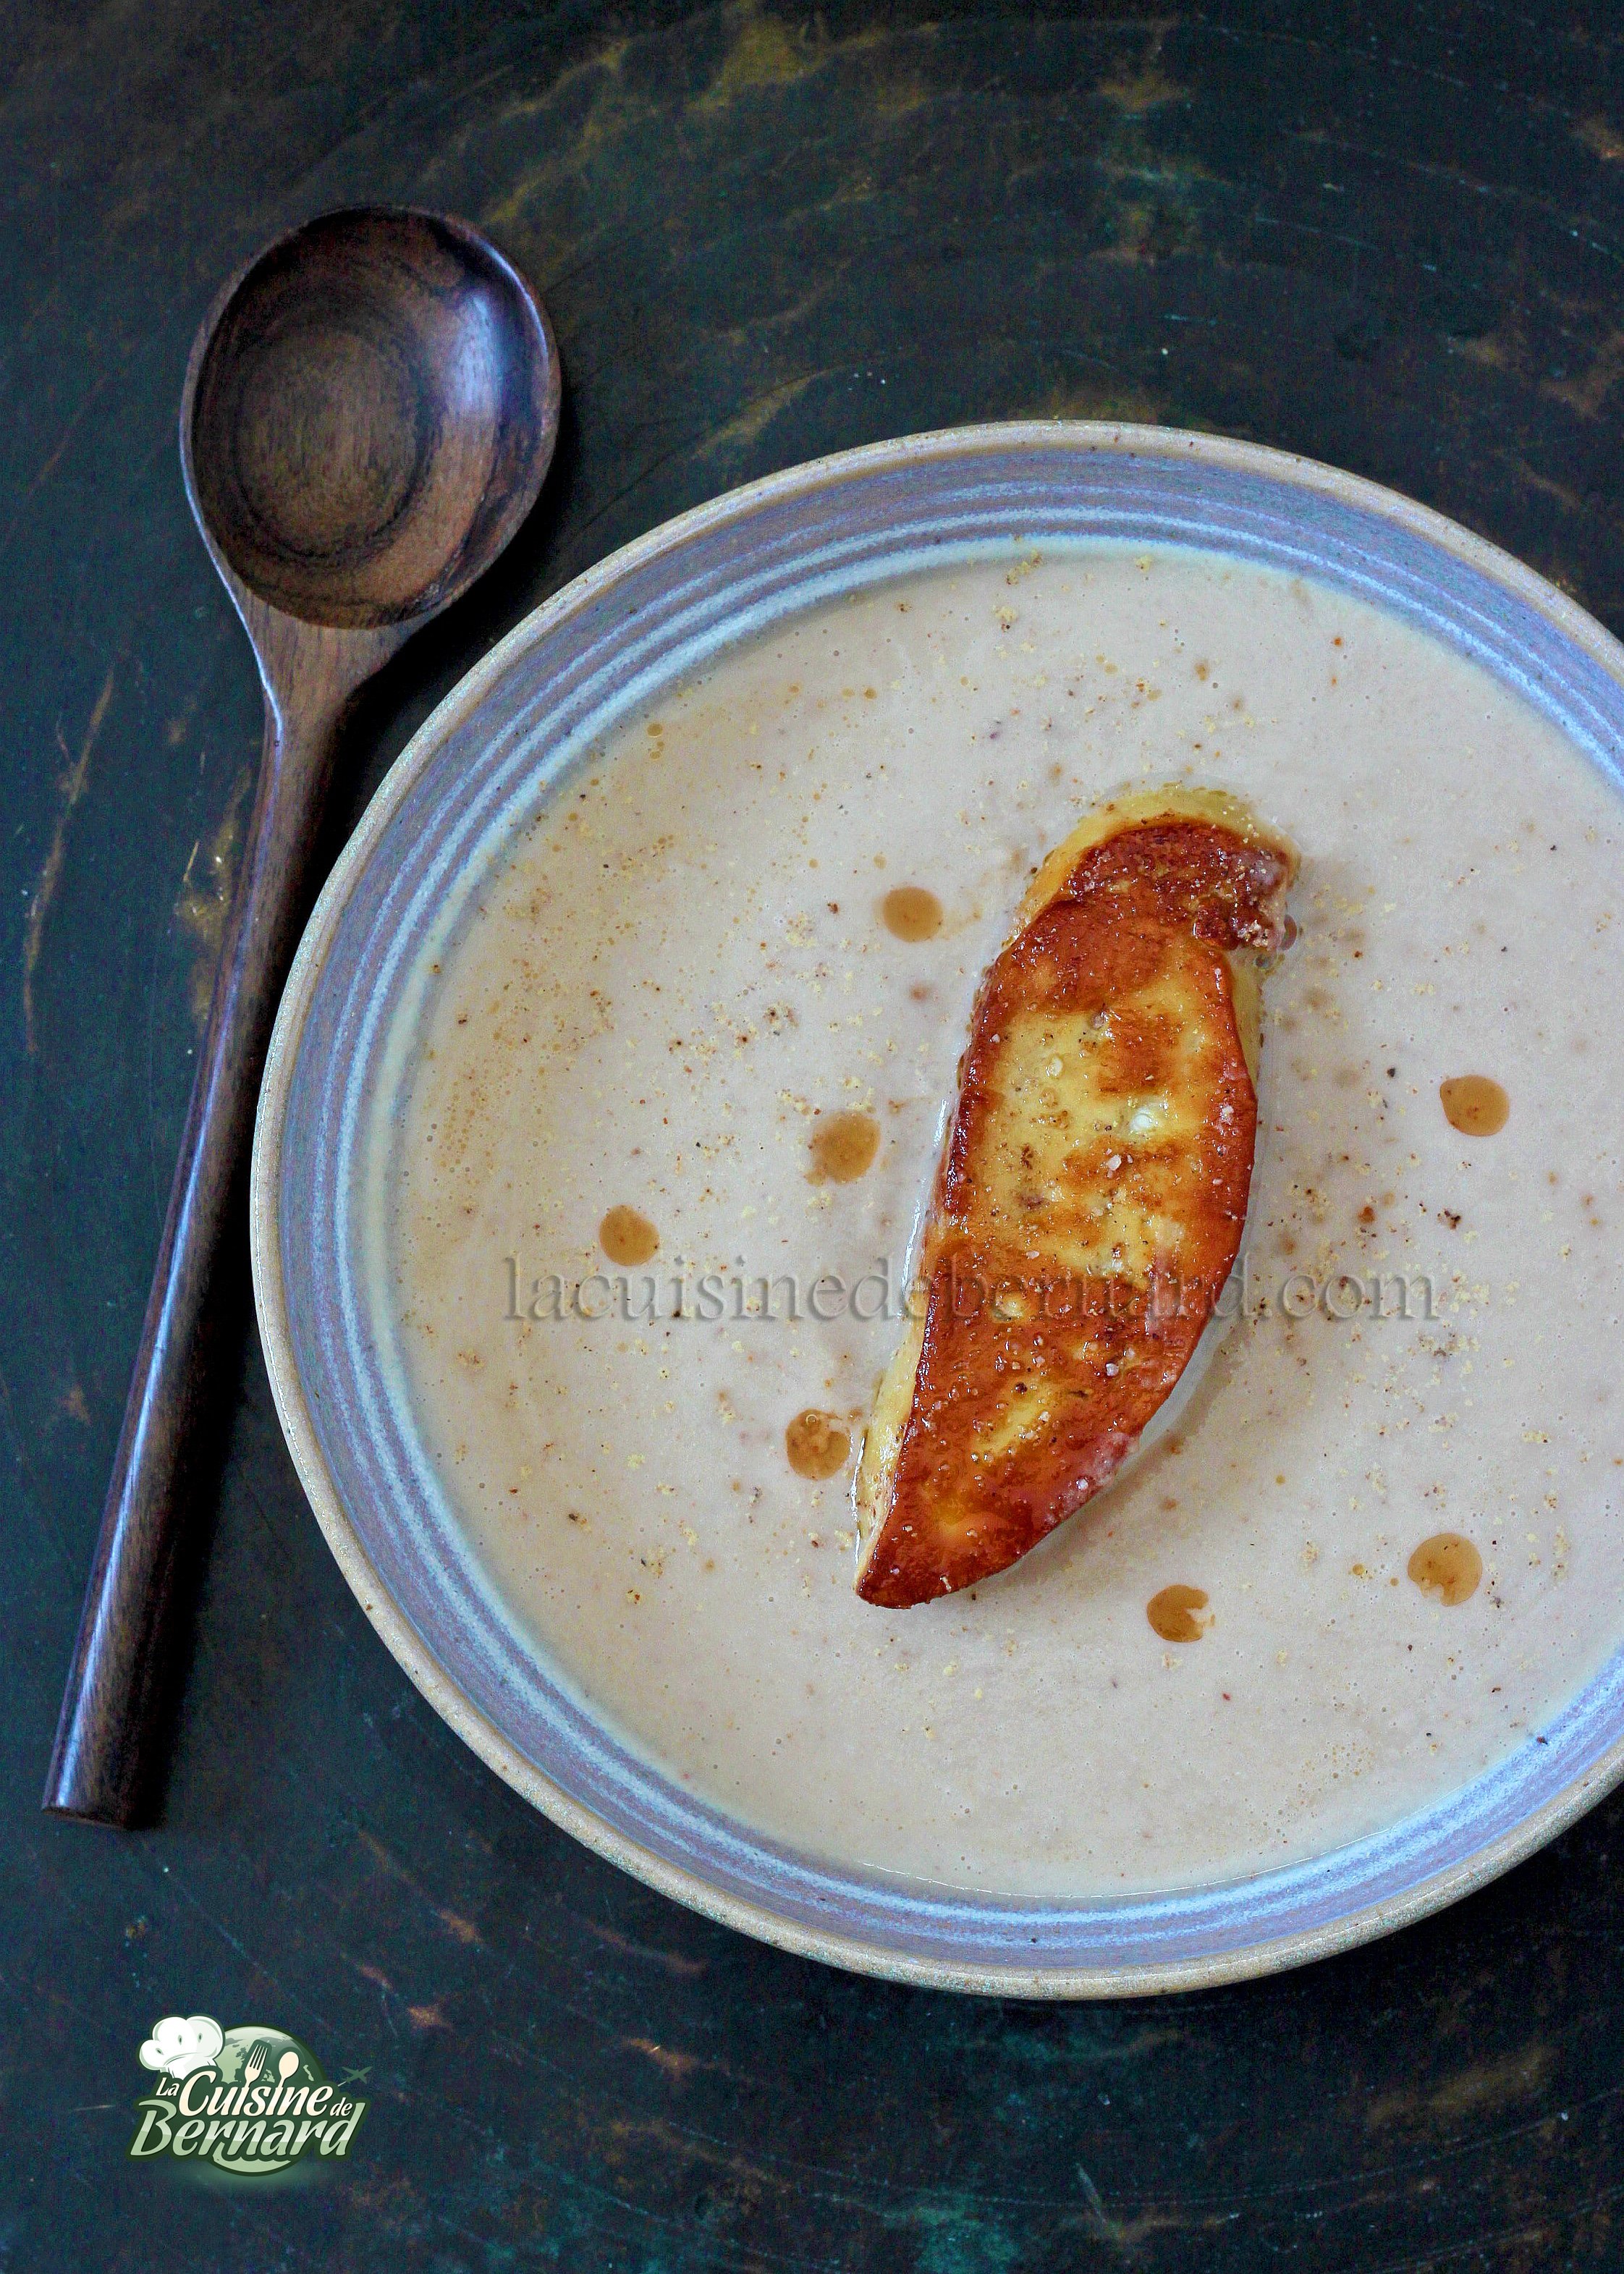
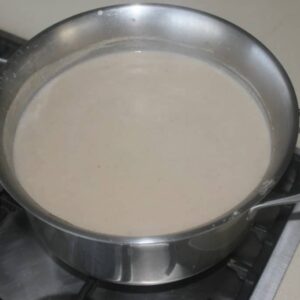
I can’t believe the holidays are right around the corner! Yet we should believe it with the ambient cold… In the evening, I want to warm up and for that, a celery and chestnut soup is perfect. I rarely use celery, although I love it. In this soup, the combination is perfect. It is comforting as it should be and with a slice of seared foie gras, it will be perfect for a fancy dinner! But this soup can be made without liver. It is delicious on its own with a little bread and cheese.
Recipe for VELUTE CELERY CHESTNUT for 6 to 8 people:
- 1 large white (or yellow) onion
- 7 cloves of garlic
- 50g semi-salted butter
- 3 tablespoons of olive oil
- 850g of celery flesh
- 420g cooked chestnuts (in a jar)
- 2 liters of water
- 250ml full cream
- salt pepper
Instructions :
Cut the onion into pieces.

Peel and chop the celery into large pieces.


Put the butter, olive oil, onion and peeled garlic cloves in a large pot.
Let it cook until it browns nicely.
Add the celery.

Pour in the water.

Cook for 15 minutes, pour in the cooked chestnuts.

Cook for an additional 10 minutes. Blend with an immersion blender.

Pour the cream.

Put salt and pepper at your taste. I salted it quite generously because the chestnuts give a sweet taste!

One last stir, the soup is ready!

And for a more festive touch, I put a slice of fried foie gras per person. But there is no obligation!
Cream of celery and chestnut soup
Ingredients
- 1 large white (or yellow) onion
- 7 cloves of garlic
- 50 mg semi-salted butter
- 3 tablespoons olive oil
- 850 g celery flesh
- 420 g cooked chestnuts (in a jar)
- 2 liters water
- 250 ml full cream
- salt and pepper
Instructions
- Cut the onion into pieces.
- Peel and chop the celery into large pieces.
- Put the butter, olive oil, onion and peeled garlic cloves in a large pot.
- Let it cook until it browns nicely.
- Add the celery.
- Pour in the water.
- Cook for 15 minutes, pour in the cooked chestnuts.
- Cook for an additional 10 minutes. Blend with an immersion blender.
- Pour the cream.
- Put salt and pepper at your taste. I salted it quite generously because the chestnuts give a sweet taste!
- One last stir, the soup is ready!
- And for a more festive touch, I put a slice of fried foie gras per person. But there is no obligation!
Nutrition


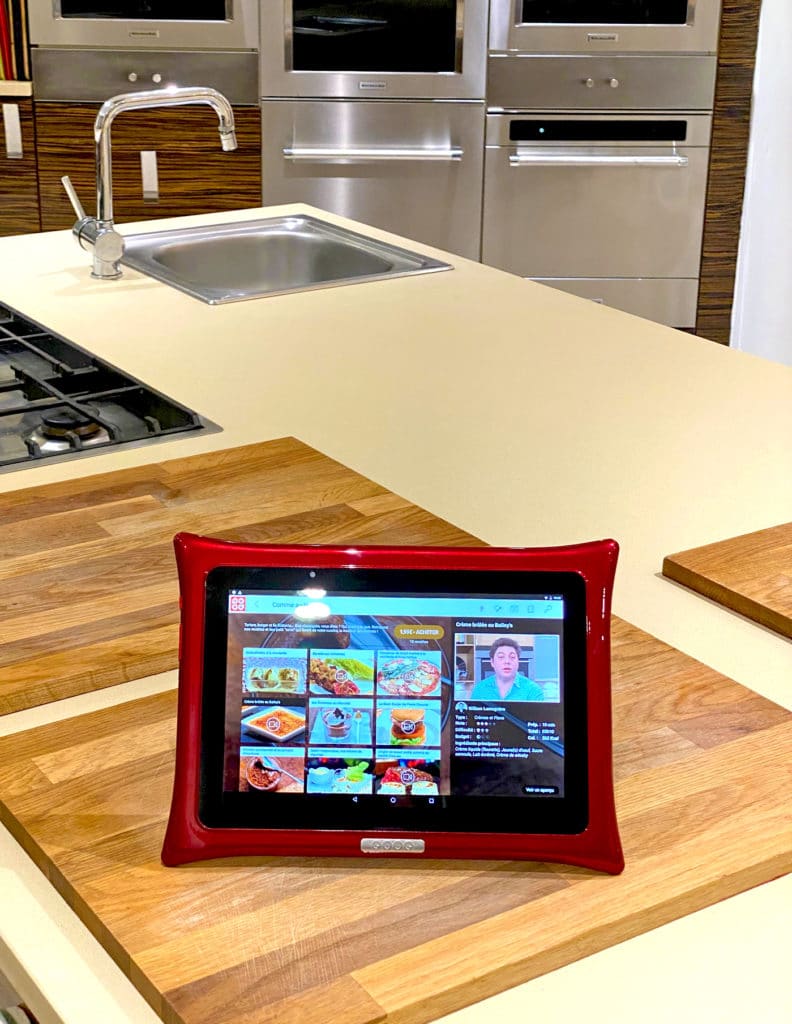
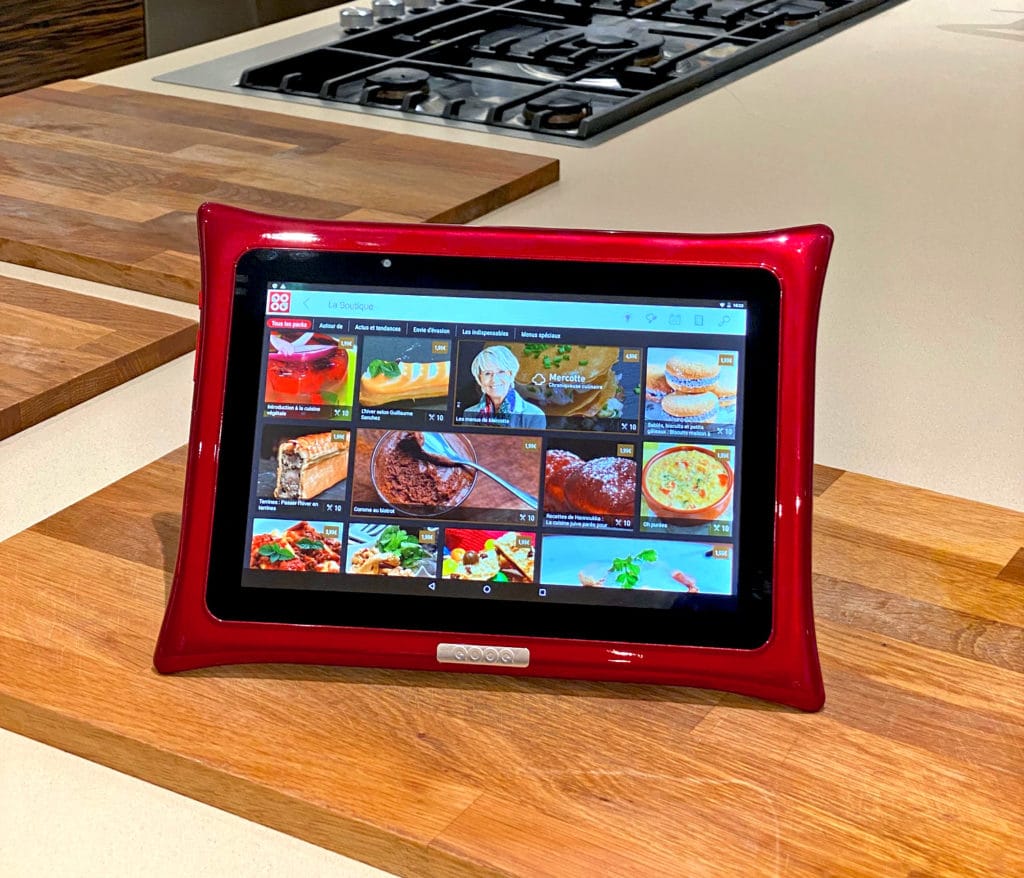
Hello to all! I don’t know if you know the QOOQ tablet? I was asked to discover it around the holidays and I immediately accepted. Like you, I knew about this famous tablet that offers recipes, but without really knowing more about it. It has been around for 10 years now, just like my cooking blog! If you are looking for a gift for a cooking enthusiast, I will show you why QOOQ is probably made for him/her! And on top of that you can benefit from a coupon code! To get a 30 euros discount with all the store offered, just go HERE and then add the promo code QOOQBERNARD
I also give you the direct link to the QOOQ store: https: //store.qooq.com/fr/
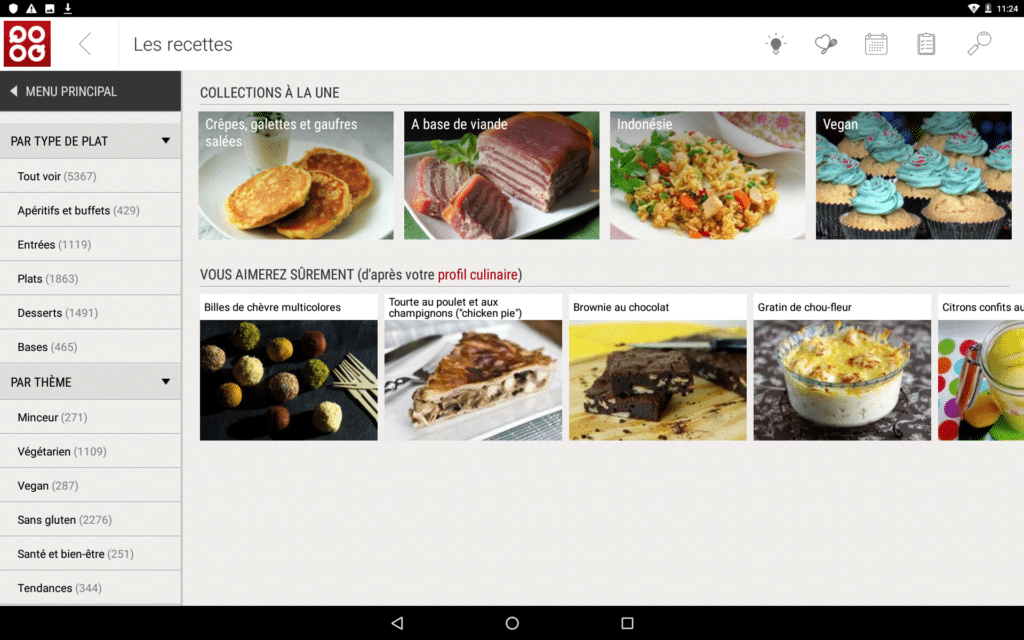
I think what you like here is that I explain all the recipes step by step. So imagine with QOOQ, it’s like having a cookbook that contains more than 5000 recipes and all perfectly explained.

Well, I admit, I was bluffed, because the designers have literally thought of everything and have anticipated all the needs we could have with such a connected object. It is an android tablet, with a full HD screen. As a result, the photos are clear and the videos are very pleasant to follow. Because it’s a bit like a cookbook, but magical, because it’s fully interactive for cooking enthusiasts, like all of us here! You can slip it anywhere, even when traveling, and you’ll have everything you need at your fingertips. Well, don’t forget me! Anyway, you can of course also go on the internet and surf on my blog for example! So phew, I still keep in touch with you. And then who knows? Maybe one day I’ll offer recipes on the tablet too…
The tablet is equipped with an 8M pixel camera. So you can also store your own delights in photos inside! But also a 5M pixels camera to be able to use it as your usual tablet (or smartphone). It is shock and splash resistant. So much the better, because when I see the state of my camera with which I take the pictures of the site, I tell myself that having a tablet that resists all this is very practical in the kitchen! It is really designed to follow you everywhere, but obviously especially in the kitchen, place of all these small dangers for a usual tablet, but not for the QOOQ. It is also slightly raised at the four corners, so that the base is not in contact with the work surface. So no problem if it is not perfectly clean or dry!

There’s even a built-in stand to position it for easy cooking. Hop I fall on Mercotte here! That I have been meeting regularly for 8 years (ah the small world of food bloggers! ).
I attach great importance to the accuracy of a recipe. Here they have ingredients that can be adjusted to the number of people: no need for a calculator! Once you have selected your recipes, you can make a shopping list and send it to yourself by email. No more need for a paper list! There is even a food and wine pairing suggested for certain recipes. And as always, with the step-by-step videos or the perfectly explained recipes, there is no risk of missing anything!
For those of you who are wondering what you will find inside, it’s hard to tell you everything. I won’t be able to be exhaustive, because there are really a lot of features related to recipes. For example:
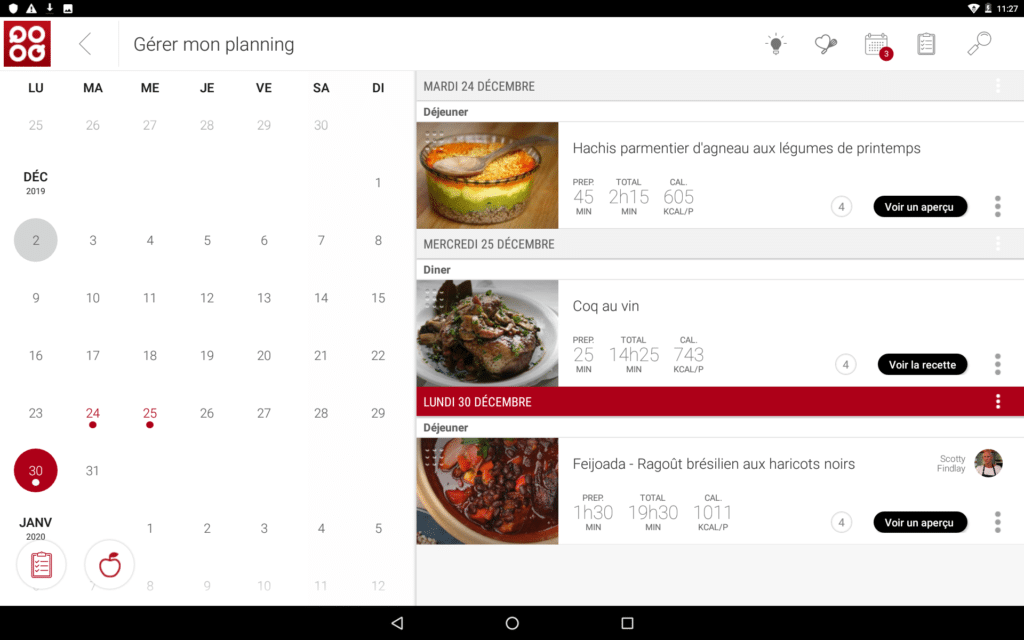
Planning: a handy little tool, as you can plan your meals in advance and put them in the schedule. It is quite intuitive (a bit like all the features!) and allows you for example not to have to wonder what to eat for busy weeks, or on the contrary, as I used to do before, a week’s vacation with friends with everything we like!
Culinary profile: very practical because you put your favorite ingredients, those you do not like. You can also indicate your culinary allergies and your cooking skills. This will refine your profile and direct you immediately to the recipes you are most likely to like.
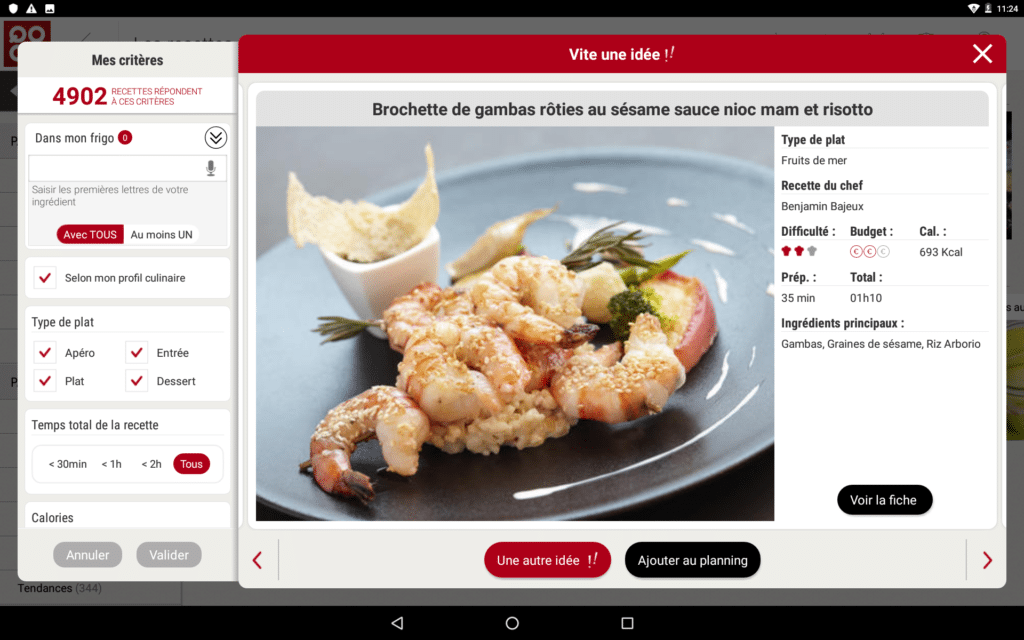
Quickly, an idea! This is a very practical tab on the QOOQ tablet, because you can put all the ingredients you have in your cupboard, choose seasonal vegetables, rich or light dishes, while taking into account the culinary profile if you have entered it in the tablet! With this option, you can’t run out of inspiration. I myself can find myself in this situation when I have to make a recipe for everyday cooking! Sure for the blog, I have plenty of ideas ahead of time, but when it comes to feeding myself with a more classic recipe that I don’t post, well this little tab will come in handy!
You’ll also get plenty of techniques and tips from famous chefs (I came across a mouth-watering bailey crème brûlée from William Lamagnère that I really admire!). Whether you are a novice or an expert, you are bound to find ideas that will be very useful.

The recipes are classified under many different indexes and you will always find a way to find the perfect recipe for the occasion: gluten-free, vegetarian, vegan, for kids, for lovers, for holiday meals, for brunches, etc.
Feel free to check out the QOOQ website: www.qooq.com or/and the qooqstore.com!

Well, I have to worry, because this is a formidable competition I have here! 🙂 I’ve been surfing the QOOQ tablet quite a bit and I have to say that I’m impressed by the amount of information it has. So don’t be afraid, because if you take the time to discover it, you will see that it is really easy to use!