

I propose you here cooking classes in my workshop in Porte des Lilas! Do not hesitate to contact me for any request for private lessons, lessons for company committees or renting the place to do your own lessons.
Sunday, May 26, 2024 at 2pm: Vietnamese cooking workshop! In this course, we’ll look together at four dishes from Vietnamese cuisine. First of all, the famous Banh cuons, delicious rice and tapioca pancakes stuffed with pork and mushrooms. Then banh kots, small coconut milk and rice flour pancakes, topped with shrimp and pork. We’ll simmer an irresistible dish of pork with lemongrass, and the course will end with an explosive dish of flavors and textures, crispy beef with chili sauce. SOLD OUT
Saturday, June 8, 2024 at 2 p.m.: Maki and mochi workshop! An afternoon devoted to Japanese cuisine. We’ll prepare the sushi rice, then each of us will make two maki, those famous and delicious rolls, with crab, surimi and avocado. We’ll be making mochi, those fluffy little sweets. First, we’ll look at the ingredients used, then cook the azuki bean paste, anko, and its more versatile sidekick, the white bean-based shiroan, which will be used to prepare the lime mochi. We’ll also be making tamagoyaki , the irresistible Japanese omelette! You’ll go home with the maki and mochi you’ve made. Registration HERE
Sunday, June 30 at 2pm: Vietnamese cooking workshop! In this course, we’ll look together at four dishes from Vietnamese cuisine. First of all, the famous Banh cuons, delicious rice and tapioca pancakes stuffed with pork and mushrooms. Then banh kots, small coconut milk and rice flour pancakes, topped with shrimp and pork. We’ll simmer an irresistible dish of pork with lemongrass, and the course will end with an explosive dish of flavors and textures, crispy beef with chili sauce. Registration HERE
Saturday, November 23 and Sunday, November 24, 2024: Chocolate Madness Workshop! This two-day course is unique in France. We will indeed see the manufacture of the bean to the tablet. The dark, milk and white chocolate will be made live and together. We will make homemade Nutella, pralines, but we will also learn more about cocoa butter and its tempering. We’ll start this course on Saturday morning with a hot chocolate and learn all the secrets of chocolate: roasting, crushing, winnowing and conching… My book “Je fais mon chocolat maison” published by Solar and prefaced by Christophe Michalak, will also be offered during this workshop! Registration HERE
See registration details below.
Payment is made in advance by credit card online on my website atelier-lacuisinedebernard.com. Do not hesitate to ask me for private lessons from 1 to 5 students.
To register, click on the following link: https: //www.atelier-lacuisinedebernard.com/les-cours/
The workshop is located in Les Lilas, 4 minutes walk from the metro “Mairie des Lilas” on line 11 (15 minutes door to door from République).
For this new adventure, partners followed me and allowed me to make this dream come true. KitchenAid was the first to provide me with all the necessary equipment. We will work with gas, hood, steam oven, Twelix oven, microwave oven, food processors, utensils, pots and pans of the brand.
The place is even from September, a permanent KitchenAid showroom in France!
If you are a blogger and dream of teaching your readers, I rent the workshop at a special blog rate. All materials are available (an empty fridge/freezer is dedicated to workshops) and you can accommodate your students (up to 10 or 12 depending on what you do as a class) in a 100m2 space. Contact me at contact@lacuisinedebernard.com for pricing and to arrange a visit.
To learn more, go to my workshop website: www.atelier-lacuisinedebernard.com


An autumn cheesecake with everything I love about it. A chewy texture, but also crunchy on top with the addition of a cinnamon crumble, all on a speculo base. It’s an irresistible delight for all cheesecake lovers. The melting apples add a touch of freshness to this rich, flavorful cake.
For a 23cm diameter mould (12 portions) :
Base de pâte :
- 210g speculos
- 20g of sugar
- 40g melted butter
Crème au cream cheese :
- 600g Philadelhia cream
- 100g of full cream
- 1 teaspoon of liquid vanilla
- 3 eggs
- 60g of sugar
Crumble :
- 40g of semi-salted butter
- 75g of flour
- 70g brown sugar
- 1 teaspoon cinnamon powder
Pommes à la cannelle :
- 3-4 apples
- 20g of semi-salted butter
- 1 tablespoon of sugar
- 1 teaspoon cinnamon powder
Commencez par préparer les pommes.
I prepared many more to eat as they were, without putting them all in the pannukakku. Peel them and cut them into quarters.

Place in a frying pan with the butter, sugar and cinnamon.


Cook for 30 minutes over low heat, with a lid, shaking the pan from time to time. They should become very tender.

Préparez la base du cheesecake.
Put the speculos in a blender to reduce them to a powder.


Pour the melted butter, sugar and specula powder into a small bowl.

Mix well, then pour into a 23cm removable-bottom mold lined with parchment paper.

Bake for 15 minutes at 170°C.
Préparez la crème à cheesecake.
In a bowl, mix the cream cheese, which has been out of the fridge for at least 2 hours, with all the ingredients: cream, eggs, sugar and vanilla.

Mix well with a whisk.

Pour half over the pre-cooked speculo base.

Sprinkle with chopped cooked apples.

Pour over the remaining cream and sprinkle with apples.

Pour le crumble :
Mix the butter, flour, brown sugar and cinnamon powder by hand.

Compact the dough between your hands, then break into pieces to sprinkle over the top of the cake.

Cuisson :
Bake for 1h15 to 1h30 at 170°C over static heat (not ventilated heat).

Leave to cool completely, then chill for at least 3 hours. Add a little powdered sugar for decoration!


Cheesecake crumble pommes cannelle
Ingredients
Crème au cream cheese :
- 600 g cream cheese
- 100 g crème liquide entière
- 1 c. à café extrait de vanille liquide
- 3 œufs
- 60 g sucre
Crumble :
- 40 g beurre demi-sel
- 75 g farine
- 70 g sucre roux
- 1 c. à café cannelle en poudre
Pommes à la cannelle :
- 3-4 pommes
- 20 g beurre demi-sel
- 1 c. à soupe sucre
- 1 c. à café cannelle en poudre
Instructions
- Commencez par préparer les pommes. J’en ai préparées beaucoup plus pour les manger telles quelles, sans toutes les mettre dans le cheesecake. Épluchez les et coupez-les en quartiers.
- Placez-les dans une poêle avec le beurre, le sucre et la cannelle.
- Faites-les cuire 30 minutes sur feu doux, avec un couvercle, en secouant de temps en temps la poêle. Elles doivent devenir toutes tendres.
- Préparez la base du cheesecake. Mettez les spéculos au mixeur pour les réduire en poudre.
- Dans un petit récipient, versez le beurre fondu, le sucre et la poudre de spéculos.
- Mélangez bien puis versez dans un moule à fond amovible de 23cm, chemisé de papier sulfurisé.
- Mettez à cuire 15 minutes à 170°C.
- Préparez la crème à cheesecake.Dans un récipient, mélangez le cream cheese préalablement sorti du réfrigérateur depuis au moins 2 heures, et tous les ingrédients : crème liquide, œufs, sucre et vanille liquide. Mélangez bien au fouet.
- Versez la moitié sur la base de spéculos.
- Parsemez de pommes cuites et recoupées en morceaux.
- Versez le reste de crème puis reparsemez de pommes.
- Pour le crumble :Mélangez le beurre la farine, le sucre roux et la cannelle en poudre à la main.
- Compactez la pâte entre vos mains, puis cassez-la en morceaux pour parsemer sur le dessus du gâteau.
- Faites cuire 1h15 à 1h30 à 170°C sur chaleur statique (pas chaleur ventilée).
- Laissez refroidir totalement puis mettez au frais au moins 3 heures. Ajoutez un peu de sucre glace pour la décoration !
Nutrition


Not quite a far, nor a dutchbaby, still less a pancake, pannukakku is the Finnish version with its own identity of this type of dessert. The idea is to cook the dough in butter in a frying pan, then put it in the oven until it’s a lovely golden color! Here’s my version with cinnamon apples, to get in the autumn mood.
For a 20cm frying pan :
- 50g semi-salted butter
- 2 eggs
- 75g of flour
- 40g of sugar
- 1 teaspoon liquid vanilla extract
- 380g of semi-skimmed milk
- 3 baked apples with cinnamon
For apples:
- 3 apples (I used pink lady apples, which bake well)
- 20g semi-salted butter
- 1 tablespoon of sugar
- 1 teaspoon cinnamon powder
Pommes à la cannelle :
Start by preparing the apples. I prepared a lot more so that I could eat them as they were, without putting them all in the pannukakku. Peel them and cut them into quarters.
Place in a frying pan with the butter, sugar and cinnamon.
Cook for 30 minutes over low heat, with a lid, shaking the pan from time to time. They must be getting all soft.
Préparez la pâte à pannukakku.
Place the eggs, sugar, flour and liquid vanilla in a bowl and whisk vigorously.

Pour in the milk while whisking.


Cuisson :
Melt the semi-salted butter in an ovenproof frying pan. For this I used the Lodge brand (this is NOT a sponsored article, just my opinion) which is easily found on the internet.

When it starts to turn nutty, pour in the batter.

Sprinkle with apple pieces. If the wedges are too large for your taste, cut them in half.

Place in the oven at 205°C for 25 to 30 minutes on convection heat.

The pannukakku must be golden brown!

Serve hot, warm or chilled with a dusting of powdered sugar!


Pannukakku pommes cannelle
Ingredients
Pour une poêle de 20cm
- 50 g beurre demi-sel
- 2 œufs
- 75 g farine
- 40 g sucre
- 1 c. à café extrait de vanille liquide
- 380 g lait demi-écrémé
Pour les pommes :
- 3 pommes
- 20 g beurre demi-sel
- 1 c. à soupe sucre
- 1 c. à café cannelle en poudre
Instructions
- Commencez par préparer les pommes. J’en ai préparées beaucoup plus pour les manger telles quelles, sans toutes les mettre dans le pannukakku. Épluchez les et coupez-les en quartiers.
- Placez-les dans une poêle avec le beurre, le sucre et la cannelle.
- Faites-les cuire 30 minutes sur feu doux, avec un couvercle, en secouant de temps en temps la poêle. Elles doivent devenir toutes tendres.
- Préparez la pâte à pannukakku.Mettez les œufs, le sucre, la farine et la vanille liquide dans un récipient et mélangez au fouet de façon énergique. Versez ensuite le lait tout en fouettant.
- Faites fondre le beurre demi-sel dans une poêle allant au four. Pour cela j’ai pris la marque Lodge (ce n’est PAS un article sponsorisé, mais juste mon avis) que l’on trouve facilement sur internet.
- Quand il commence à devenir noisette, versez la pâte.
- Parsemez avec les morceaux de pommes. Si les quartiers sont trop gros à votre goût, coupes-les en deux.
- Mettez au four à 205°C pendant 25 à 30 minutes sur chaleur tournante. Le pannukakku doit être bien doré !
- Servez chaud, tiède ou frais avec un voile de sucre glace !
Nutrition


A deliciously comforting, nourishing and balanced soup! If you’re new to this Finnish dish, now’s the time to get started, because it’s not only very easy to make, but also very, very good! The soup is quick to prepare and the salmon is cooked at the last minute, just before dinner. I just added a small piece of fennel to this traditional dish, as seen once in Helsinki. And just writing the recipe makes me salivate all over again!
Lohikeitto for 4 people:
- 1 small leek
- 1 small fennel
- 50g semi-salted butter
- 400-500g small potatoes
- 3-4 carrots
- 1.25 liters of fish stock (I use 3 teaspoons of stock powder for 1.25 liters of water).
- 10 sprigs fresh dill
- 15cl heavy cream
- 400g skinless, boneless salmon fillet
- salt pepper
Préparation :
Start by cleaning and cutting the leek and fennel into very small pieces.

To do this, remove the leafy part of the leek and its roots. Strain the top of the leaves to get rid of any soil, then chop.

Cut the fennel in the same way.

Cuisson :
Place the butter in a large saucepan or casserole dish.

Heat over moderate heat with the leek and fennel. Cook for 7 to 8 minutes.

I used small potatoes for this recipe.

Cut them into pieces. I keep the skin on, but you’re free to peel them.

Peel and chop the carrots.

Pour into the casserole dish.

Pour in 1.25 liters of water. I simply added 3 teaspoons of powdered fish stock, no more!

Bake for 20 minutes until potatoes are tender. Then pour in the cream.

Finely chop the dill and add it to the casserole.


Cut the salmon into cubes.

Add the salmon 3 minutes before serving. You can therefore prepare the soup in advance without the salmon, then reheat it at the last minute by cooking the fish just before serving.

Simmer the salmon for 3 minutes, then serve immediately! Add salt and pepper to taste.


LohiKeitto (soupe de saumon finlandaise)
Ingredients
- 1 petit poireau
- 1 petit fenouil
- 50 g beurre demi-sel
- 400 g pommes de terre type grenail
- 4 carottes
- 1,25 l fumet de poisson
- 10 branches d'aneth
- 15 cl crème fraiche épaisse
- 400 g saumon cru
- sel, poivre
Instructions
- Commencez par nettoyer et couper en très petits morceaux le poireau et le fenouil.
- Enlevez pour cela la partie trop feuillue du poireau et ses racines. Passez bien le haut des feuilles pour vous débarrasser de la terre éventuelle, puis hachez-le. Coupez le fenouil de la même façon.
- Placez le beurre dans une grande casserole ou une cocotte.
- Faites chauffer sur feu modéré avec le poireau et le fenouil. Faites cuire le tout 7 à 8 minutes.
- J’ai pris pour cette recette, des petites pommes de terre.
- Coupez-les en morceaux. Je garde la peau, mais libre à vous de les éplucher.
- Épluchez et coupez les carottes en morceaux.
- Versez le tout dans la cocotte.
- Versez 1,25 litre d’eau. J’ai simplement ajouté 3 cuillerées à café de fumet de poisson en poudre, pas plus !
- Faites cuire 20 minutes jusqu’à ce que les pommes de terre soient tendres. Versez alors la crème.
- Hachez finement l’aneth que vous ajouterez dans la cocotte.
- Coupez le saumon en cubes.
- Ajoutez-le 3 minutes avant de servir la soupe. Vous pourrez donc préparer la soupe en avance sans le saumon, puis la réchauffer au dernier moment en faisant cuire le poisson juste avant de passer à table.
- Laissez mijoter le saumon 3 minutes puis servez sans attendre ! Salez et poivrez à votre convenance.
Nutrition


A good cake with fresh figs and hazelnut powder, very melt-in-your-mouth, that’s the recipe I suggest. I use mixed figs in the batter, but also chopped figs for even more flavor and softness. A delicious cake, as good warm as out of the fridge.
Recipe for a 22cm square mould (or a 24cm diameter circular mould):
- 200g fresh figs
- 100g milk
- 100g of soft butter
- 30g neutral oil
- 150g brown sugar
- 110g egg (2 large eggs)
- 175g of flour
- 100g of powdered hazelnuts
- 5g baking soda
- 3g sodium bicarbonate
- 200g fresh figs, cut into pieces

Préparation de la pâte :
Start by washing the 200g of fresh figs at the beginning of the ingredients list.

Remove the stalks and place in a small blender with the 100g milk.

Blend well to obtain a sort of fig cream.

In the bowl of your food processor, or in a bowl, combine the butter, oil and brown sugar.


Add the eggs and fig cream.

Mix, then add the flour, hazelnut powder, baking powder and baking soda.

The dough should be smooth.

Finish with the 200g of fresh figs, cut into pieces.


Cuisson :
Pour into a 22cm square mold lined with parchment paper. You can also use a 24-25cm-diameter round tin.

Bake for 1h15 at 155°C over static heat (not fan-assisted or convection heat).

Let cool completely before cutting into slices.


Gâteau figues noisettes
Ingredients
- 200 g figues fraiches
- 100 g lait
- 100 g beurre
- 30 g huile neutre
- 150 g sucre roux
- 2 œufs 110g au total
- 175 g farine
- 100 g noisettes en poudre
- 5 g levure chimique
- 3 g bicarbonate de sodium
- 200 g figues fraiches
Instructions
- Commencez par laver les 200g de figues fraiches du début de la liste d’ingrédients.
- Équeutez-les puis mettez-les dans un petit mixeur avec les 100g de lait.
- Mixez bien pour avoir une sorte de crème de figue.
- Dans la cuve de votre robot, ou dans un récipient, mélangez le beurre, l’huile et le sucre roux.
- Ajoutez les œufs et la crème de figue.
- Mélangez, puis versez la farine, la noisette en poudre, le levure chimique et le bicarbonate de sodium. La pâte doit être bien homogène.
- Terminez avec les 200g de figues fraiches coupées en morceaux.
- Versez dans un moule carré de 22cm de côté, chemisé de papier sulfurisé. Vous pouvez aussi utiliser un moule rond de 24-25cm de diamètre.
- Faites cuire 1h15 à 155°C sur chaleur statique (et non chaleur tournante ou ventilée).
- Laissez tiédir complètement avant de couper en parts.
Nutrition


Recipe for “cold zucchini soup”:
-3 medium zucchini
-3 white onions
-3 tablespoons of olive oil
-500g of water (a little more if the zucchini are huge!)
-1 bouillon cube
-100g of “boursin ail et fines herbes
-salt, pepper, tabasco
-fresh cilantro
-pine nuts


Start by washing and cleaning three white onions.


A surprising and totally addictive mix. I love asparagus, green or white. I took this photo with green asparagus because it cooks in two or three minutes in a pan, but you can do the same with white asparagus. They should then be peeled and steamed for about 20 minutes. The combination of beurre blanc, in which I keep the shallots, and the black tahini sauce is incredibly good and delicate. You’ll certainly need some fresh bread to clean your plate!
Pour 4 personnes:
- 20 green asparagus spears
- Olive oil, salt, pepper
White butter :
- 2 shallots
- 150ml dry white wine
- 125g of salted butter
- 1 tablespoon full cream
- Salt and pepper
Black tahini sauce :
- 100g black sesame cream
- 25g white vinegar
- 25g olive oil
- 60g water
- 10g honey
- 1 clove garlic, peeled and minced
- Salt and pepper
- 20 asperges vertes
- 2 c. à soupe huile d'olive
- sel, poivre
- 2 échalotes
- 150 ml vin blanc sec
- 125 g beurre salé
- 1 c. à soupe crème liquide entière
- sel, poivre
- 100 g crème de sésame noir
- 25 g vinaigre blanc
- 25 g huile d'olive
- 60 g eau
- 10 g miel
- 1 gousse d'ail épluchée et finement hachée
- sel, poivre
- Pour le tahiné noir :J’ai acheté ce tahiné de sésame noir dans une boutique bio à côté de chez moi. Il faut bien vérifier qu’il n’y a que du sésame, car il existe aussi (mais plutôt en rayon asatique) de la crème sucrée de sésame noir à tartiner, et ce n’est pas du tout le même produit !
- Placez la crème de sésame noir et un peu d’eau (que vous pesez avant de cuisiner) dans un récipient.
- Au départ, le tahiné se solidifie légèrement, puis se redétend en ajoutant l’eau au fur et à mesure, tout en mélangeant.
- Ajoutez le reste des ingrédients et mélangez soigneusement. Laissez de côté.
- Pour le beurre blanc :Épluchez et hachez finement les échalotes. Placez-les dans une petite casserole.Versez les 150ml de vin blanc sec. Poivrez et laissez bouillir jusqu’à n’avoir presque plus de liquide, juste un léger fond. Cela prend 15 minutes environ.
- Ajoutez alors le beurre salé en 4 ou 5 fois, sur feu doux en mélangeant en permanence. Le premier morceau doit bien fondre avant d’ajouter la suite. Je garde ici les échalotes, je trouve dommage de les enlever comme dans beaucoup de beurre blanc.
- Mélangez constamment toujours sur feu doux. Le beurre garde sa texture crémeuse et ne tranche pas.
- Quand tout le beurre est ajouté, versez une cuillerée à soupe de crème liquide entière pour bloquer la sauce et l’empêcher de trancher, c’est prêt.
- Faites griller les asperges vertes lavées et séchées dans une poêle avec un peu d’huile d’olive, pendant 2 minutes sur feu assez fort. Salez et poivrez à vote goût.
- Versez un peu des deux sauces dans les assiettes puis disposez les asperges sur le dessus. Dégustez sans attendre avec un bon pain frais.
Comment choisir ses asperges ?
Privilégiez les asperges fraîches, bien fermes, avec des tiges sans taches. Pour cette recette, les asperges vertes sont idéales, mais les blanches peuvent aussi être utilisées après épluchage et cuisson à la vapeur.
Peut-on préparer les sauces à l’avance ?
Oui, vous pouvez préparer le beurre blanc et la sauce tahiné noir à l’avance. Conservez-les au réfrigérateur et réchauffez doucement avant de servir.
Quel type de vin utiliser pour le beurre blanc ?
Un vin blanc sec comme un Sauvignon Blanc ou un Chardonnay fonctionne très bien. Évitez les vins sucrés.
Où trouver du tahiné noir ?
Le tahiné noir se trouve dans les boutiques bio ou les rayons spécialisés des grandes surfaces. Assurez-vous qu’il s’agit de pur sésame noir et non d’une version sucrée.
Astuces pour la cuisson des asperges
Pour des asperges vertes, une cuisson rapide à la poêle avec un peu d’huile d’olive donne une texture croquante. Si vous utilisez des asperges blanches, épluchez-les et cuisez-les à la vapeur pendant environ 20 minutes.
Comment empêcher la sauce beurre blanc de trancher ?
Ajoutez une cuillerée de crème liquide entière à la fin de la préparation. Cela stabilise la sauce et empêche qu’elle ne se sépare.
Pour le tahiné noir :
I bought this black sesame tahini at an organic store near my home. It’s important to check that it only contains sesame, because there’s also a sweetened black sesame cream spread (available in the dairy section), and it’s not the same product at all!

Place the black sesame cream and a little water (which you weigh before cooking) in a container.

Initially, the tehena solidifies slightly, then is re-spread by adding water gradually, while stirring.

Add the remaining ingredients and mix thoroughly. Leave it out.

Pour le beurre blanc :
Peel and finely chop the shallots. Place them in a small saucepan.
Pour the 150ml of dry white wine. Add pepper and boil until almost no liquid remains, just a slight melt. This takes about 15 minutes.


Add the salted butter in 4 or 5 additions over low heat, stirring constantly. The first piece should melt well before adding the next. I keep the shallots here, I think it’s a shame to remove them like in many beurre blanc.

Stir constantly over low heat. The butter keeps its creamy texture and does not slice.

When all the butter has been added, pour in a tablespoon of whole cream to block the sauce from slicing, and you’re ready to go.

Grill the washed and dried green asparagus in a frying pan with a little olive oil for 2 minutes over fairly high heat. Add salt and pepper to taste.


Pour a little of both sauces onto the plates, then arrange the asparagus on top. Enjoy with freshly baked bread.


Asperges sauce beurre blanc, tahiné noir
Ingredients
Beurre blanc :
Sauce tahiné noir :
Instructions
Nutrition


A delicious, versatile sauce that goes well with anything you like. Meat, fish, vegetables, rice, vegetable cakes, etc. An absolute delight, and very easy to make at home. It should be prepared at least a day in advance, to give the ginger time to marinate. I had bought a jar of the equivalent of this sauce in Tokyo and immediately thought that I would have to make it again and offer it on my cooking site! It contains no fat. Store in an airtight container for at least 10 days in a cool place.
Les questions :
- Peut-on préparer la sauce à l’avance ?
- Oui, la sauce gingembre peut être préparée à l’avance et se conserve bien au réfrigérateur dans un récipient hermétique pendant au moins 10 jours.
- Comment obtenir une texture bien homogène ?
- Mixez le gingembre finement mais sans en faire une pâte. Mélangez ensuite soigneusement tous les ingrédients pour une texture lisse.
- Peut-on congeler la sauce gingembre ?
- Il est déconseillé de congeler cette sauce car la texture pourrait être altérée. Elle se conserve bien au réfrigérateur.
- Quelles variantes peut-on essayer ?
- Vous pouvez ajouter des zestes de citron vert pour une touche d’acidité, ou remplacer le sucre par du miel, du sirop d’érable ou du sirop de riz (ou tout autre sucre à votre goût ! ) pour une saveur différente.
- Comment ajuster la sauce selon les saisons ?
- En été, ajoutez du concombre râpé pour une sauce rafraîchissante. En hiver, ajoutez une pincée de piment pour réchauffer les plats. Utilisez des produits locaux de saison pour enrichir la saveur.
Recette pour 550g de sauce au gingembre :
- 300g fresh peeled ginger (peeled weight)
- 20g miso paste
- 135g light soy sauce (the classic)
- 55g white vinegar
- 40g of sugar
La préparation :
To obtain 300g of peeled ginger, take 400g of fresh ginger. Choose a plump one!

Peel it like an apple, it’s as simple as that. A good knife will do the trick.

Cut into pieces and place in a small blender.

Blend it fairly finely, but without turning it into a paste.

Le mélange :
Pour into a container, then simply add the remaining ingredients. I used a brown miso paste, but any miso paste will do.

Mix thoroughly, then cover with cling film. Place in a cool place overnight to ensure that the flavours blend as perfectly as possible and the ginger has time to marinate.
L’utilisation :
The sauce is perfect with anything you like. Grilled meat, vegetables, vegetable patties, on white rice… It’s totally addictive and ultra-savory!

Bernard’s advice:
- For a more intense taste, marinate the sauce for at least 24 hours before eating.
- Serve this sauce with grilled meats, sautéed vegetables or rice for an Asian touch to your dishes.
- If the sauce is too strong, sweeten it with a little honey or maple syrup.

Sauce Gingembre
Ingredients
- 300 g gingembre frais et épluché
- 20 g pâte miso
- 135 g sauce soja claire
- 55 g vinaigre blanc
- 40 g sucre
Instructions
- Pour obtenir 300g de gingembre épluché, prenez 400g de gingembre frais. Choisissez-le bien dodu !
- Épluchez-le comment une pomme, c’est aussi simple que cela. Avec un bon couteau ça fait très bien l’affaire.
- Coupez-le en morceaux, puis placez-le dans un petit mixeur.
- Mixez-le assez finement, sans pour autant en faire une pâte.
- Versez le tout dans un récipient puis ajoutez simplement le reste des ingrédients. J’ai pris une pâte miso brune, mais toute pâte miso fera l’affaire.
- Mélangez soigneusement le tout, puis couvrez d’un film étirable. Placez au frais la nuit pour que le mélange des saveurs soit le plus parfait possible et que le gingembre ait le temps de bien mariner.
- La sauce sera parfaite avec tout ce que vous aimez. Une viande grillée, des légumes, des galettes végétales, sur un riz blanc… Elle est totalement addictive et ultra-savoureuse !


Here’s a recipe idea for an aperitif or starter with friends. These breaded mozzarella balls are delicious, especially with the colourful sauce! You have to like wasabi, and you can of course use another sauce to serve these crispy balls! Make sure you prepare them in advance if necessary, and fry them at the last minute for maximum crispiness.
Recette pour 4 à 6 personnes :
- 300g mozzarella balls
- 50g of flour
- 200g fermented milk
- 100g roasted peanuts
- 100g panko (or breadcrumbs)
- salt, pepper, oil for frying
For the wasabi mayonnaise :
- 100g of mayonnaise
- 20g wasabi
- 10g white vinegar
- 1 – Can the mozzarella balls be prepared in advance?
Yes, it’s perfectly possible to prepare your mozzarella balls in advance. Freeze them raw to preserve their freshness and texture. Simply fry them at the last minute for an incomparable crispness.
- How do you prevent the breadcrumbs from separating?
For breadcrumbs that adhere perfectly, make sure your mozzarella balls are well drained and perfectly dried before coating them. Residual moisture could compromise the breading’s adhesion.
- Can I use a sauce other than wasabi mayonnaise?
Absolutely! Vary your taste buds by opting for a pesto sauce, a lighter spiced fromage blanc sauce, or even a homemade paprika mayonnaise. All these options will add a unique touch to your mozzarella balls.
- How do you get crispy breadcrumbs?
For a light, crispy breading, panko is your best ally. Make sure the frying oil is at the right temperature, ideally 180°C, for the perfect texture.
- Can I use other types of dried fruit?
Of course, feel free to experiment with cashews or roasted almonds instead of peanuts. These alternatives bring different flavors that are just as delicious.
Bernard’s advice:
- Use fermented milk: For an even tastier, crunchier breading, soak your logs in fermented milk before coating them with breading.
- Coating technique: For a perfect coating, follow this technique: first dip the balls in the flour, then in the fermented milk, and finally in the peanut/panko mixture.
- Optimum service: Serve your mozzarella balls immediately after frying for the ultimate crispy experience.
La recette :
Here are the mozarella balls. Take them out of the packet and drain.

Place the roasted peanuts in a small blender and grind to a powder.

Pour into a dish with the panko (or breadcrumbs).

Mix well.

First, dip the balls in flour.

Then dip them in fermented milk (or beaten egg, which also works).

Then roll them in the peanut/panko mixture.

Set aside as you go along.

La cuisson :
Heat a small pan of oil to 180°C. Dip in the breaded marbles. Cooking will be quick. When they’re golden brown, they’re good. You can also hear the sound of frying changing, as the mozzarella will release liquid at some point, indicating that they need to be removed from their oil bath.

Place on absorbent paper.

The sauce:
For the sauce, mix all the ingredients together. Watch out for the action! For this recipe, a good quality industrial mayonnaise will do, although of course I make my mayonnaise at home most of the time.

Serve the breaded balls while they’re still hot, and enjoy them with the sauce right away!
Note de Bernard :
Warning: unfortunately, they’re only good when they come out of the fryer. If you reheat them in the oven afterwards, the cheese will melt as it spreads out in the dish! It’s best to prepare them in advance, bearing in mind that they can be frozen raw and fried at the last minute.


Mozza balls, mayonnaise au wasabi
Instructions
- La recette :Voici les billes de mozarella. Sortez-les du paquet et égouttez-les.
- Mettez dans un petit mixeur, les cacahuètes grillées et réduisez-les en poudre.
- Versez dans un plat avec le panko (ou la chapelure). Mélangez bien.
- Passez tout d’abord les billes dans de la farine.
- Plongez-les ensuite dans le lait fermenté (ou de l’œuf battu, cela fonctionnera aussi).
- Puis roulez-les dans le mélange cacahuète/panko.
- Mettez de côté au fur et à mesure.
- La cuisson : Faites chauffer une petite casserole d’huile à 180°C. Plongez les billes panées. La cuisson va être rapide. Quand elles sont bien dorées, c’est que c’est bon. On entend aussi le bruit de la friture qui change, car la mozzarella va relâcher du liquide à un moment donné, c’est signe qu’il faut les sortir de leur bain d’huile. Mettez sur un papier absorbant.
- La suace : Pour la sauce, mélangez tout les éléments ensemble. Attention, ça dépote ! Pour cette recette, une mayonnaise industrielle de bonne qualité fera l’affaire, même si évidemment je fais ma mayonnaise maison la plupart du temps.
- Servez les billes panées encore très chaudes et dégustez avec la sauce sans attendre !

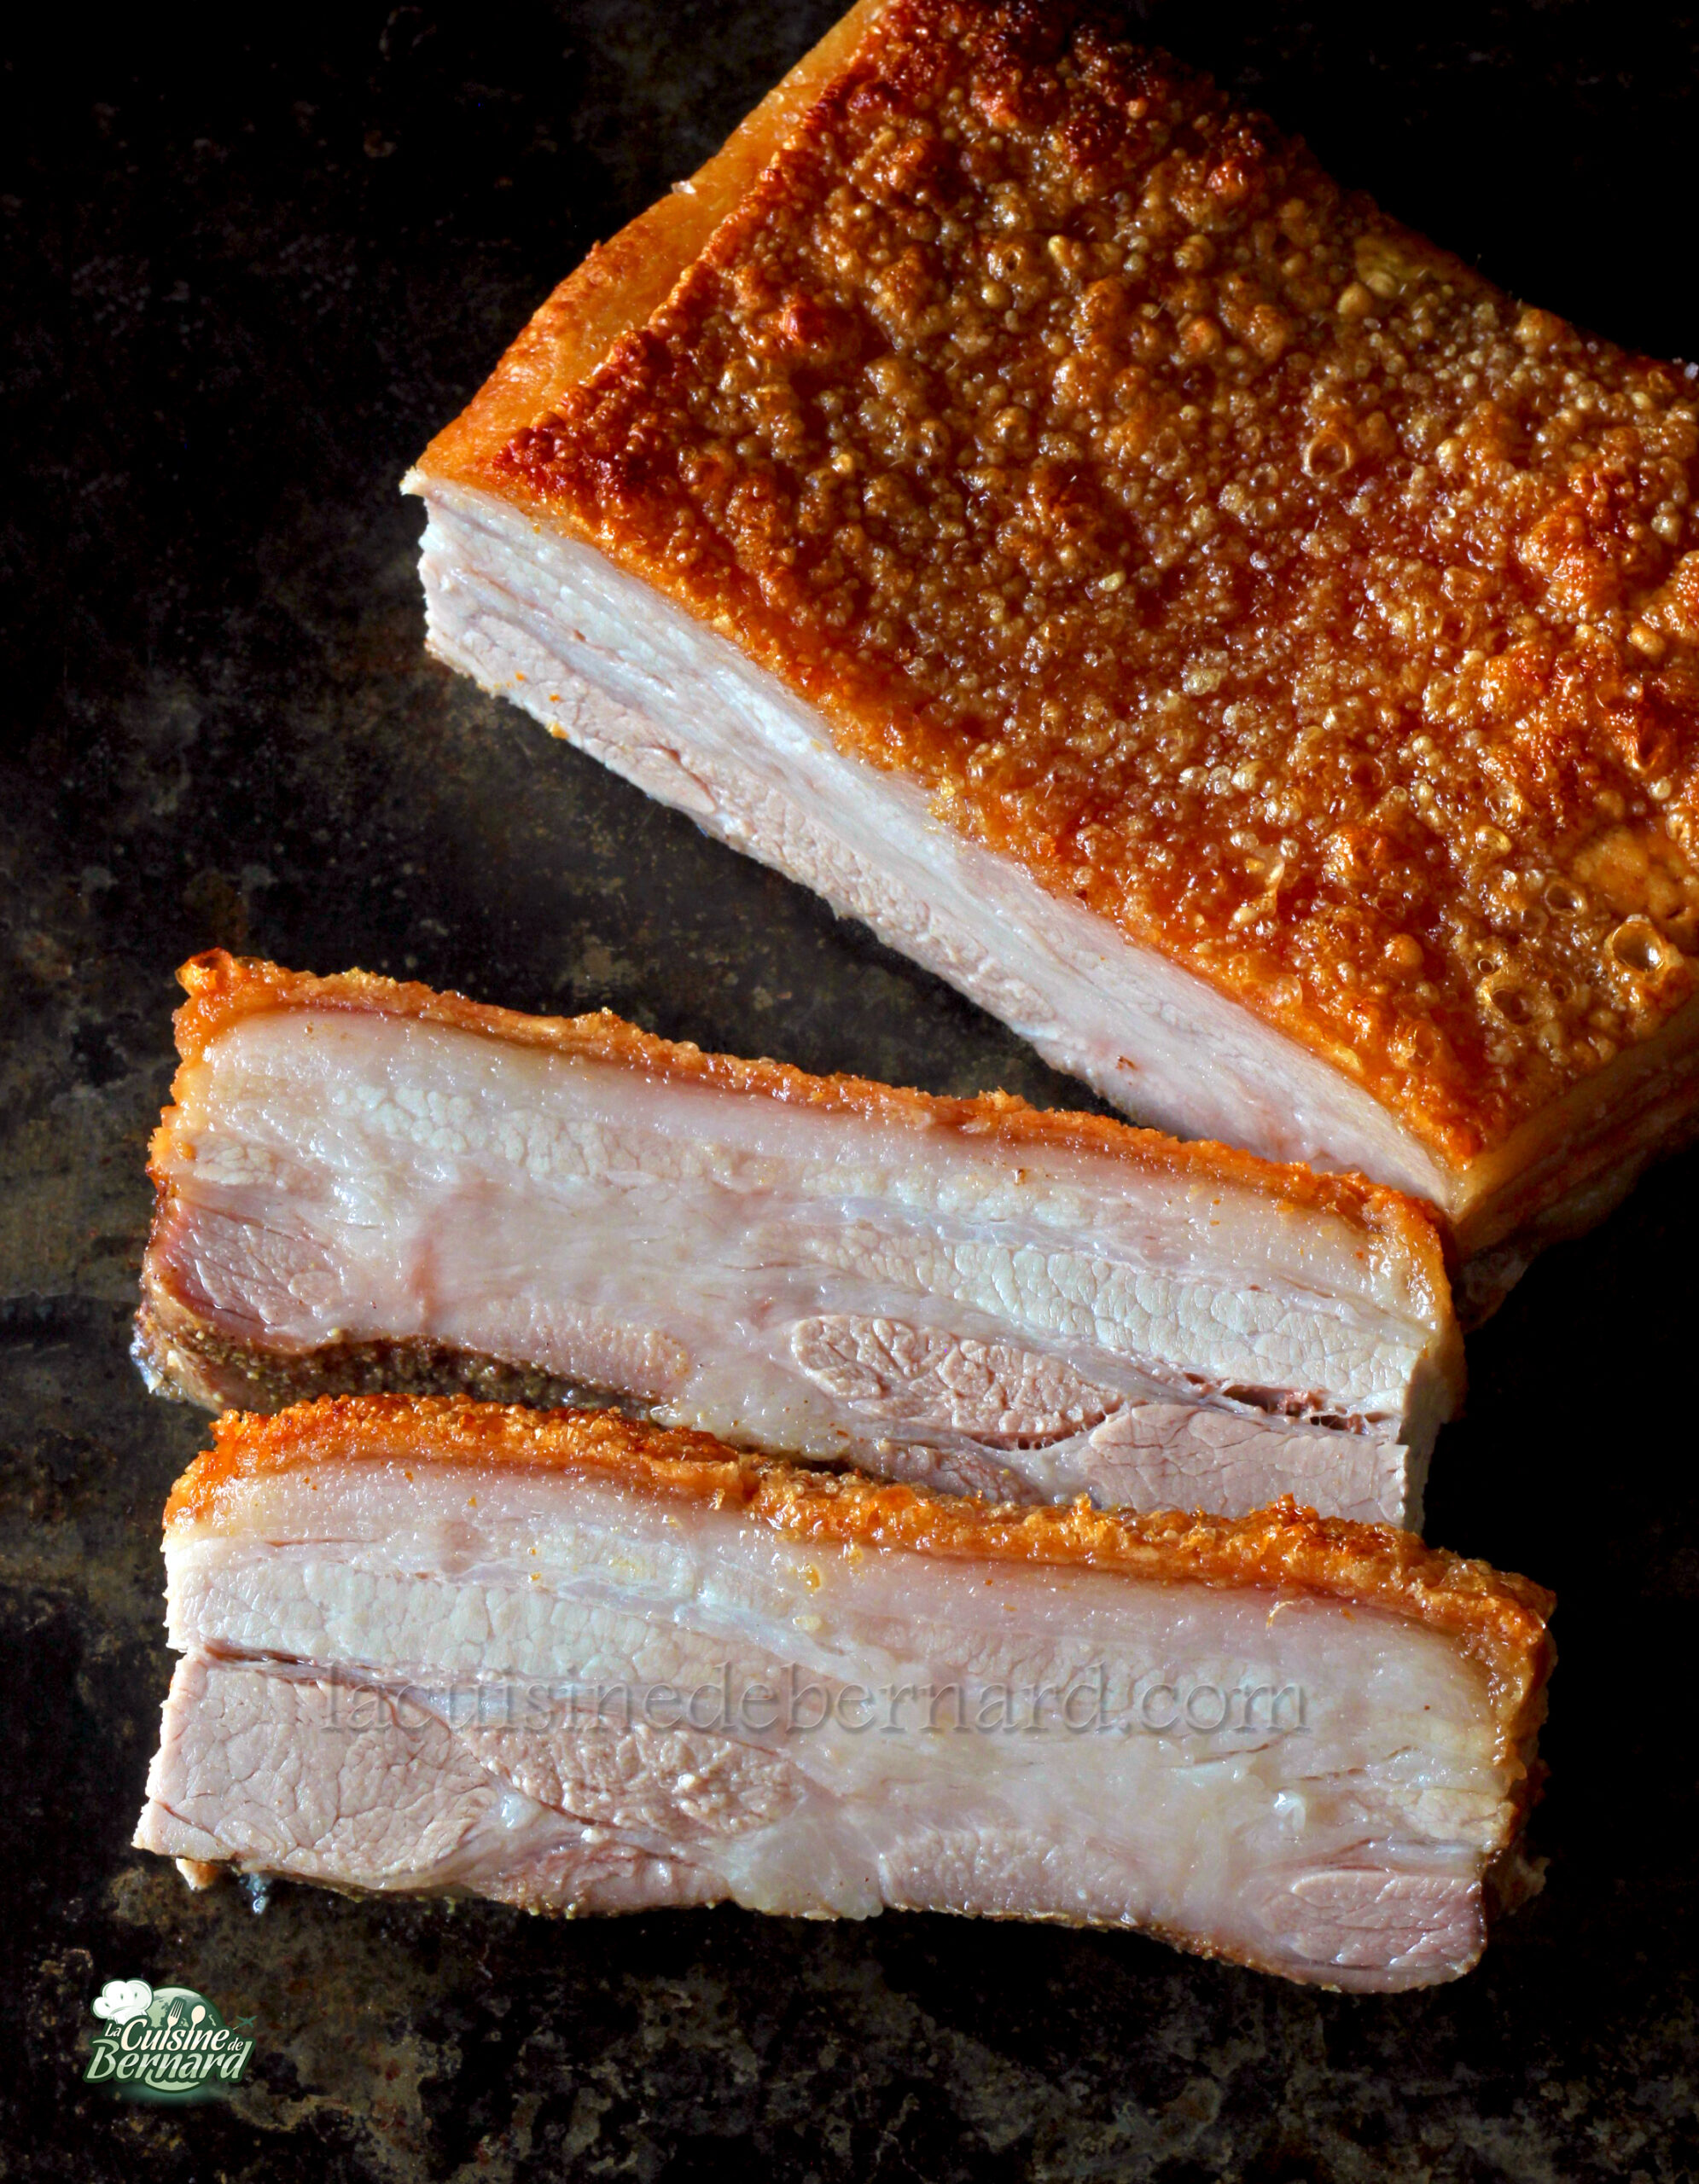
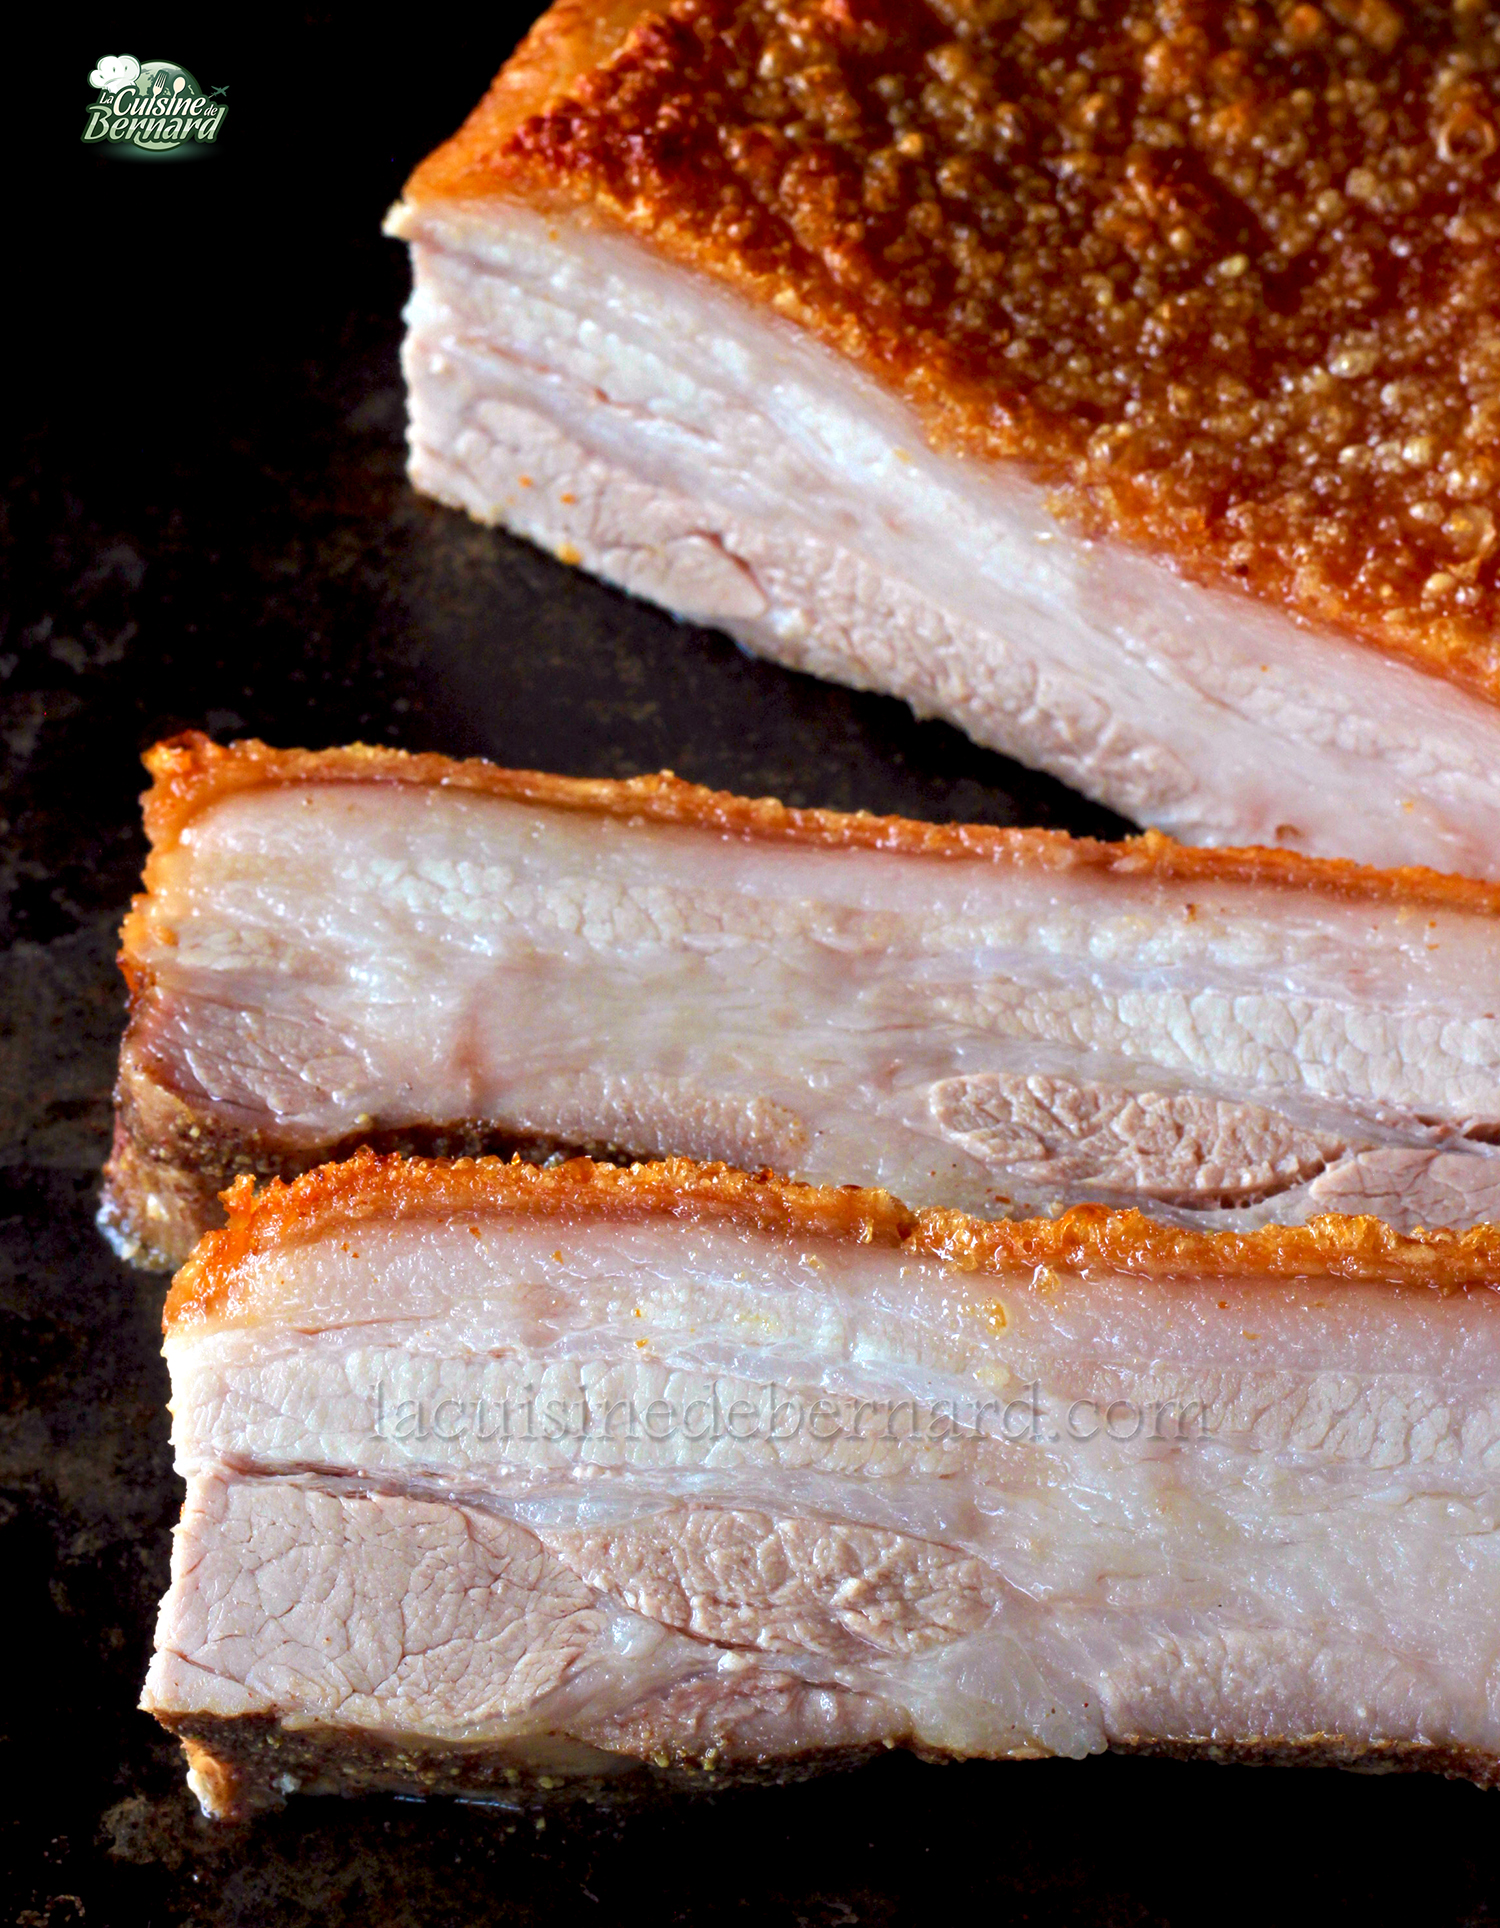
Pork with extra-crispy skin is often seen in Asian rotisseries. I’ll give you the recipe for a delicious result at home: pork cooked just right, juicy and richly flavored, with a super-crispy skin for those who love it.
You’ll need pork belly, and of course you can remove the fat as you like once it’s on the plate. Delicious with rice and a few vegetables, just to clear your conscience!
La recette pour un carré de poitrine de porc :
- 1 pork belly with skin, size of your choice
- 5 flavors” spices
- Chinese wine
- salt
- white pepper
- crystal white vinegar
- 300g coarse salt (adapt to size of meat)
Les questions sur cette recette :
- Can this recipe be prepared in advance?
- Yes, you can prepare the pork belly in advance and reheat it in the oven to keep it crisp.
- How do you get really crispy skin?
- Prick the skin without touching the flesh and apply a layer of vinegar, followed by a generous layer of coarse salt to ensure ultra-crisp skin.
- Can I use other spices?
- Of course! You can experiment with different spices such as smoked paprika or herbes de Provence to vary the flavours.
- What accompaniments go well with this dish?
- Serve pork belly with plain rice, green vegetables or a salad for an (almost!) balanced meal.
- How to prevent meat from becoming too fatty?
- You can remove the fat after cooking to suit your taste, without losing the flavor and crispy texture.
La préparation :
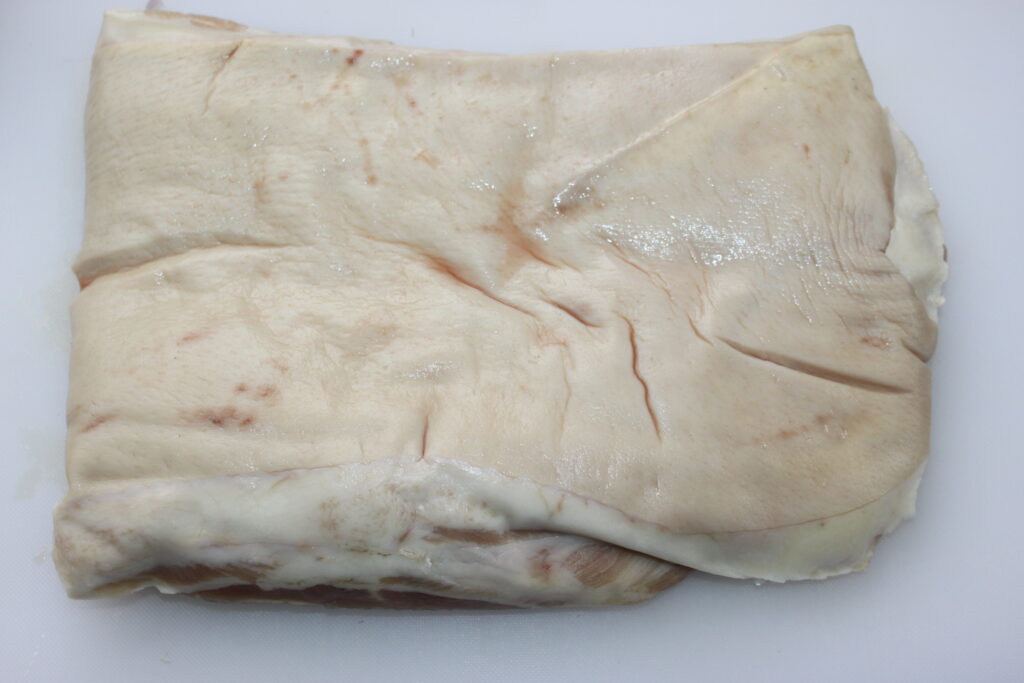
For this recipe, choose the size of meat you prefer. Just ask for the pork belly, with skin.
This is the Chinese wine I use for this recipe. This is not a drinking wine, but a cooking wine.

For the “5 flavors” or “5 spices” blend, you’ll find it in Asian grocery stores. Not to be confused with “4 spices” for gingerbread!

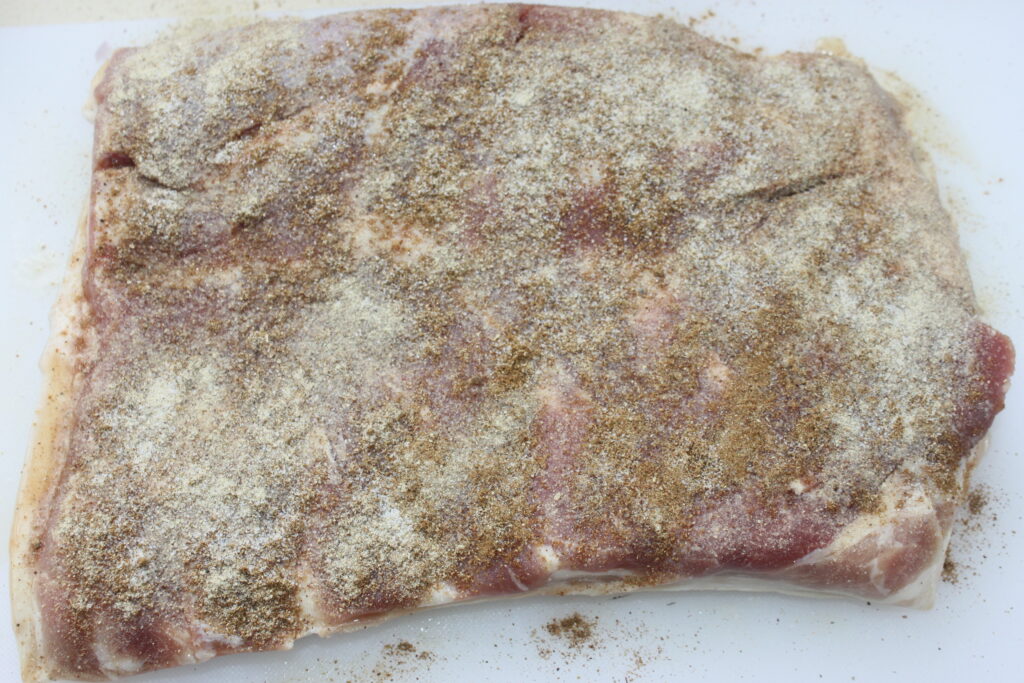
Turn the breast over onto a board, flesh side down. Drizzle Chinese wine over the entire surface (not the skin). Sprinkle with 5-flavour spices, salt and white pepper. Once again, only on the flesh side.
Turn the meat over onto a piece of aluminum foil (or 2 overlapping pieces if the piece of meat is too large).
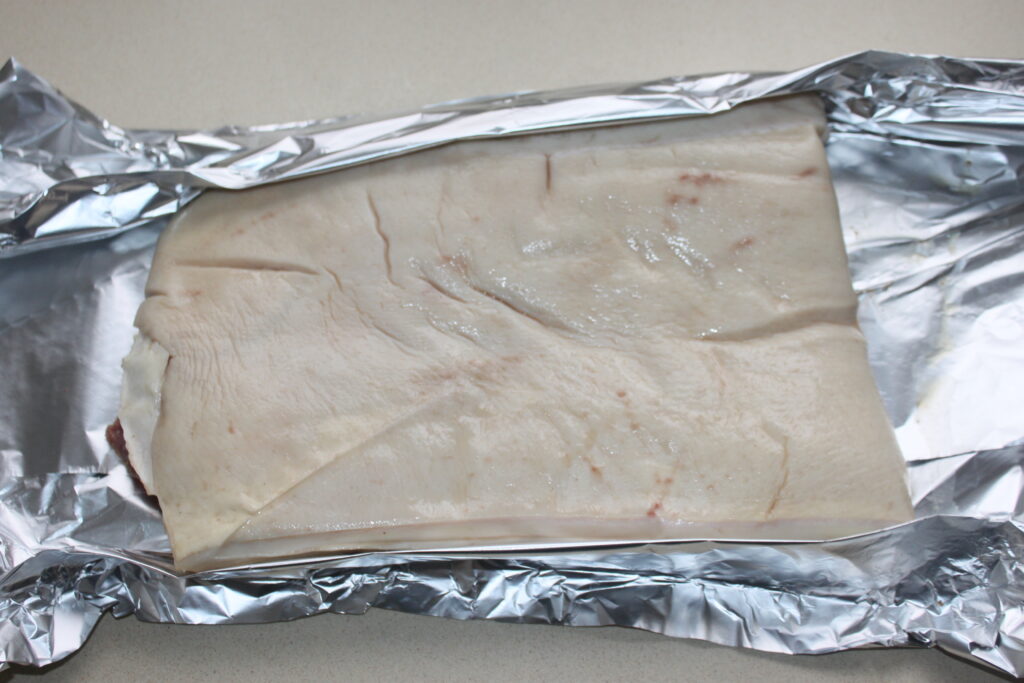
Close the foil around the meat, leaving only the skin visible.
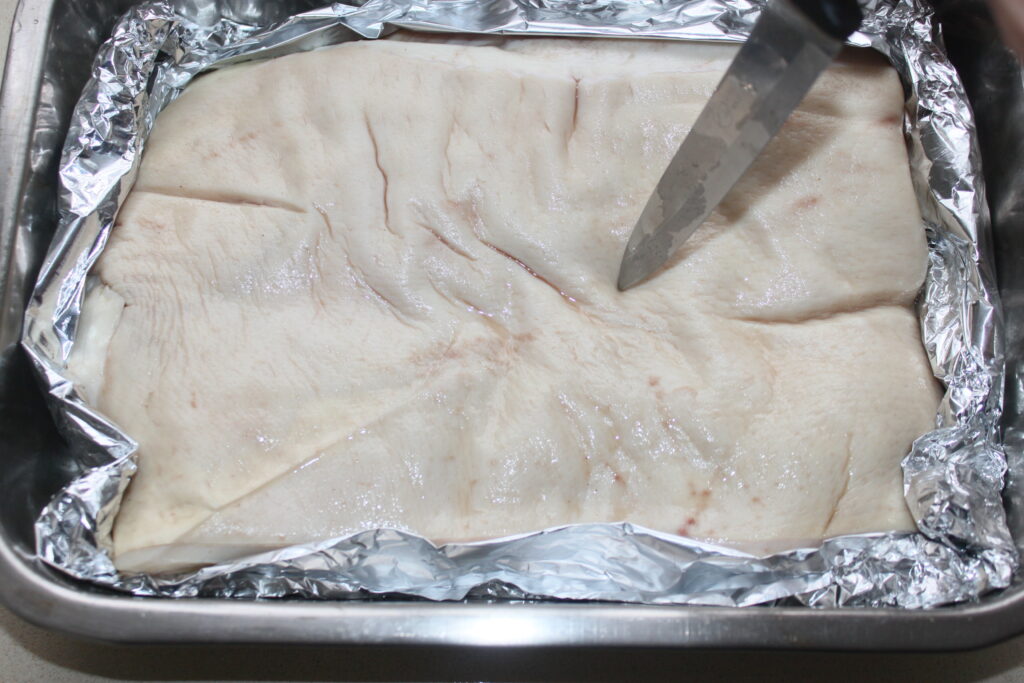
Prick the skin with the tip of a knife, or a metal skewer. Only prick the skin, not the flesh. Otherwise, the meat will release juices and prevent the skin from becoming crispy afterwards. You have to prick everywhere, which is a bit tiring. I made holes every 5mm or so.
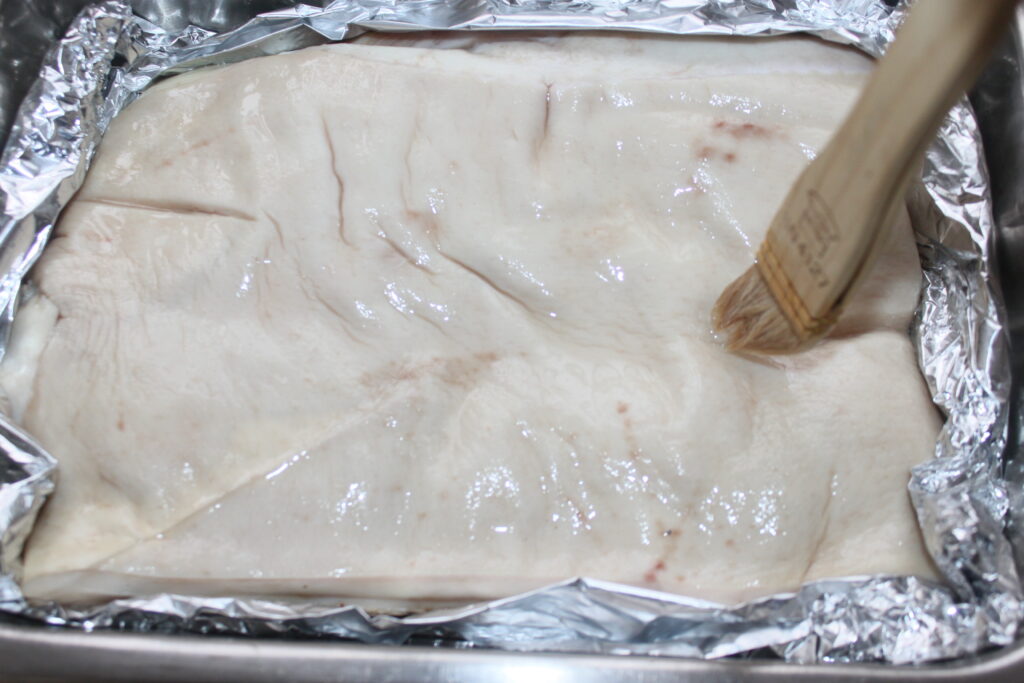
Wipe the skin with absorbent paper.

Then brush white spirit vinegar all over the skin.
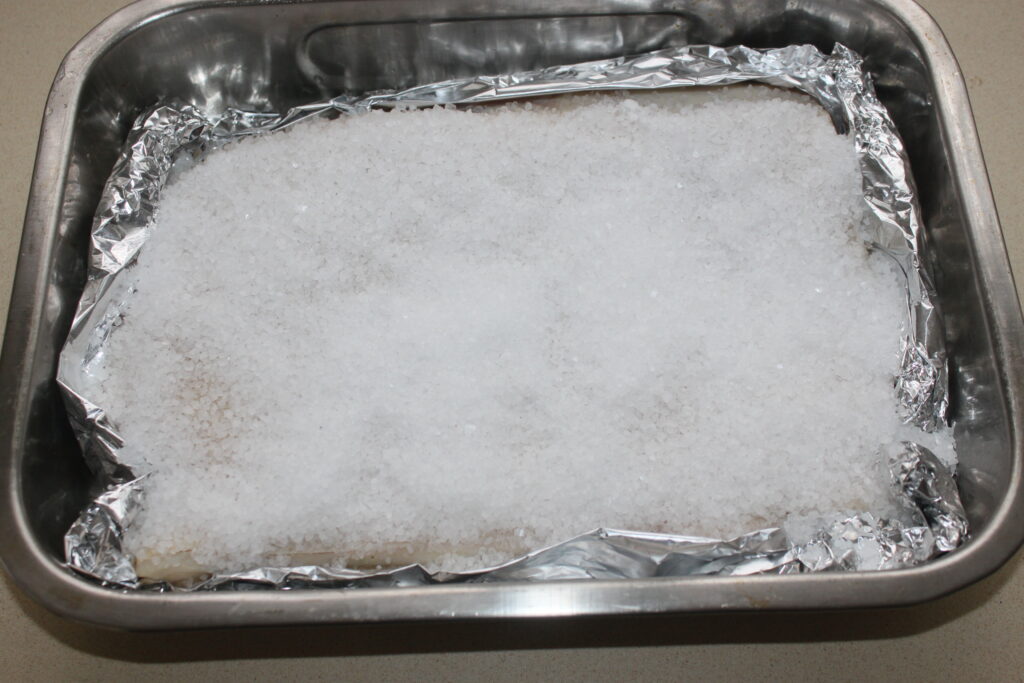
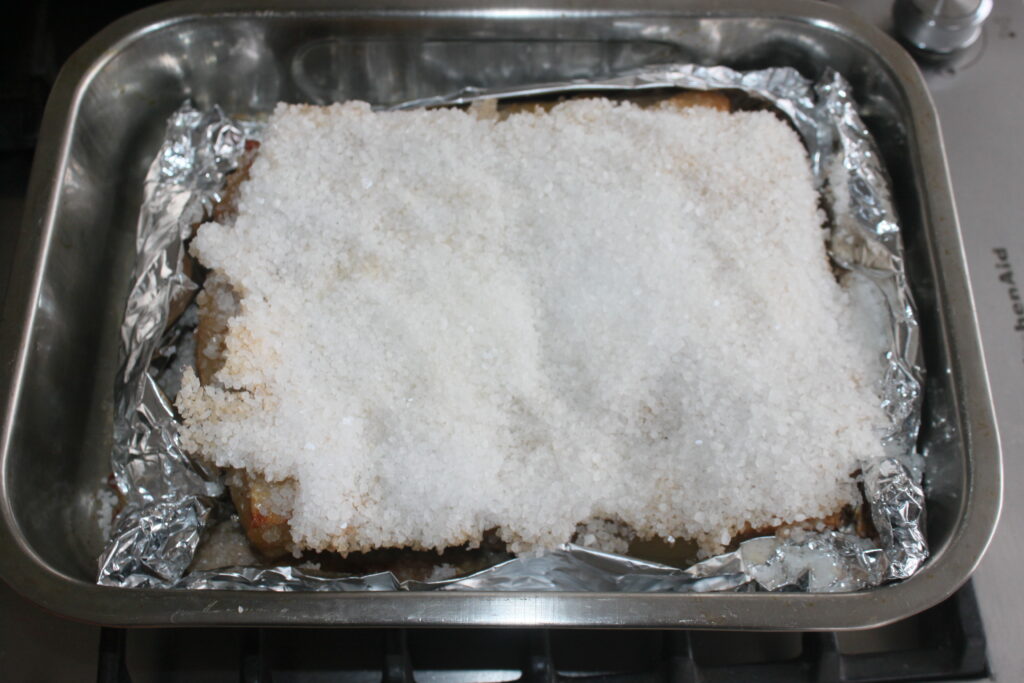
Then pour coarse salt over the entire surface of the skin, to a good thickness. I used about 250g of coarse salt for the piece I had.
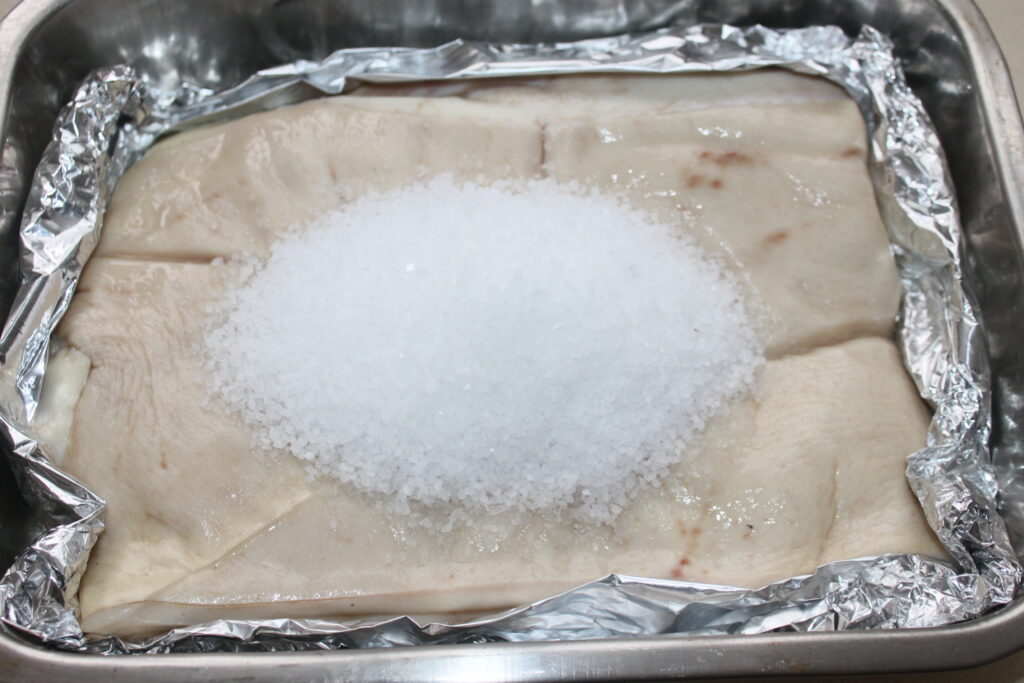
A generous crust of coarse salt is essential.
La cuisson
Then bake for 1 hour at 180°C.
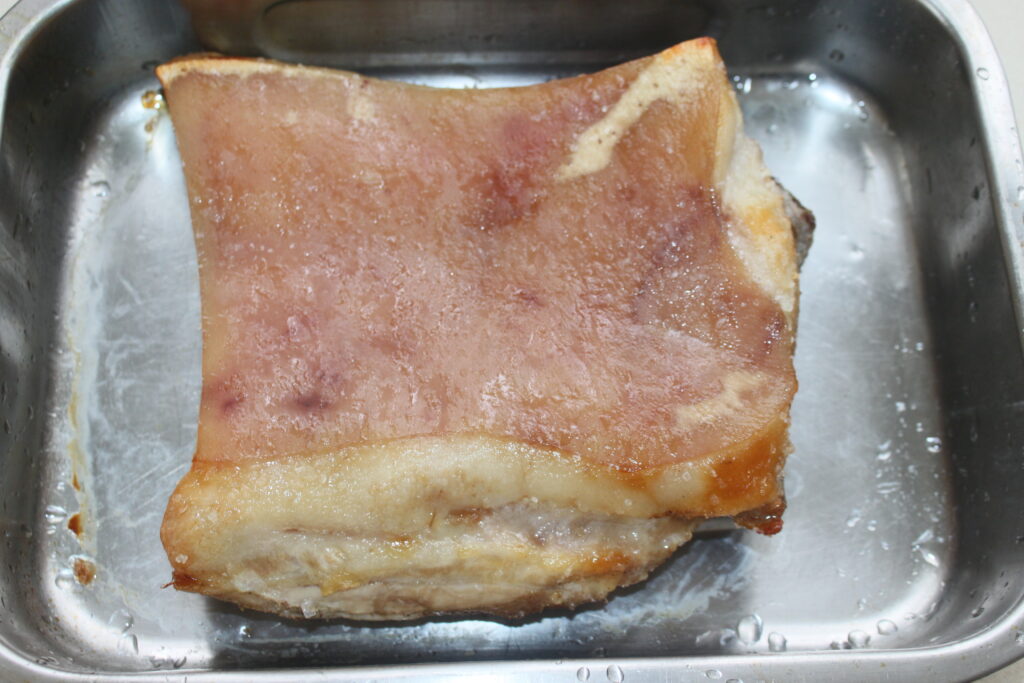
Let the meat cool, then remove all the salt – without rinsing! Scrape with a knife as much as possible. Return the meat, skin side up, to the pan without the foil.
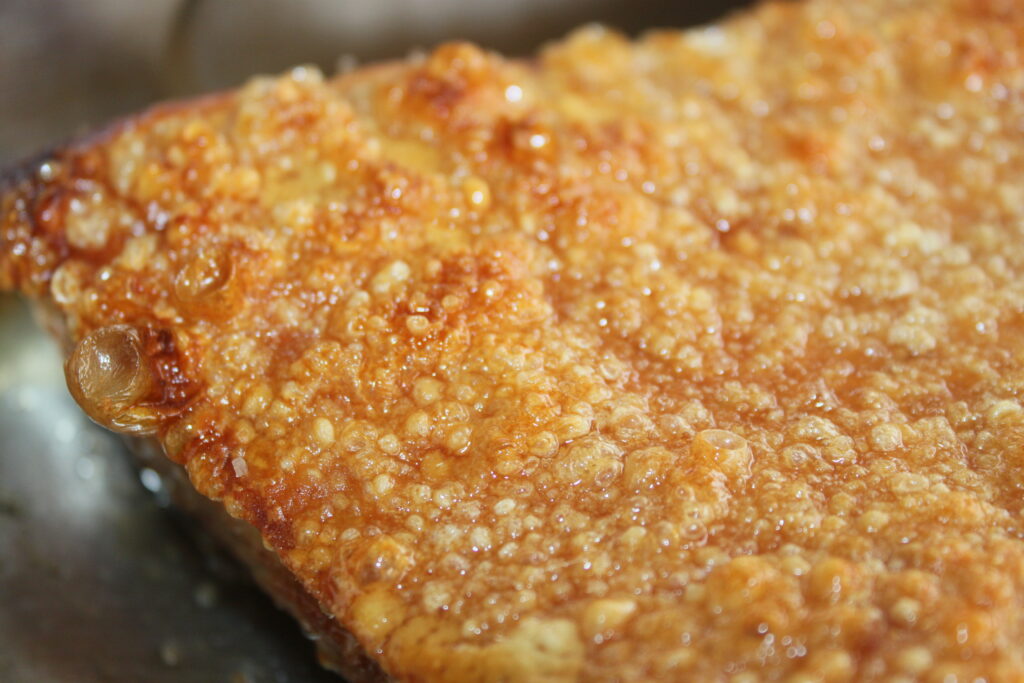
Set the oven to the “grill” function only. Do not place the dish too close to the heating elements, but approximately in the first third of the bottom of the oven. Grill for about 30 minutes, depending on your oven and the meat, which must not burn. The skin will “blow” and become extra-crispy.
Take out the meat and cut the skin with a saw, then the flesh underneath with a knife.
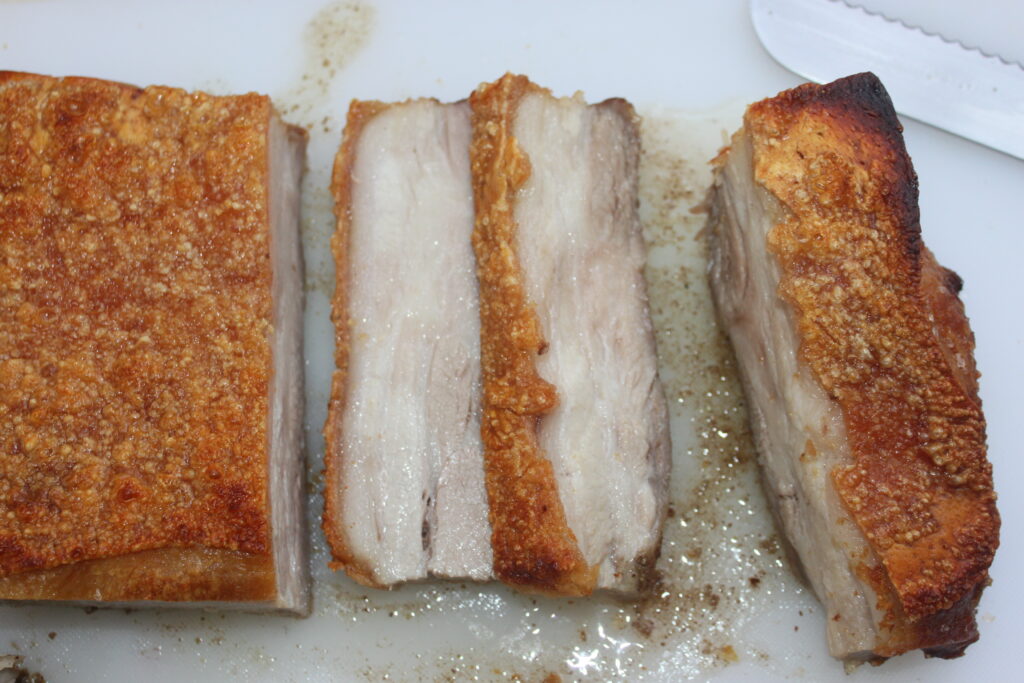
Enjoy it straight away with plain rice and a few green vegetables!

Poitrine de porc extra-croustillante
Ingredients
Instructions
- Pour cette recette, choisissez le morceau de viande de la taille de votre choix. Il faut silmplement demander la poitrine de porc, avec la peau.
- Retournez la poitrine côté chair sur une planche. Arrosez de vin chinois sur toute la surface (pas sur la peau donc). Saupoudrez ensuite d’épices « 5 parfums » , de sel et de poivre blanc. Encore une fois, uniquement côté chair.
- Retournez la viande sur un morceau de papier d’aluminium (ou 2 qui se chevauchent si le morceau de viande est trop grand).
- Refermez le papier d’aluminium autour de la viande, pour ne laisser apparent que la peau. Piquez la peau avec la pointe d’un couteau, ou un pic à brochette en métal. Il ne faut piquer que la peau sans enfoncer dans la chair. Sinon la viande relâchera du jus et empêchera la peau de devenir croustillante par la suite. Il faut piquer partout, ce qui est un peu fatigant. J’ai fait des trous tous les 5mm environ
- Essuyez la peau avec un papier absorbant.
- Passez ensuite au pinceau du vinaigre blanc cristal sur toute la surface de la peau.
- Versez ensuite du gros sel sur toute la surface de la peau, en mettant une bonne épaisseur. J’ai mis environ 250g de gros sel pour le morceau que j’avais.
- Il faut donc une belle croûte géénreuse de sel.
- Mettez ensuite à cuire 1 heure sur chaleur tournante à 180°C.
- Laissez tiédir la viande, puis enlevez tout le sel, sans le rincer ! Il faut gratter au couteau au maximum. Remettez la viande, peau apparente vers le haut, dans le plat, sans le papier d’aluminium.
- Mettez le four sur fonction « grill » uniquement. Ne mettez pas le plat trop près des résistances, mais environ dans le premier tiers du bas du four. Laissez griller environ 30 minutes, tout en adaptant à votre four et à la viande qui ne doit bien sûr pas brûler. La peau va « souffler » et devenir extra-croustillante.
- Sortant la viande et coupez la peau avec une scie, puis la chair en dessous avec un couteau.
- Il faudra la déguster sans attendre avec un riz nature et quelques légumes verts !