

During my “inverted puff pastry” workshops, I am often asked what can be done with the dough scraps. Because unlike shortcrust or sweet dough, it cannot be rolled into a ball and reused in the same way. You will lose some of the pretty puff pastry, but you can still make delicious puff pastries for the aperitif! Here is a good way to recycle it in the most delicious way!
For savory puff pastries:
- the rest of your puff pastry
- grated gruyere cheese
- sesame
- zaatar (this is an option and you can put whatever you want! )
- black pepper from the mill
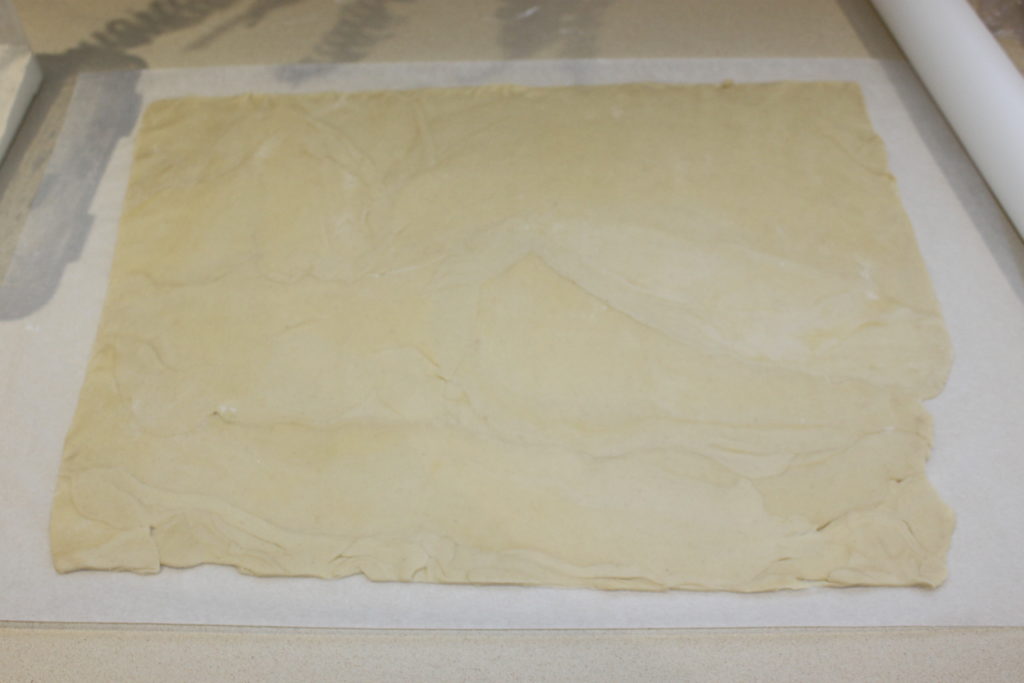
First, remove the rest of your puff pastry from the refrigerator. We will have to untangle all this. I took the rest of my homemade inverted puff pastry, which I had used for a millfeuille. We always end up with a lot of falls!
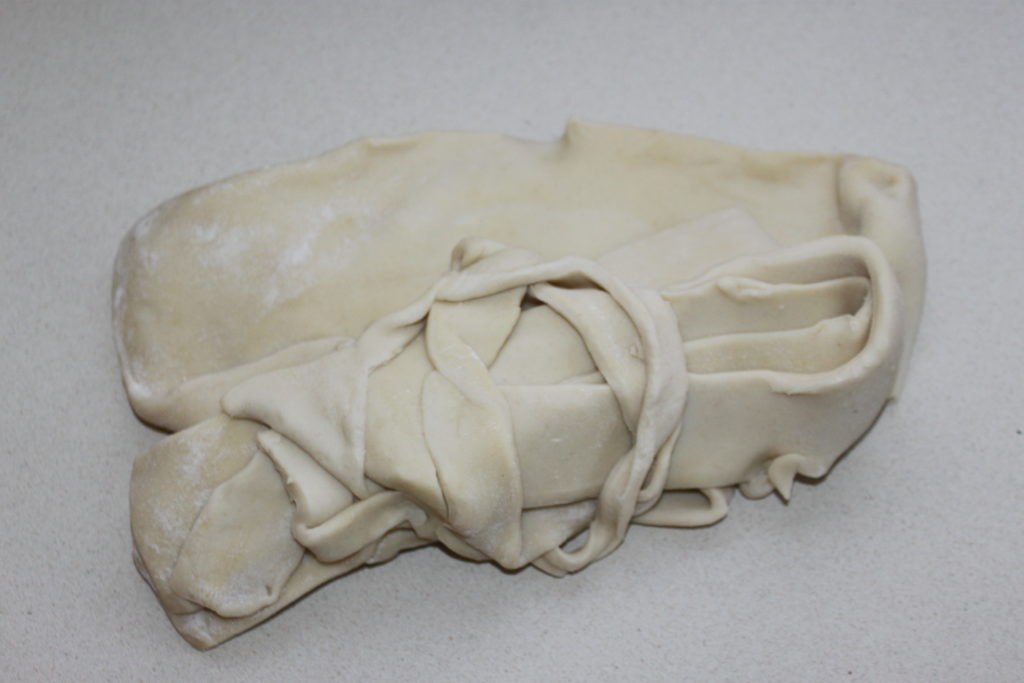
Do not ball up. Lay the dough flat on parchment paper and make a patchwork quilt, cutting the dough as needed. I try to make a rectangle as much as possible and at this point, who cares how thick the dough pieces are? Laying the dough flat keeps the puff pastry in place.

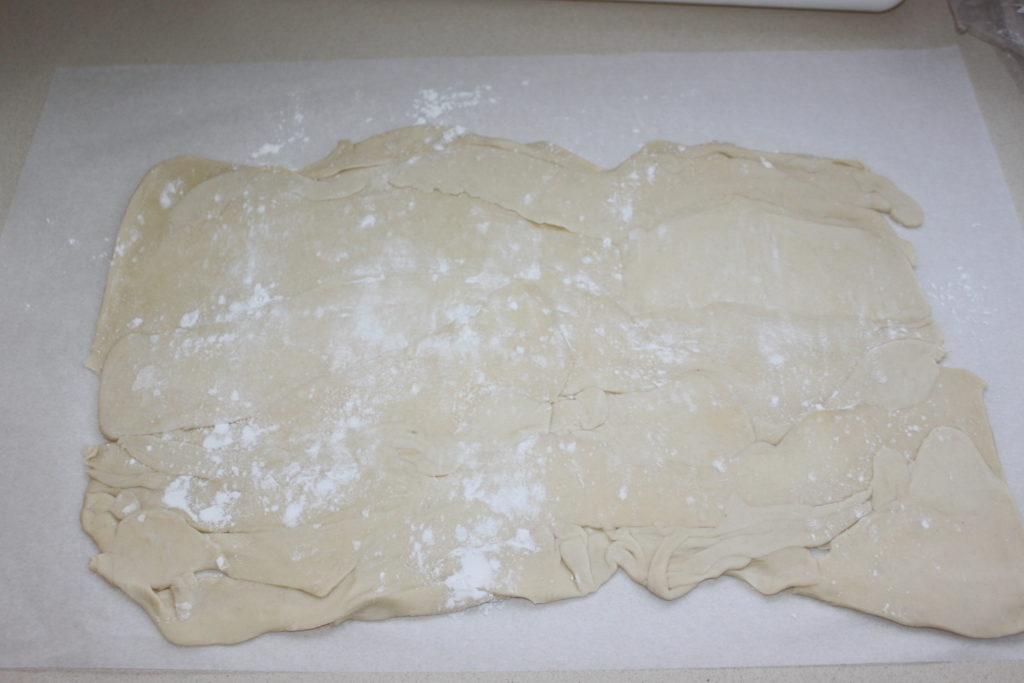
Flour the dough and gently flatten with a rolling pin. You’ll have to turn the dough over to flour the underside as well, but that’s pretty tricky, as the dough is leaving in pieces at the moment.
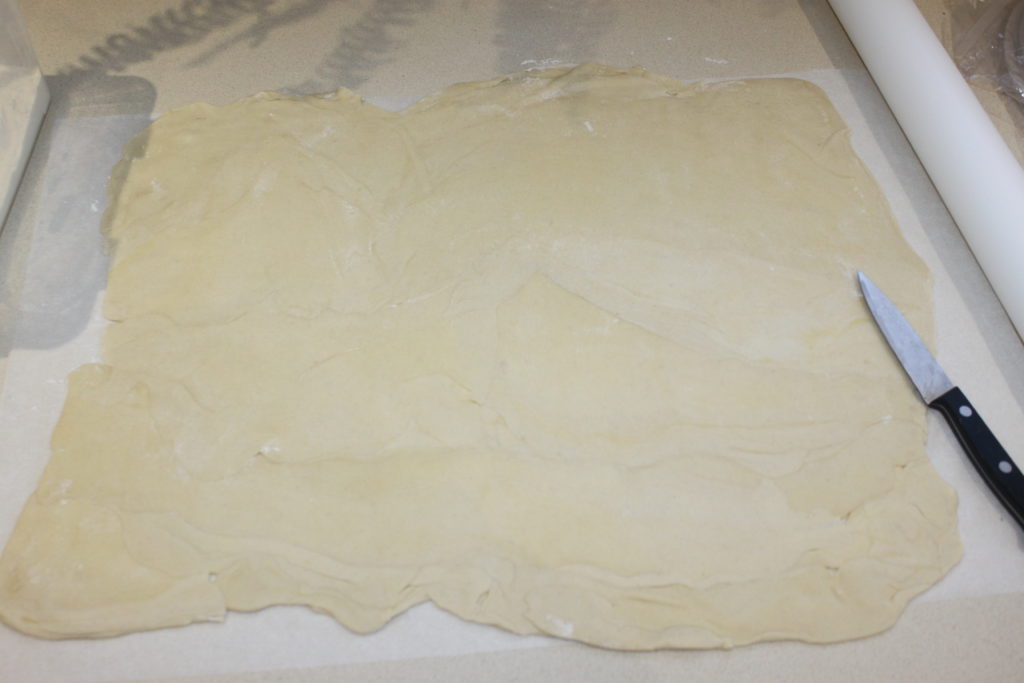
With the rolling pin, even out the thickness of the dough and then with a knife, cut the edges to make a rectangle.
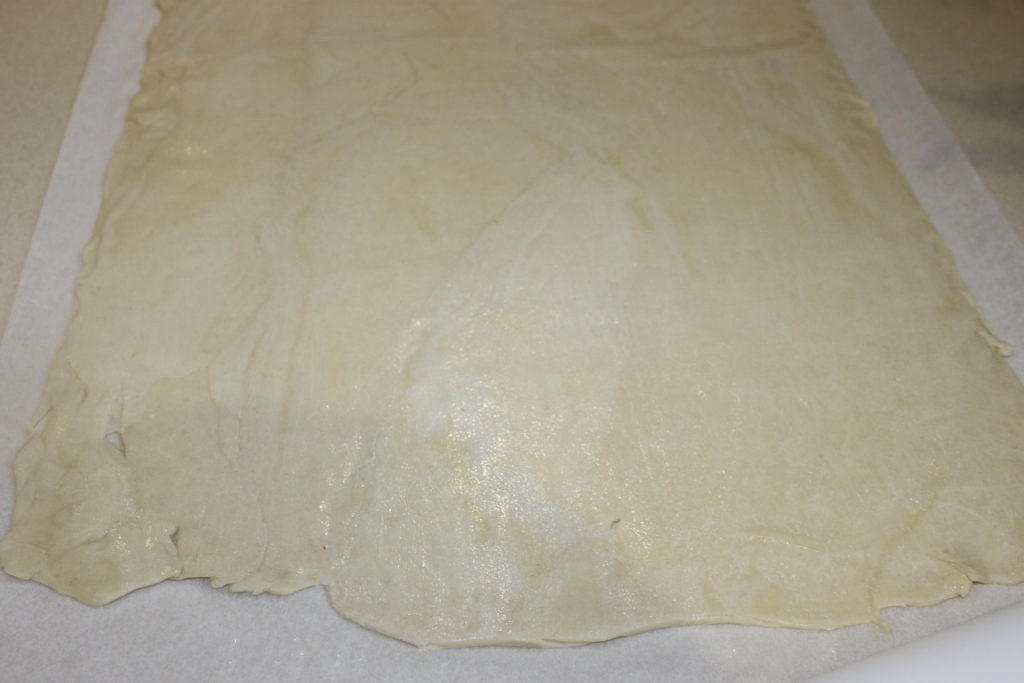
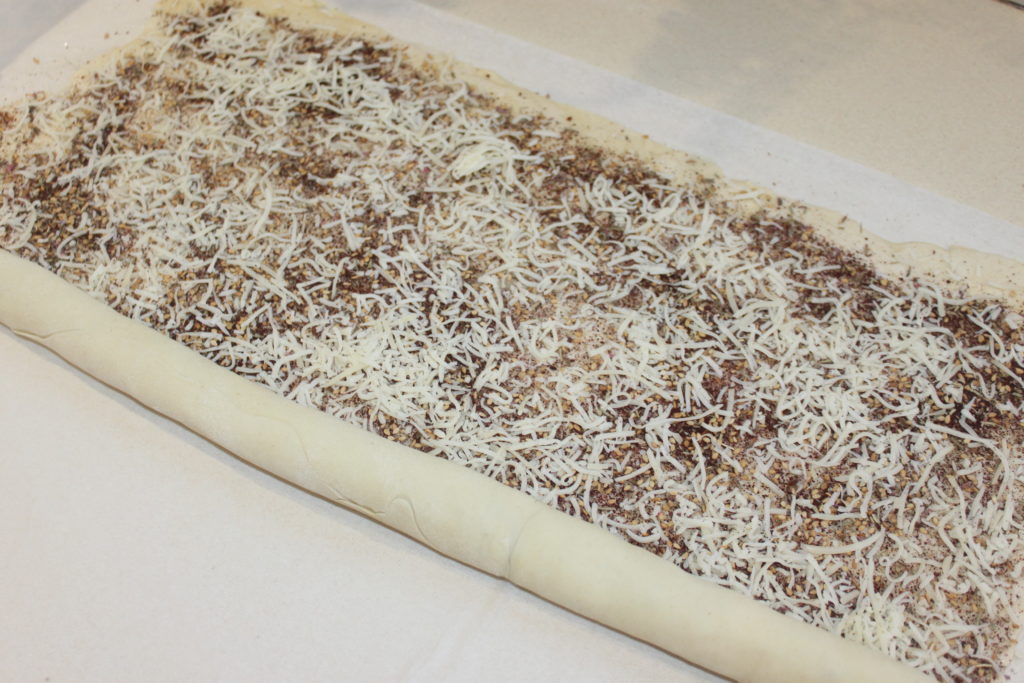
This time, wet the dough on the surface, either with a brush or with your hands. The entire surface should be wet, not soggy. The dough should stick, not be slippery!
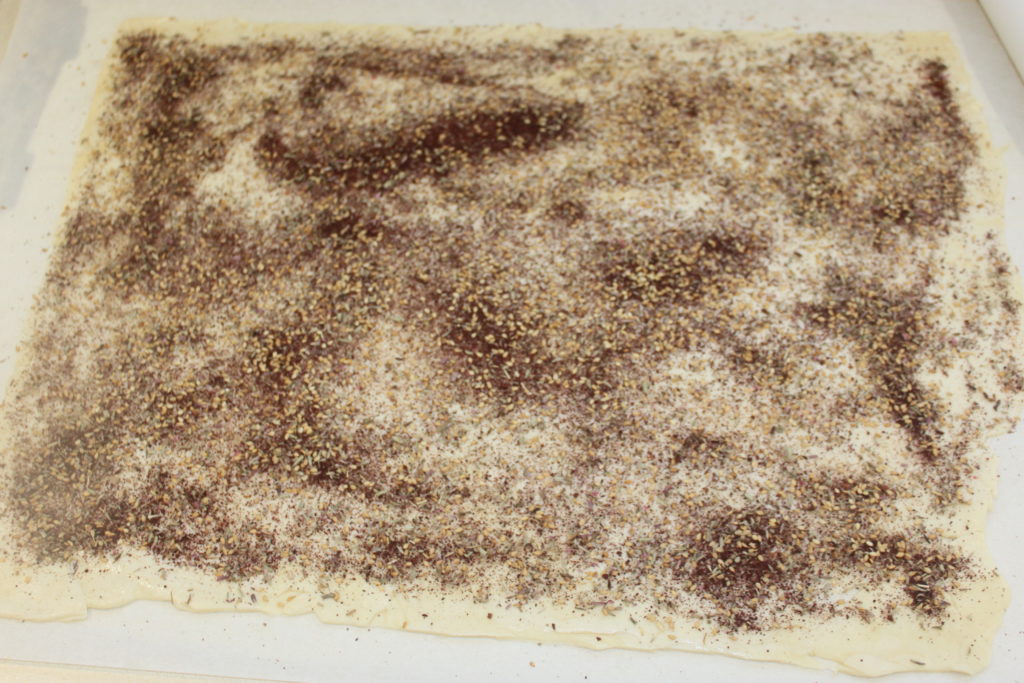
Sprinkle with spices, sesame, whatever you want to put on it. Here, I put homemade zaatar that I always keep in a jar. My recipe is HERE! There is already sesame in the zaatar, but I’m adding more here.
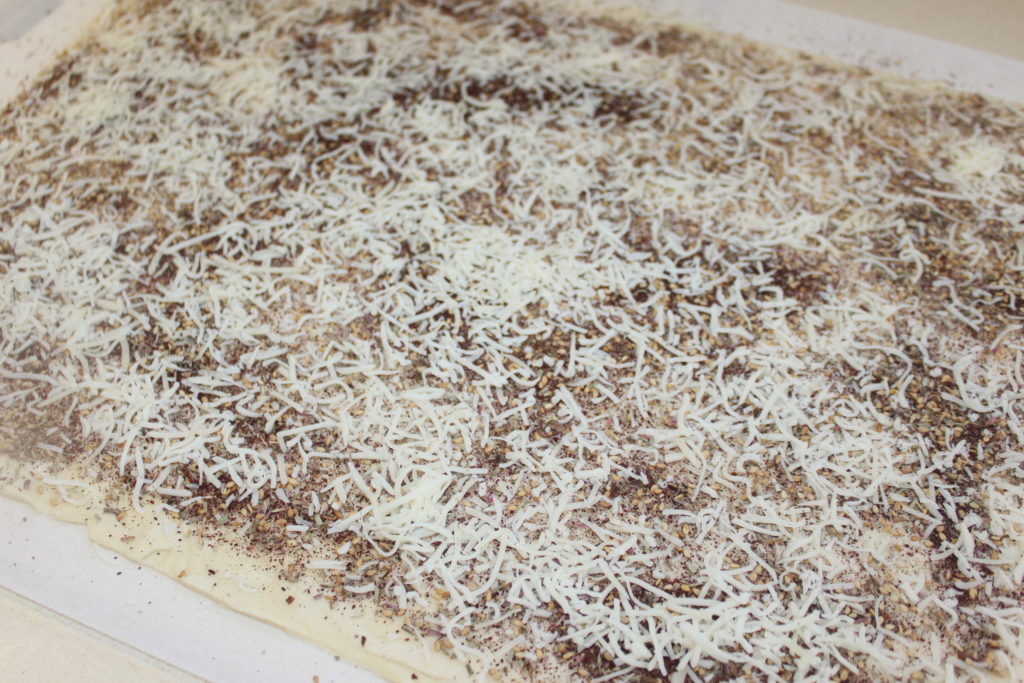
Sprinkle with grated cheese of your choice and pepper to taste.
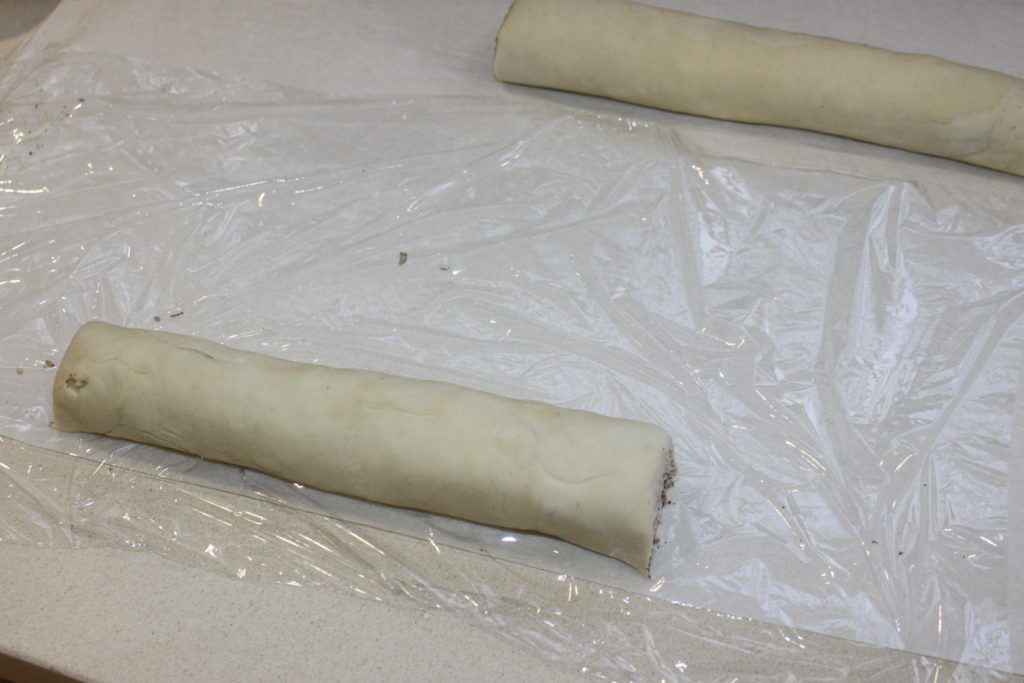
Roll up the dough into a ball, making sure you start out tight.
If the dough is too large, cut it in half if necessary and wrap in cling film.
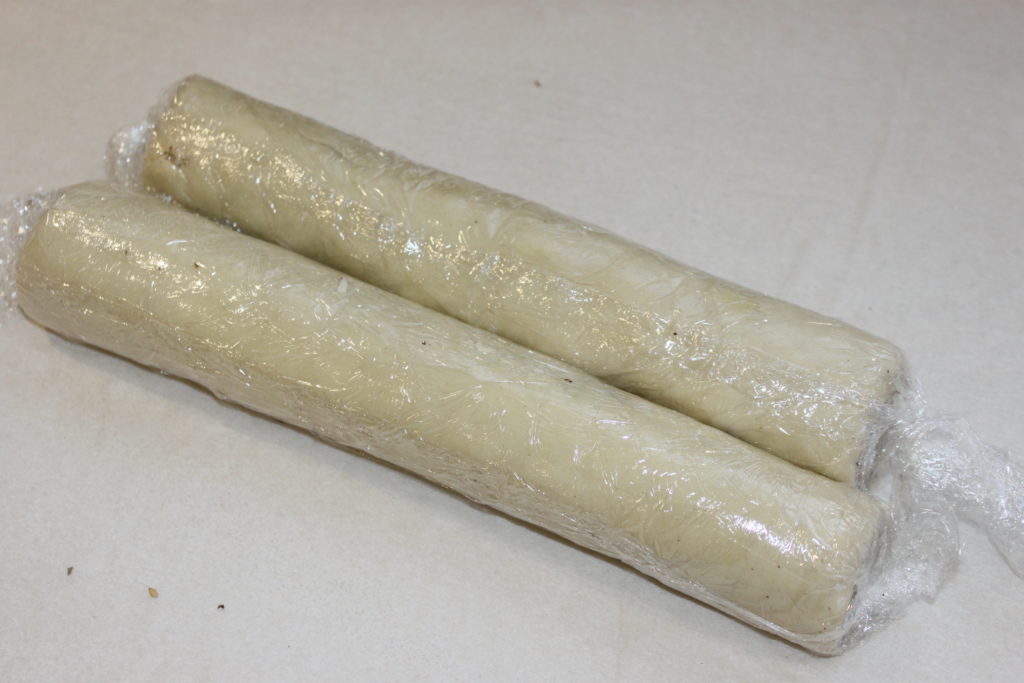
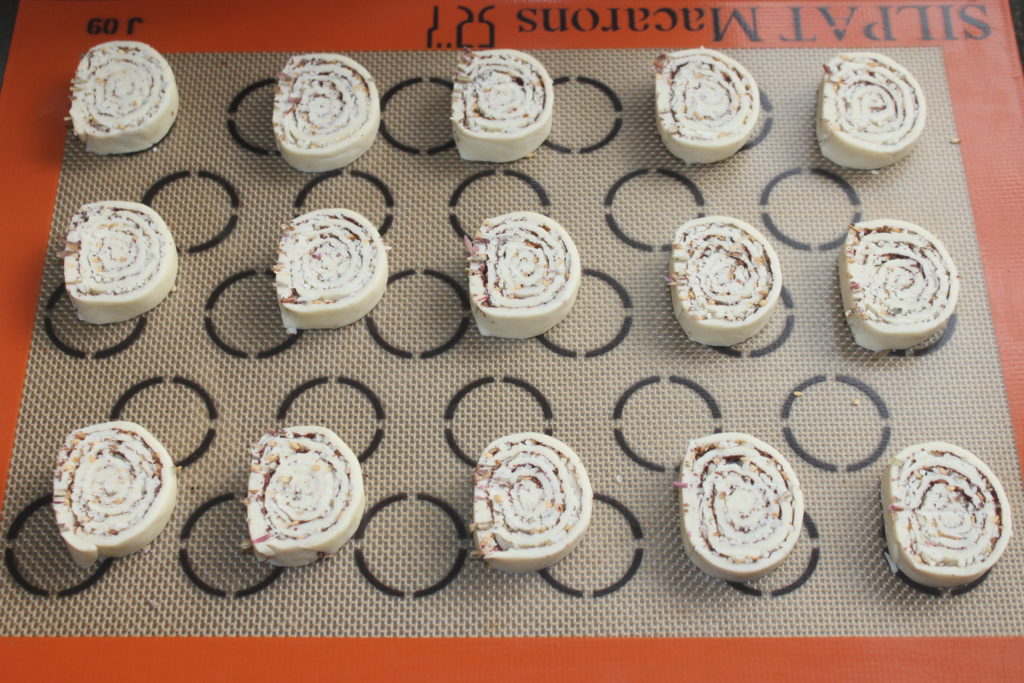
Chill for at least 3-4 hours. Preheat your oven to 205°C. Cut 8mm to 1cm thick slices.
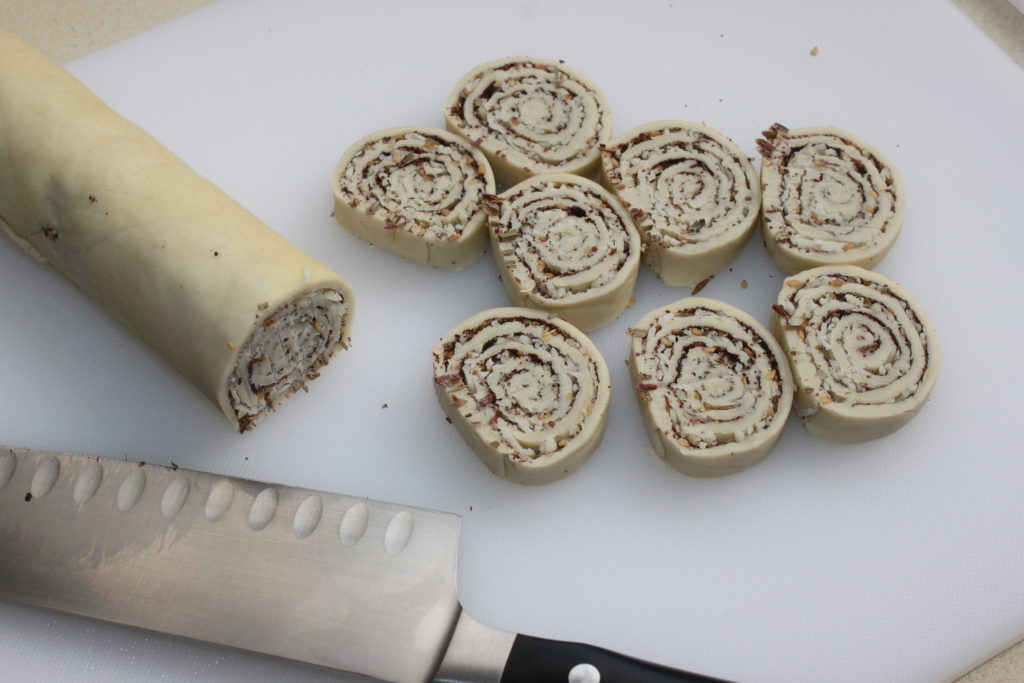
Arrange slices on a baking sheet lined with parchment paper or a silicon mat.
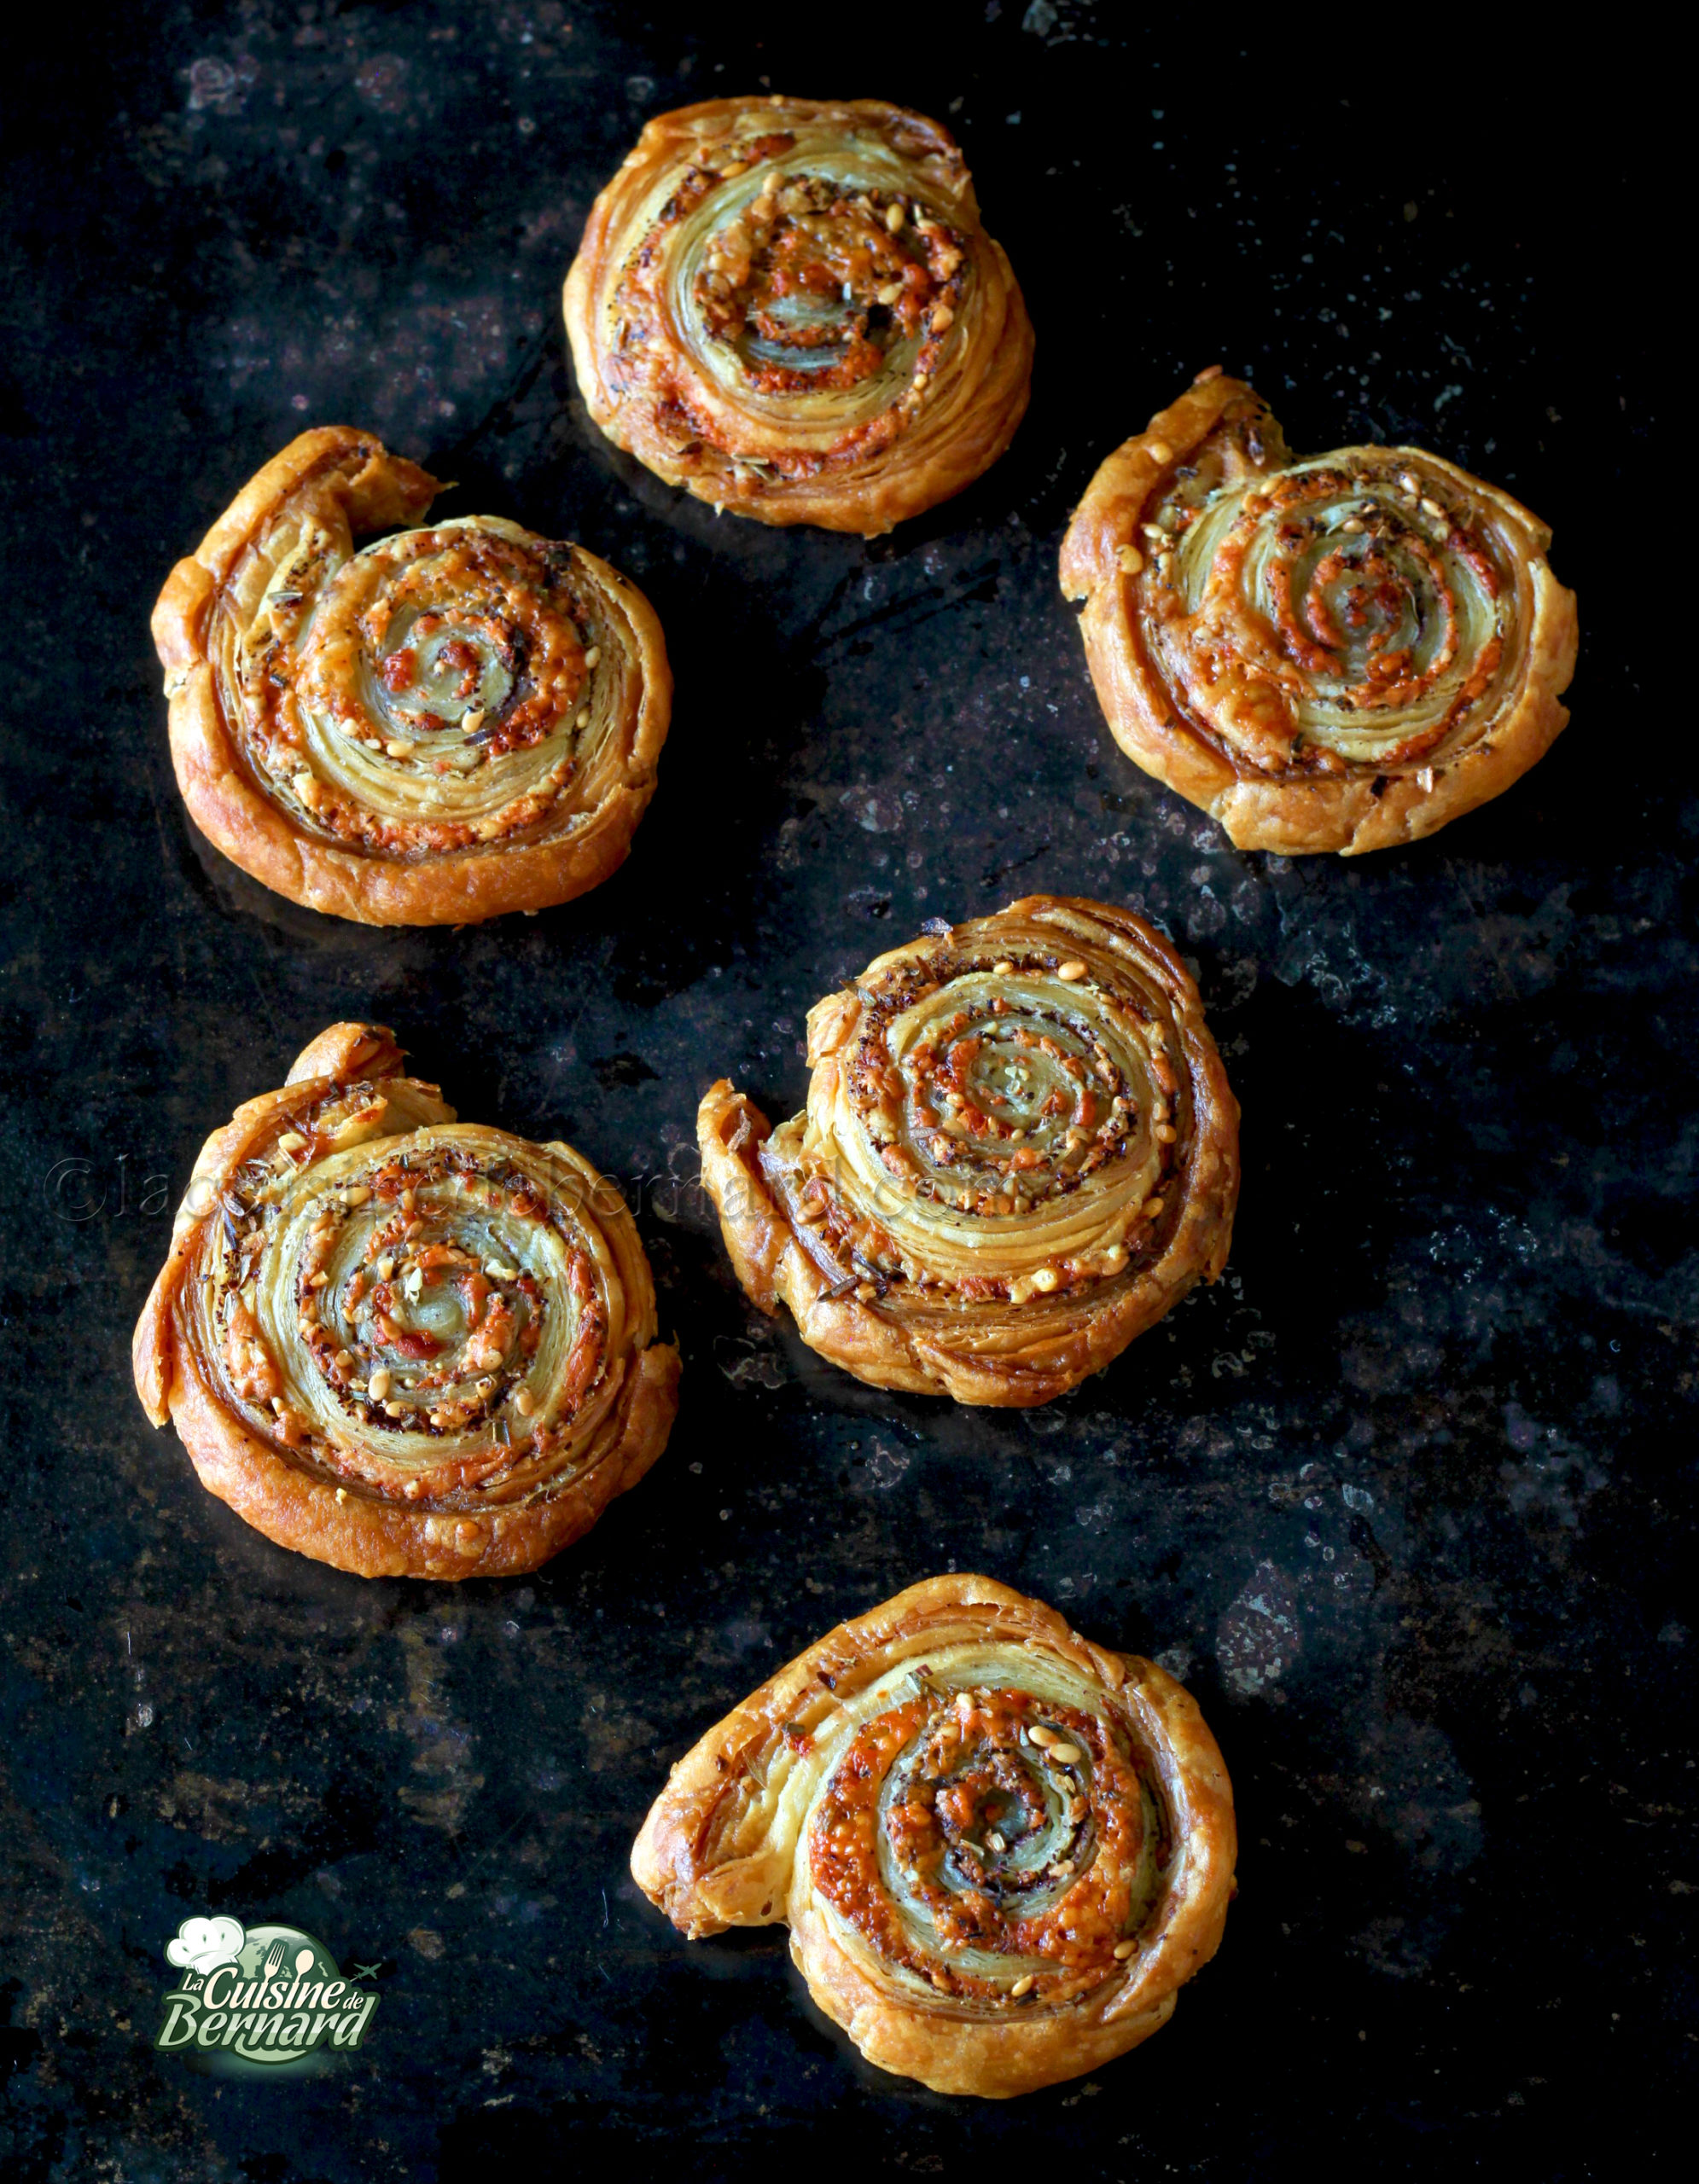
Cook for 15 to 20 minutes. The puffs should be golden brown.
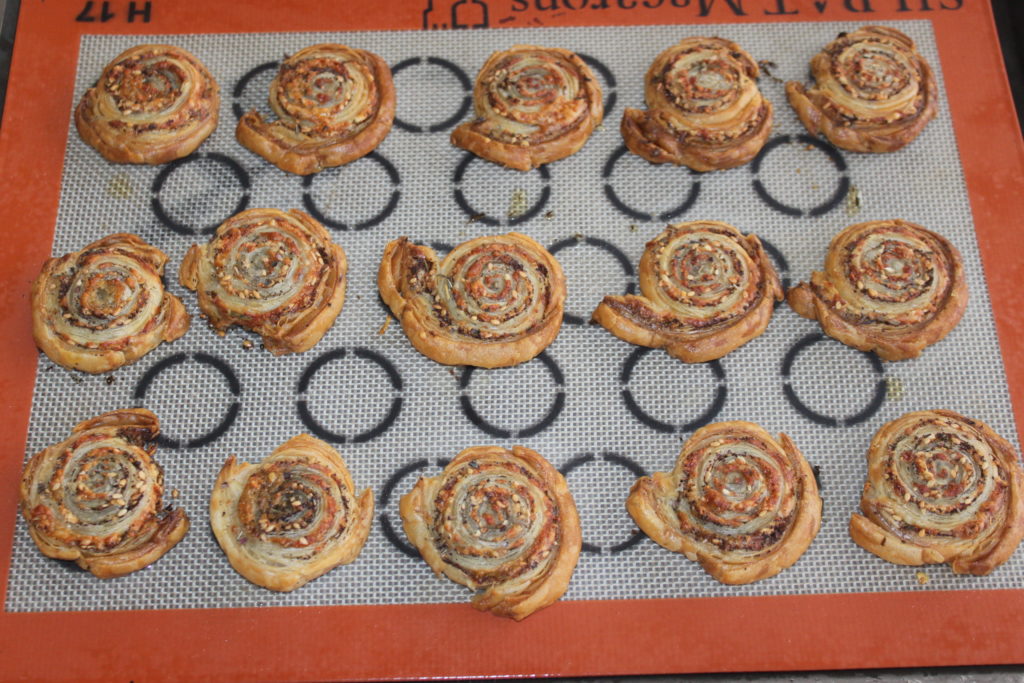
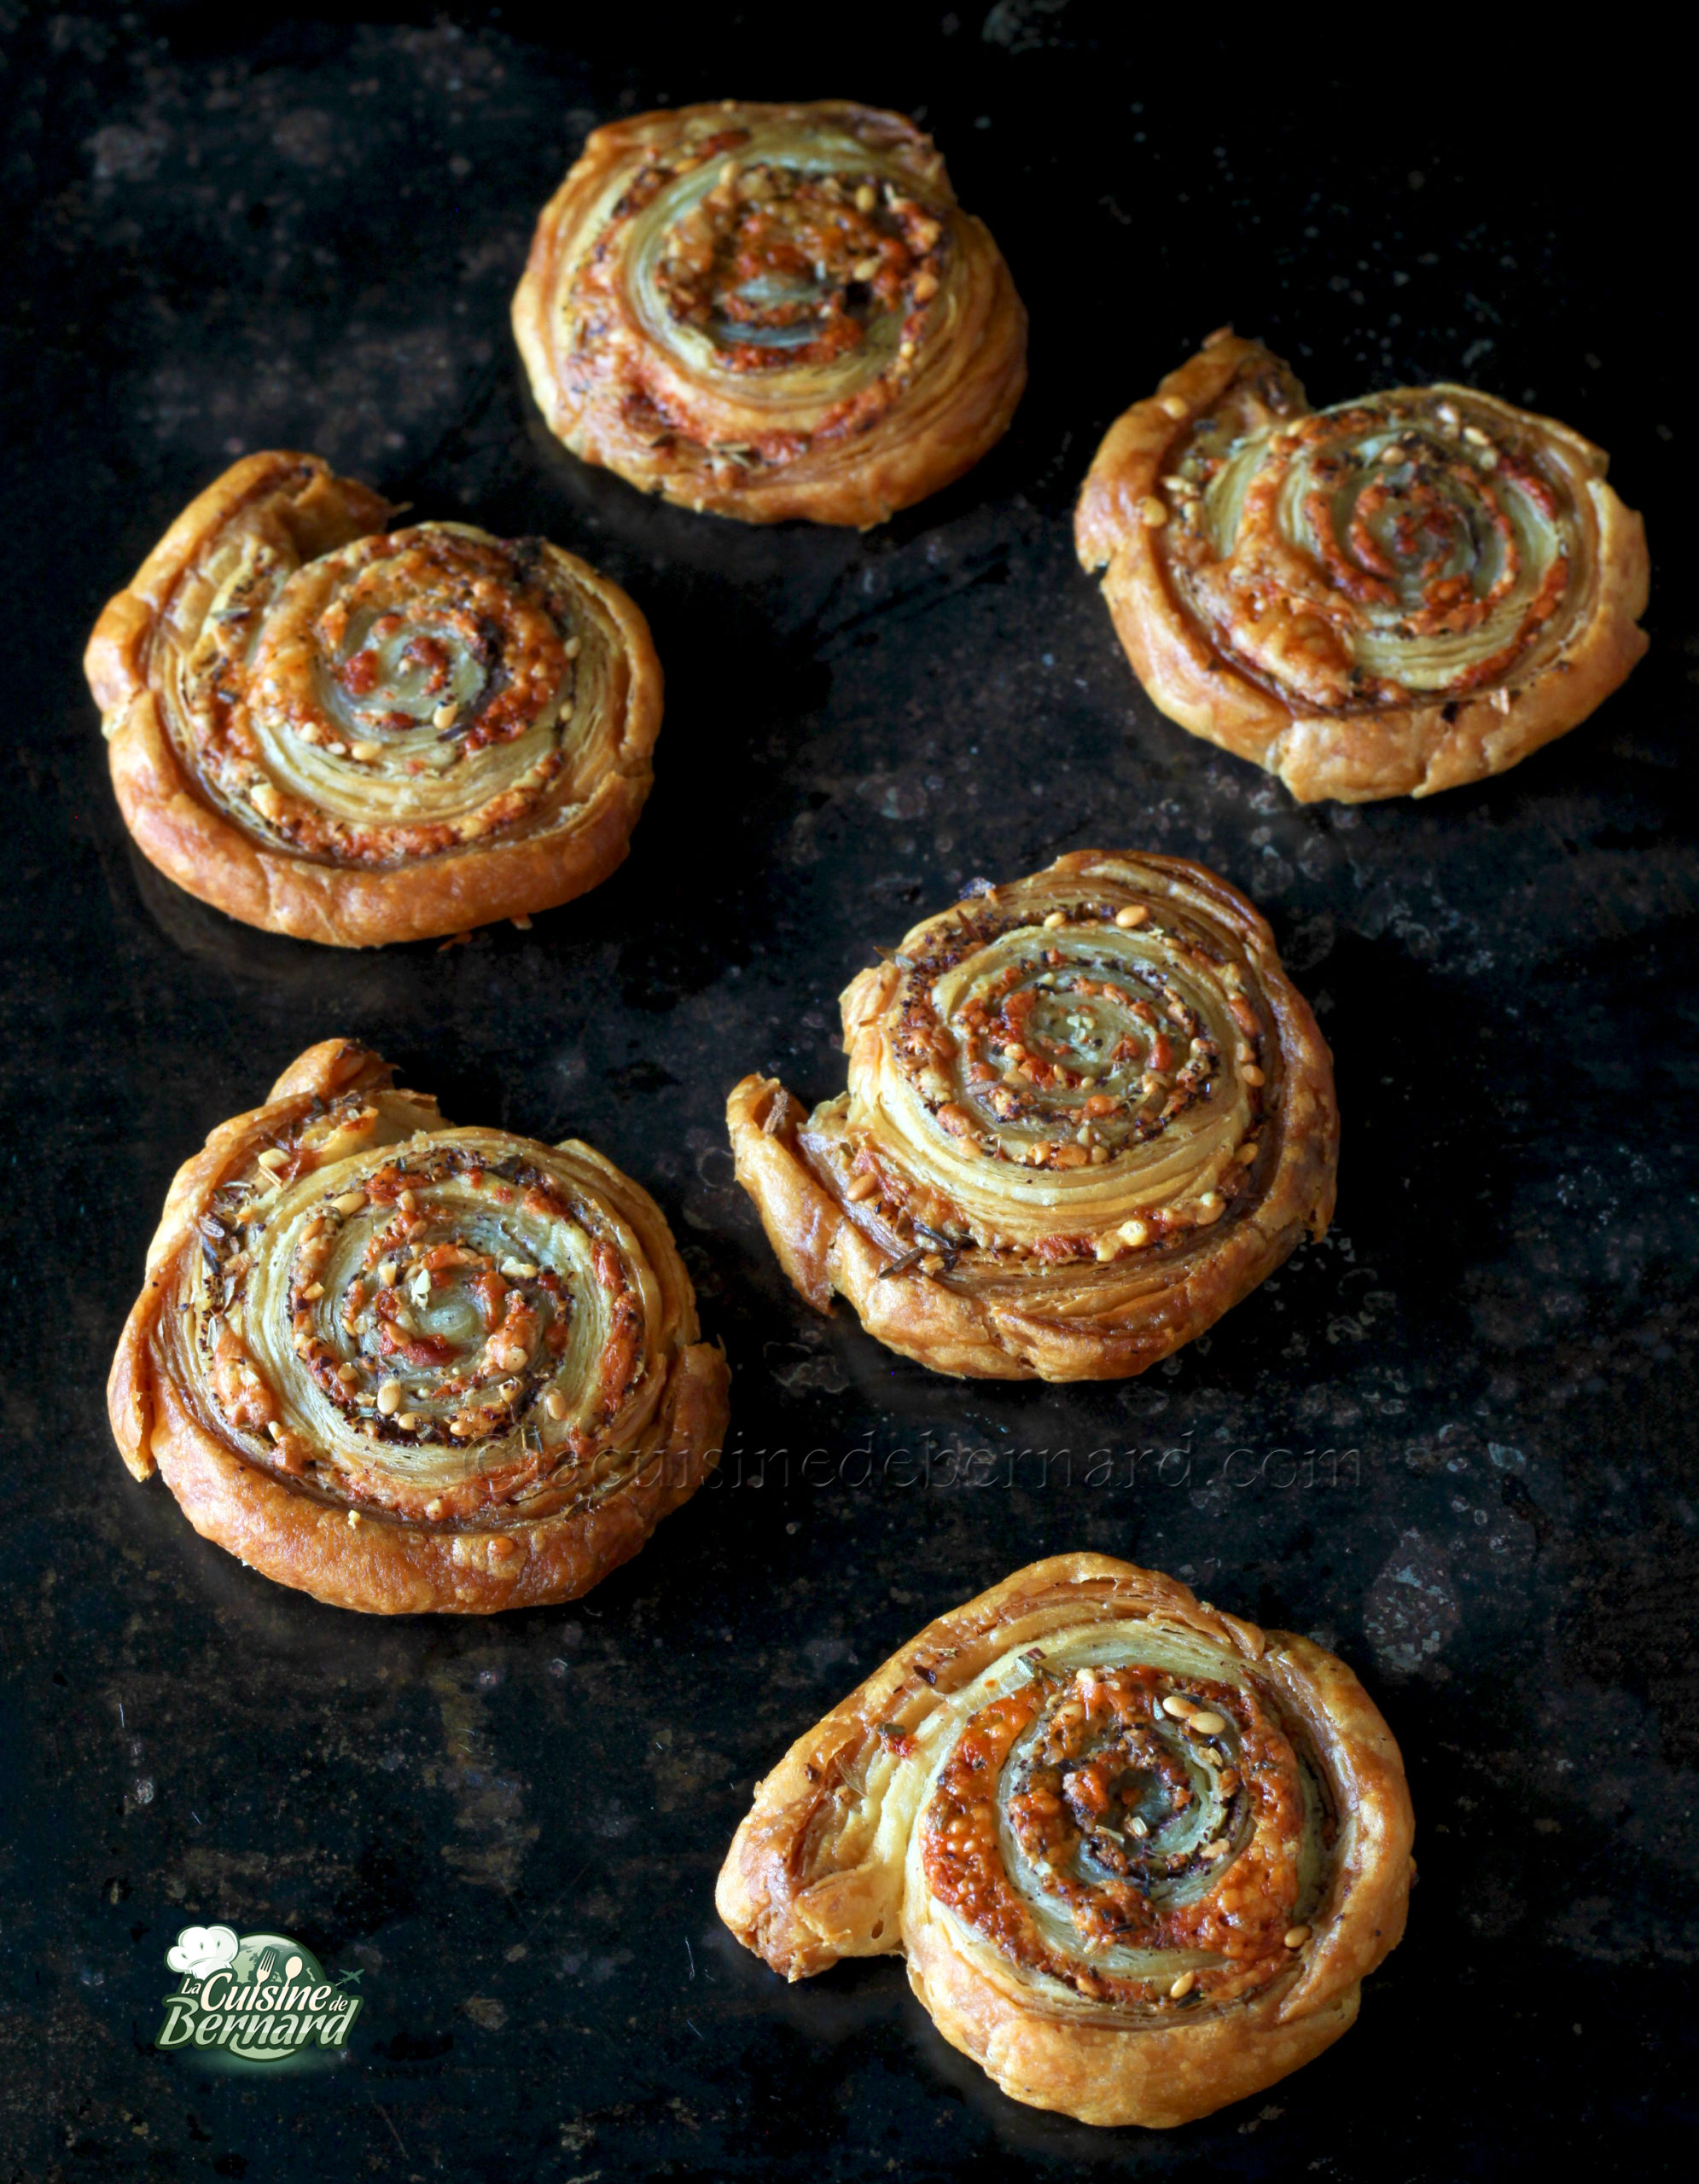
Enjoy them warm as an aperitif!

Feuilletés salés avec reste de pâte feuilletée maison
Ingredients
Instructions
- Tout d’abord, sortez le reste de votre pâte feuilletée du réfrigérateur. Il va falloir démêler tout cela. J’ai pris le reste de ma pâte feuilletée inversée maison, que j’avais utilisé pour un millfeuille. On se retrouve toujours avec plien de chutes !
- Ne mettez pas le tout en boule. Mettez à plat la pâte sur un papier sulfurisé et faites un patchwork, en coupant la pâte au besoin. J’essaie de faire un rectangle autant que possible et à ce stade, on se fiche de l’épaisseur des bouts de pâte. Mettre la pâte à plat permet de garder le feuilletage.
- Farinez la pâte et aplatissez doucement au rouleau à pâtisserie. Il faudra retourner la pâte pour fariner aussi le dessous, mais c’est assez délicat, car la pâte part pour le moment en morceaux.
- Avec le rouleau, égalisez cette fois l’épaisseur de la pâte puis avec un couteau, coupez les bords pour avoir un rectangle.
- Cette fois, mouillez la pâte sur la surface, soit au pinceau, soit avec les mains. Toute la surface doit être mouillée, sans être détrempée. La pâte doit coller et non être glissante !
- Saupoudrez d’épices, de sésame, de ce que vous voulez y mettre. Ici, j’ai mis du zaatar maison que je garde toujours dans un pot. Ma recette est ICI ! Il y a déjà du sésame dans le zaatar, mais j’en ajoute ici davantage.
- Parsemez ensuite de fromage râpé de votre choix, puis poivrez à votre goût.
- Enroulez la pâte en boudin en serrant bien au départ. Si le boudin de pâte est trop grand, coupez-le au besoin en deux puis mettez dans du film étirable.
- Mettez au frais au moins 3-4 heures. Préchauffez votre four sur chaleur tournante à 205°C. Coupez des tranches de 8mm à 1cm d’épaisseur.
- Disposez des tranches sur une plaque à pâtisserie garnie de papier sulfurisé ou d’un tapis silcioné.
- Faites cuire 15 à 20 minutes. Les feuilletés doivent être bien dorés. Dégustez-les tièdes au moment de l’apéritif !


I share with you a recipe from my book “Je fais mon chocolat maison” published by Solar and prefaced by Christophe Michalak! I was largely inspired by the cookies that you can find in New York, in a very famous bakery. I had already cracked the “plain” recipe in my blog, but this time I offer you the 100% chocolate version. With a touch of salt and vanilla, these cookies are completely addictive and if you start making them, beware, because you will be asked to make them all the time! I make them like there, in XXL version.
- 110g of semi-salted butter
- 75g of 55% dark chocolate
- 100g of sugar
- 125g of brown vergeoise
- 1 teaspoon of liquid vanilla
- 1 good pinch of salt
- 50g of egg
- 240g of flour
- 20g unsweetened cocoa powder
- 200g of 65% chocolate chips
Melt butter and chocolate in microwave oven. Mix the sugar, vergeoise, liquid vanilla and salt in the bowl of a mixer. Pour in the melted chocolate/butter and mix again. Add the egg. Mix and then pour in the flour and unsweetened cocoa powder. Mix for another minute to get a smooth paste. Pour in the chocolate chips and mix. The dough is ready. There is no yeast, this is intentional on my part.
Divide the dough into 5 balls. This makes for monstrous and totally decadent cookies weighing in at about 180g each.
Take a ball and tear it apart by hand to give it a very rough appearance. Having a highly textured dough ball increases the surface area of the crust. Place each giant cookie on a baking sheet and freeze for at least 4 hours or overnight.
Preheat your oven to 200°C (it’s this high heat in the oven that will sear the outer crust well before cooking the inside). Place the frozen cookies in the oven for 15 to 20 minutes. Let them cool on the baking sheet for about 10 minutes before carefully transferring them to a wire rack. The giant cookies will be at their best half an hour after baking: the inside will have had time to firm up slightly, the chocolate will still be half-melted and the crust will be crisp to perfection.


Cookies monstrueux au chocolat
Ingredients
- 110 g beurre demi-sel
- 75 g chocolat noir 55% de cacao
- 100 g sucre
- 125 g vergeoise brune
- 1 c. à café vanille liquide
- 1 pincée sel
- 50 g œuf
- 240 g farine
- 20 g poudre de cacao non sucrée
- 200 g pépites de chocolat 65% de cacao
Instructions
- Faites fondre le beurre et le chocolat au four à micro-ondes.Mélangez dans la cuve d’un batteur, le sucre, la vergeoise, la vanille liquide et le sel. Versez alors les chocolat/beurre fondus puis mélangez de nouveau. Ajoutez l’œuf. Mélangez puis versez la farine et le cacao non sucré en poudre. Mélangez pendant encore une minute pour avoir une pâte homogène. Versez les pépites de chocolat et mélangez. La pâte est prête. Il n’y a pas de levure, cela est voulu de ma part.
- Divisez la pâte en 5 boules. Cela donne des cookies monstrueux et totalement décadents d’environ 180g chacun.
- Prenez une boule et déchirez-la à la main pour lui donner une apparence très brute. Le fait d’avoir une boule de pâte très texturée augmente la surface de la croûte. Posez chaque cookie géant sur une plaque et mettez au congélateur pendant au moins 4 heures ou toute une nuit.
- Préchauffez votre four à 200 °C (c’est cette forte chaleur du four qui va bien saisir la croûte extérieure avant même de cuire l’intérieur). Mettez les cookies congelés au four pour 15 à 20 minutes. Laissez-les ensuite tiédir sur la plaque pendant une dizaine de minutes avant de les transposer délicatement sur une grille à pâtisserie. Les cookies géants seront à leur paroxysme une demi-heure après leur cuisson : l’intérieur aura eu le temps de se raffermir légèrement, le chocolat sera encore à moitié fondu et la croûte sera craquante à souhait.
Nutrition

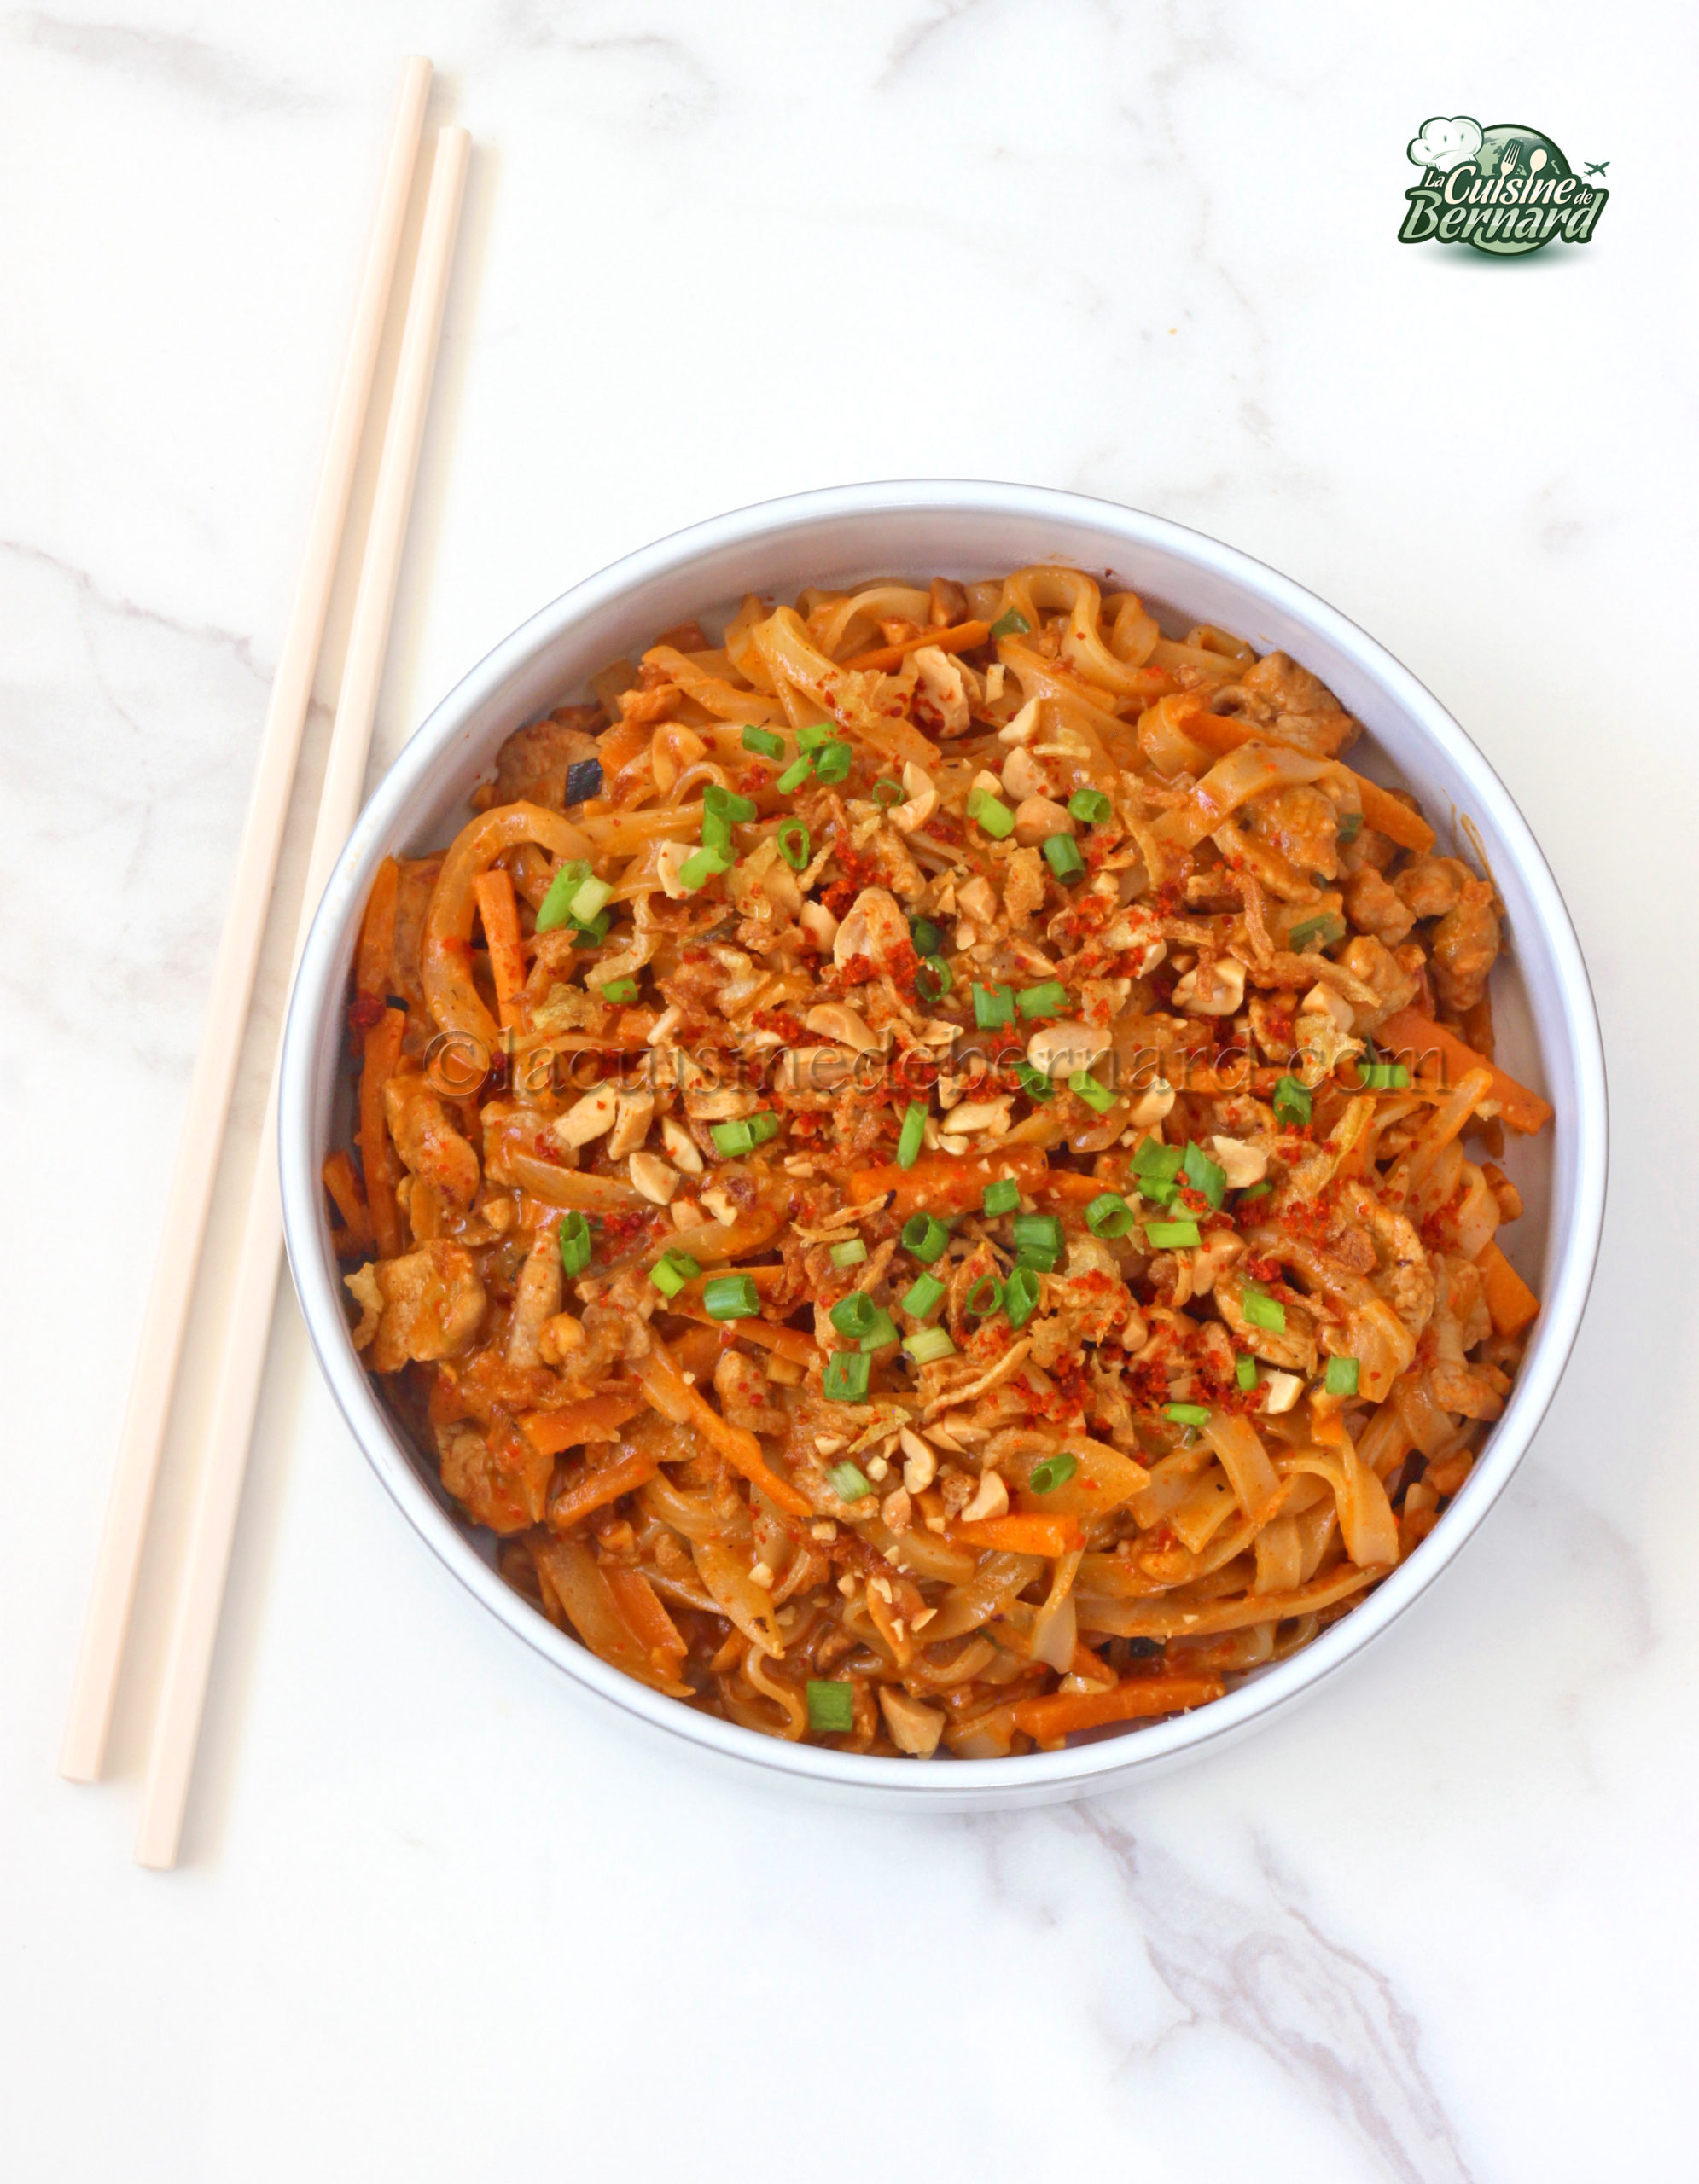
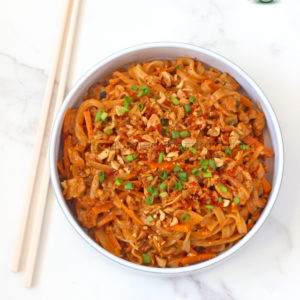
After my Asian cooking classes, I sometimes have ingredients left over. This time I had a lot of rice noodles and coconut milk. In less than 20 minutes, this dish is made and it’s a real taste bomb! Well, I’m a satay fan, so I’m not very objective. But what a delight! You can of course change the meat to the one of your choice, or make a version with shrimps or vegetarian.
For 2 persons :
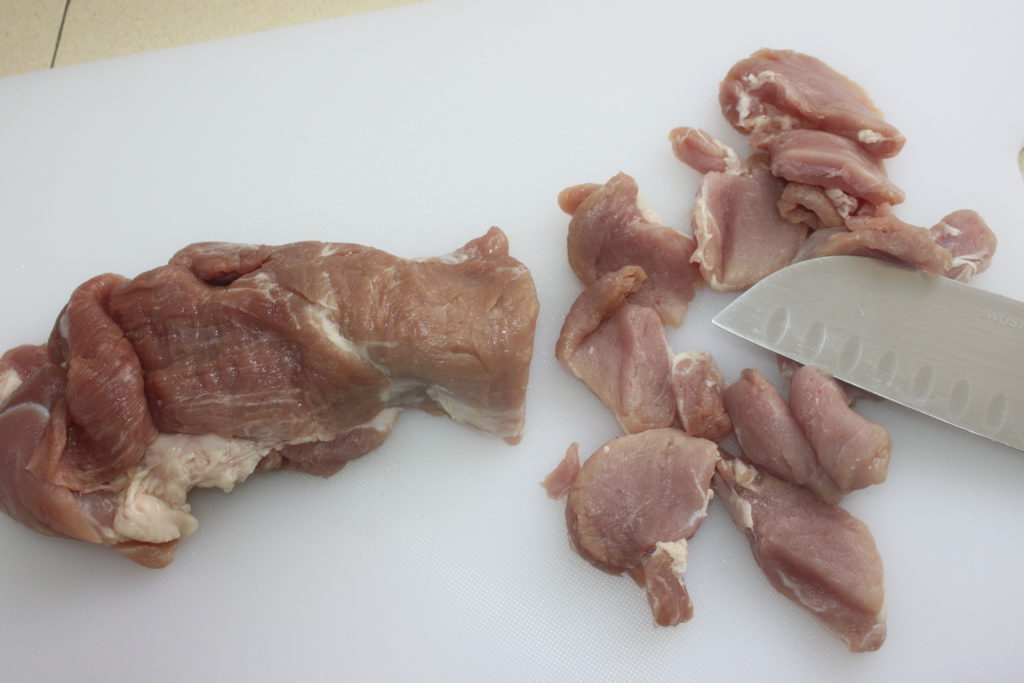
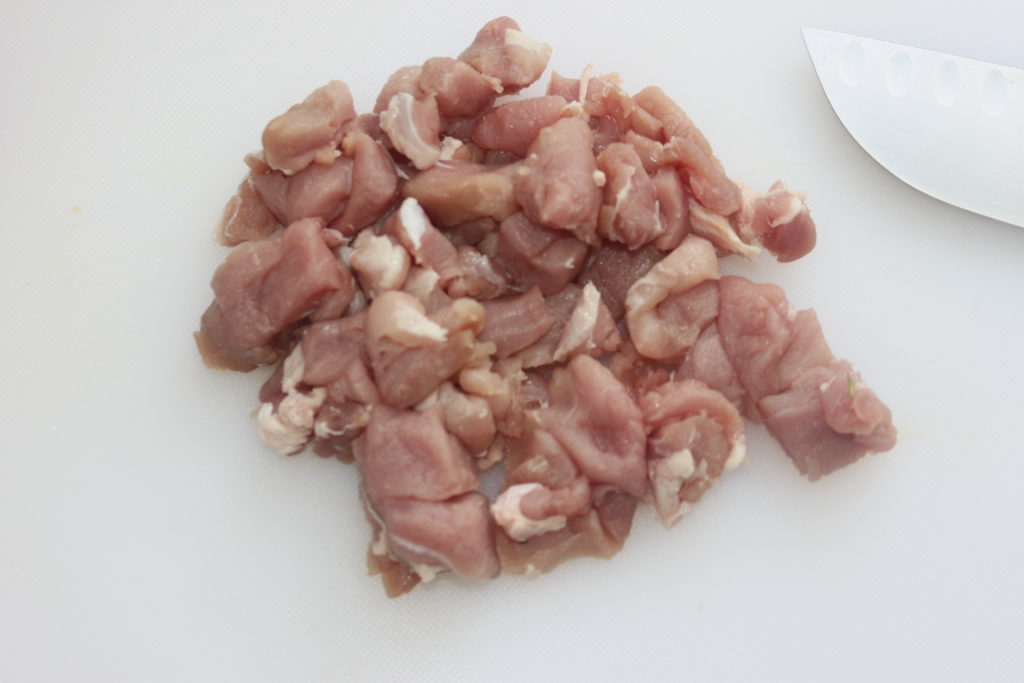
- 150g of meat, I took here some pork tenderloin
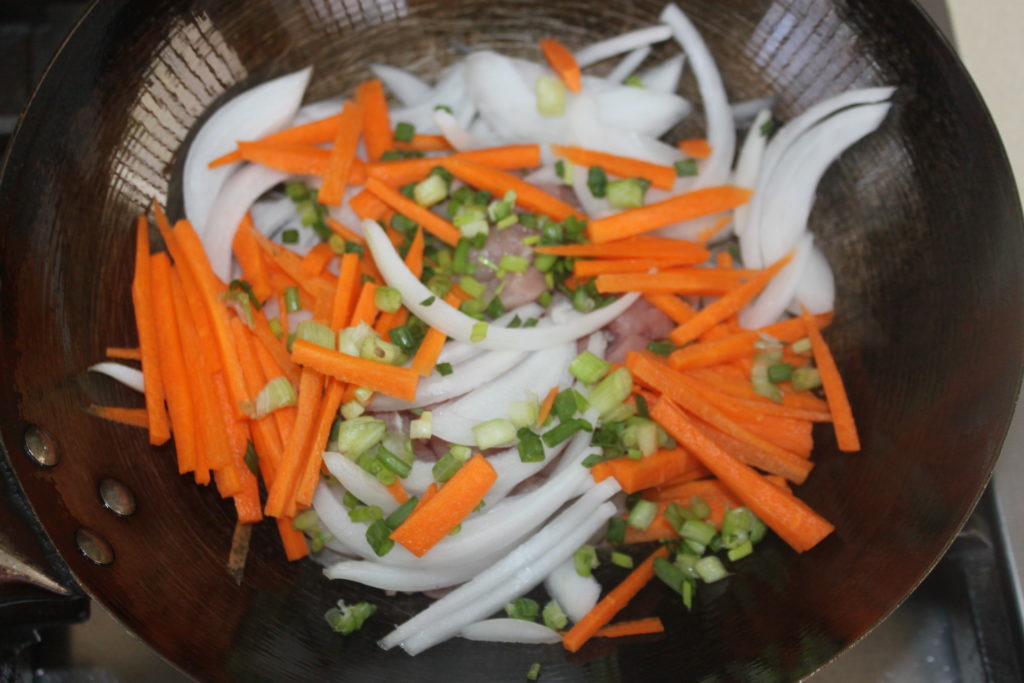
- 1/2 white onion
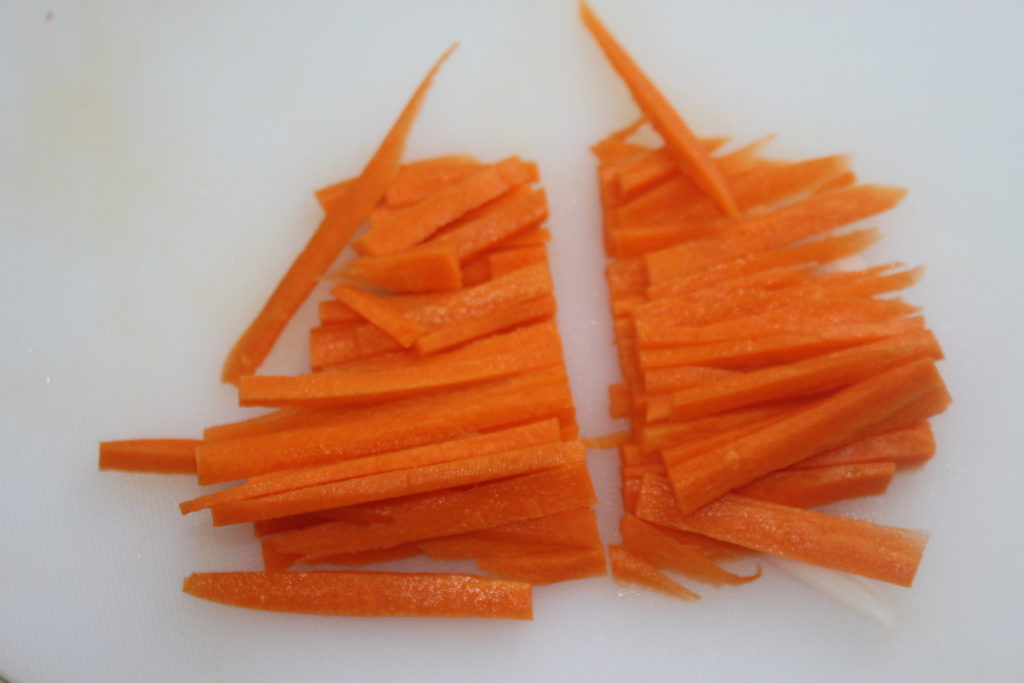
- 1 half carrot
- 2 Chinese chives
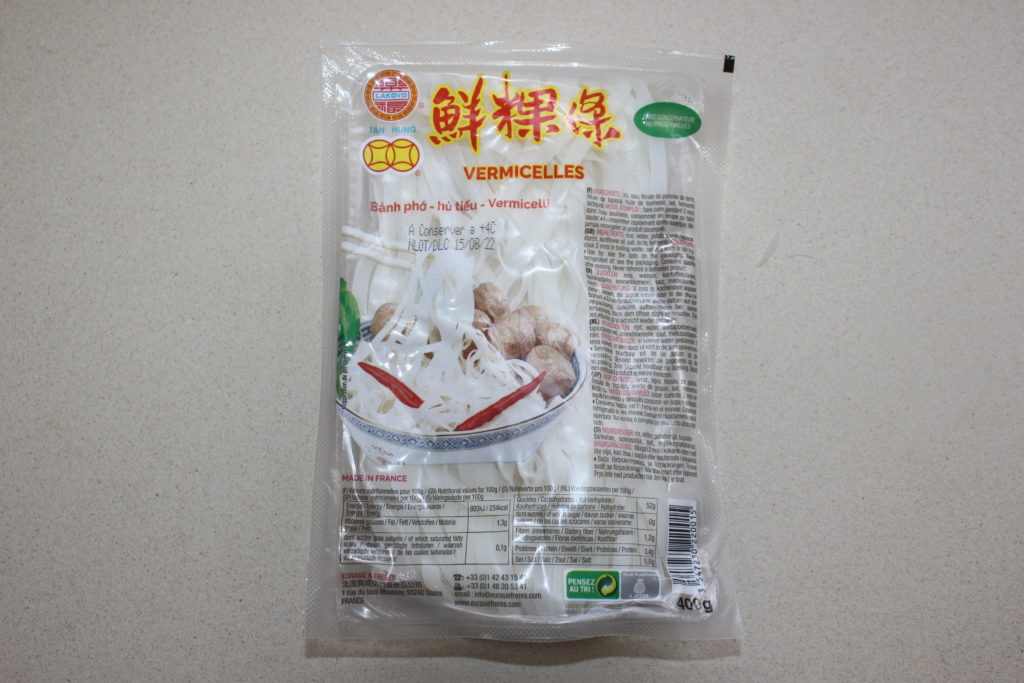
- 170g of semi-dry rice noodles
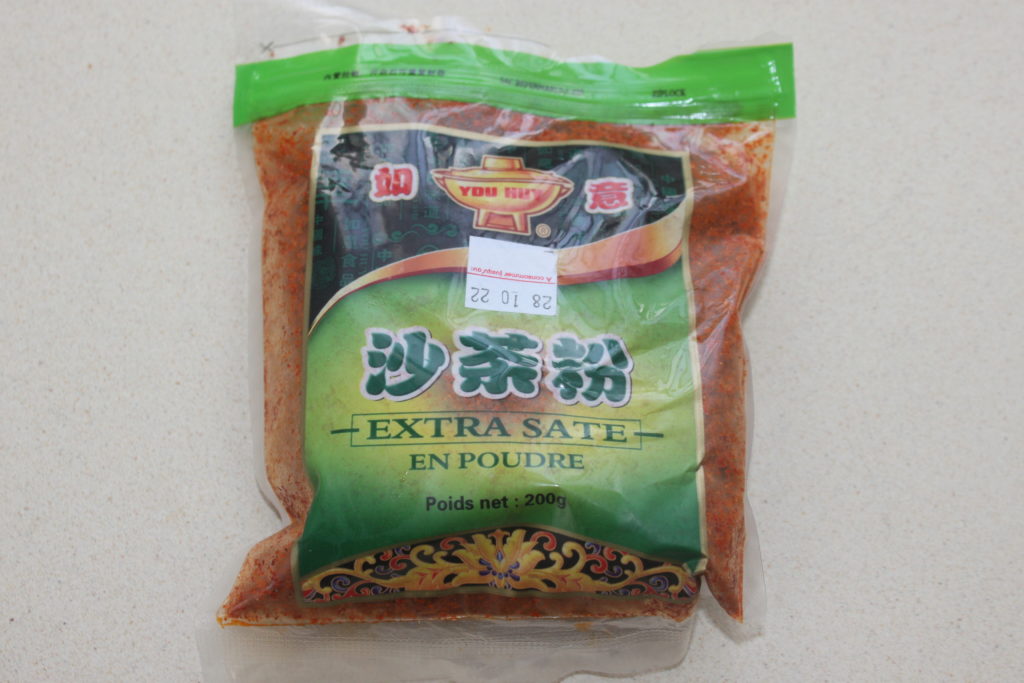
- 3 teaspoons of satay powder
- 150ml of water
- 150ml of coconut milk
- 1 small handful of unsalted roasted peanuts
- fried onions for sprinkling (optional)
Here are the noodles I buy for this dish. I take this package which is very easily found in the fresh section of Asian grocery stores. These are the noodles for pho, but they are perfect in this dish.
And this is the satin powder I take. It is delicious and not expensive. It is not spicy at all, it is very tasty.
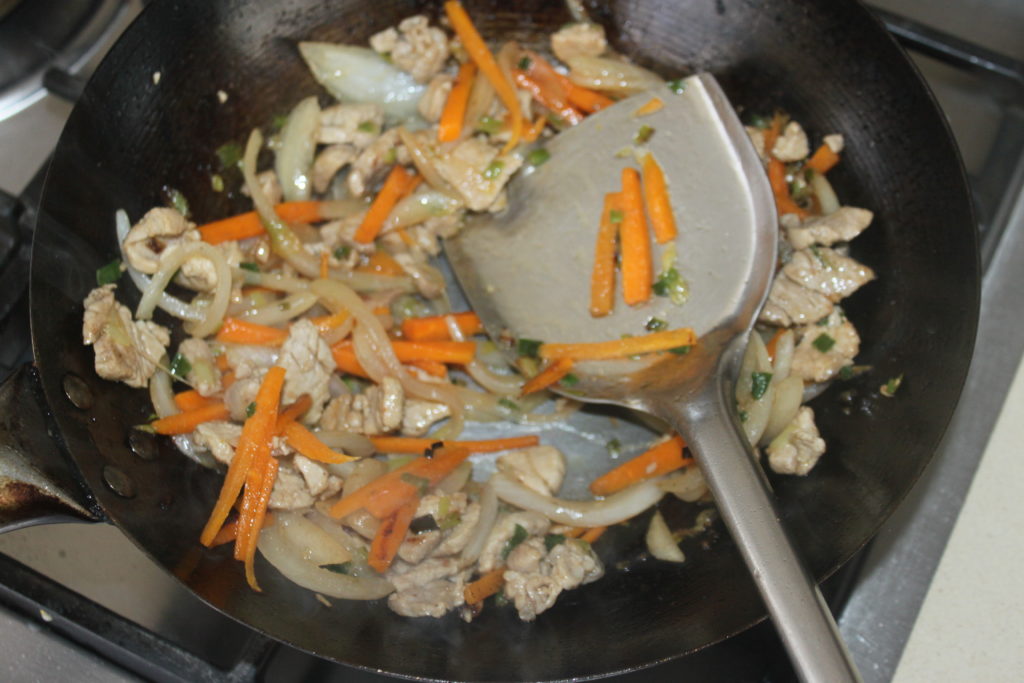
Cut the chosen meat into small pieces. I had filet mignon which remained tender despite the cooking.
Peel the half white onion and cut it into strips, do the same with the half carrot to cut into sticks. Finely chop the chives, removing just the small roots.
Put everything in a wok with 3-4 tablespoons of oil and the pork.
Cook over fairly high heat. If you don’t have a wok, a saute pan will do, even a simple skillet!
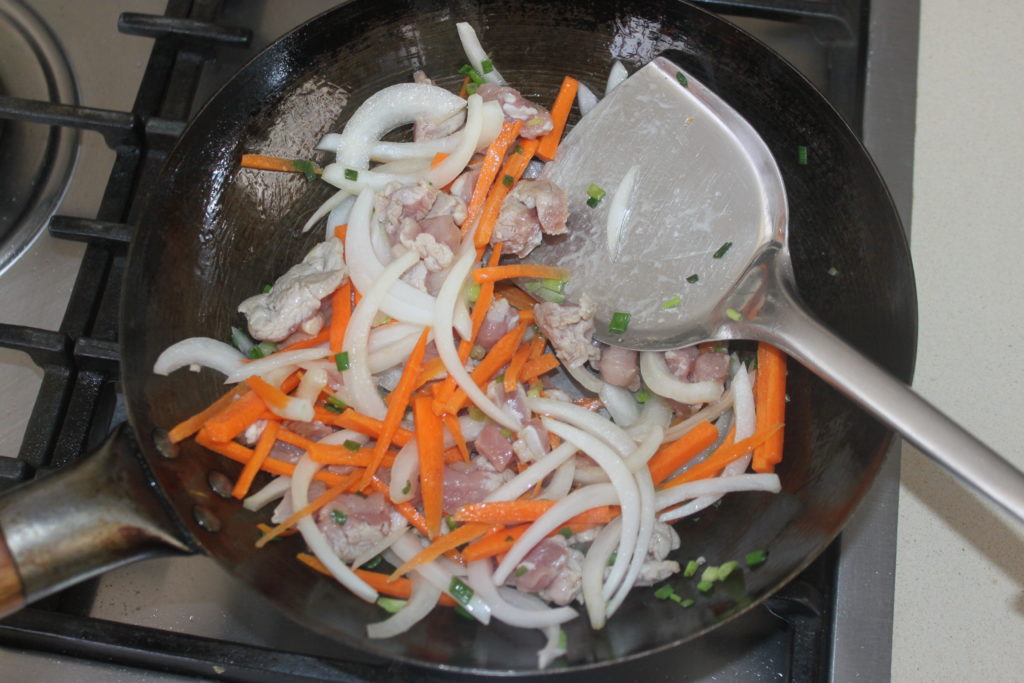
The meat should be cooked and a good indicator of doneness will also be the change in color of the carrot.
Then add the noodles and water.
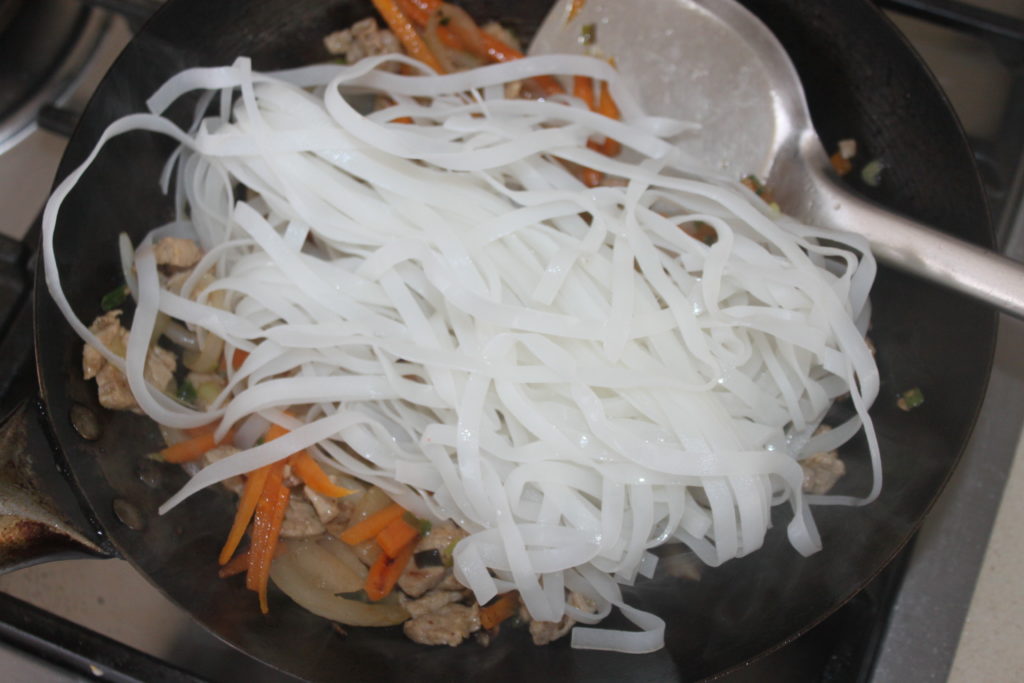
Mix and cook until all the water has disappeared. The noodles will be perfectly cooked once the water is absorbed.
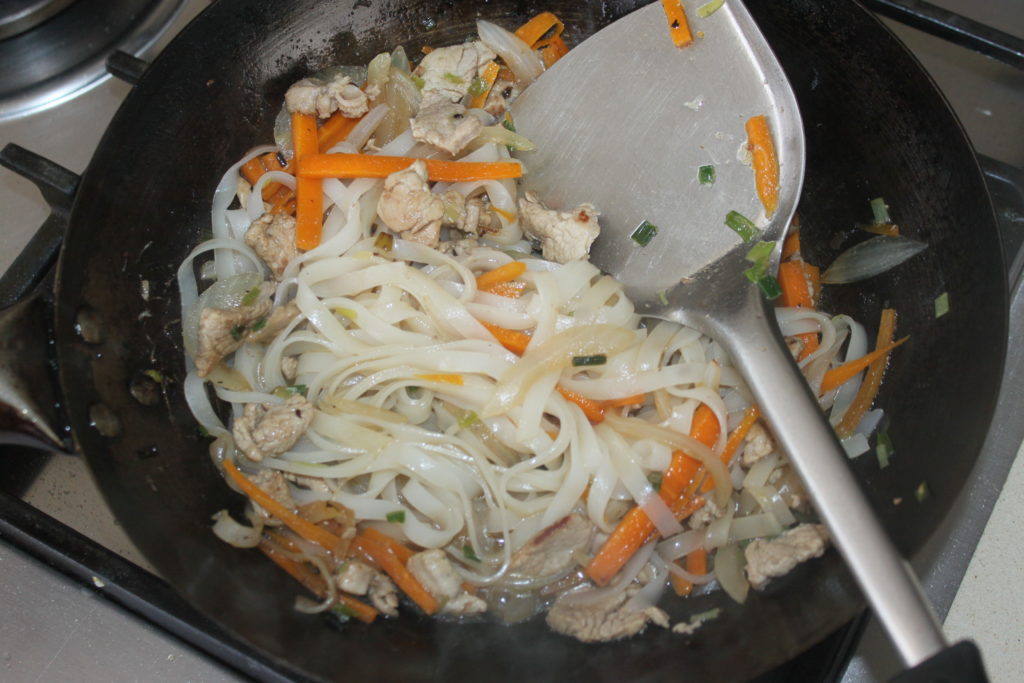
Pour in the satay powder and coconut milk.
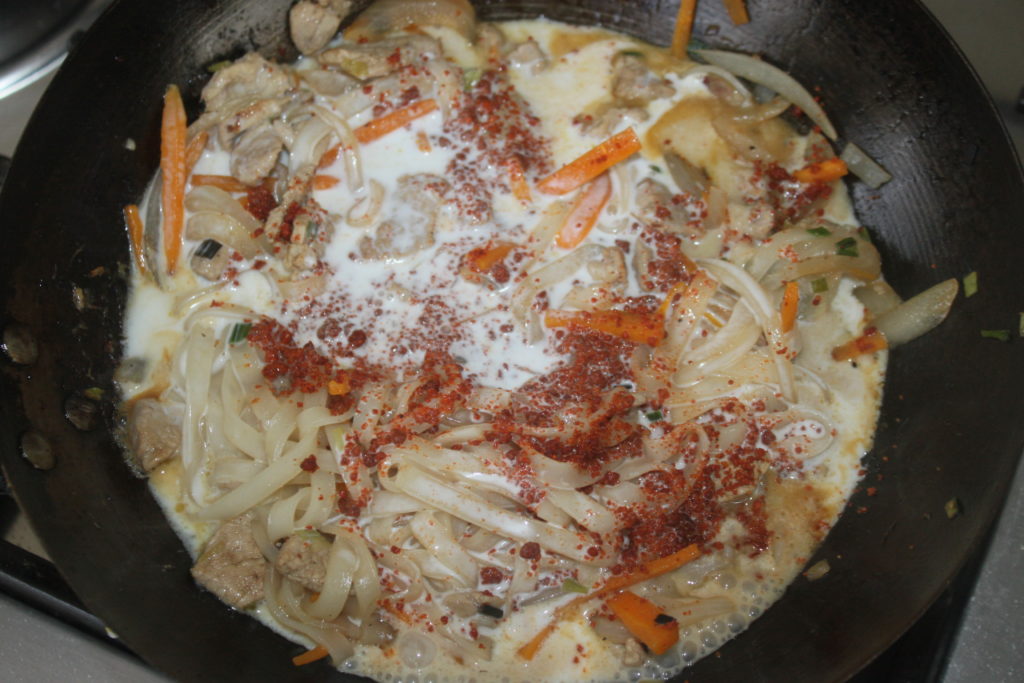
Cook again until creamy.
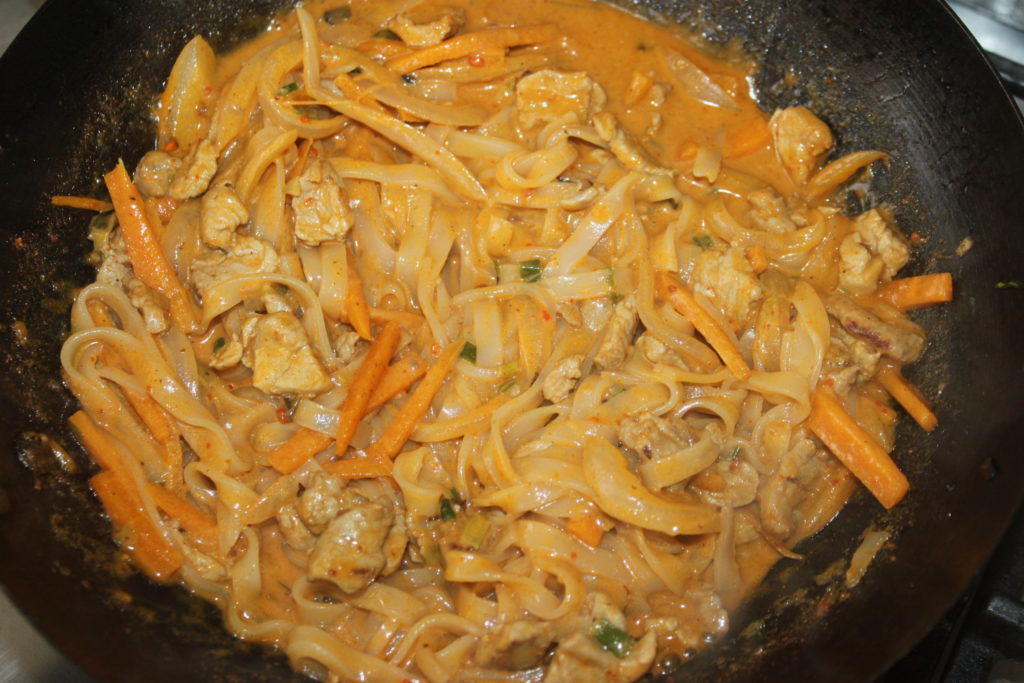
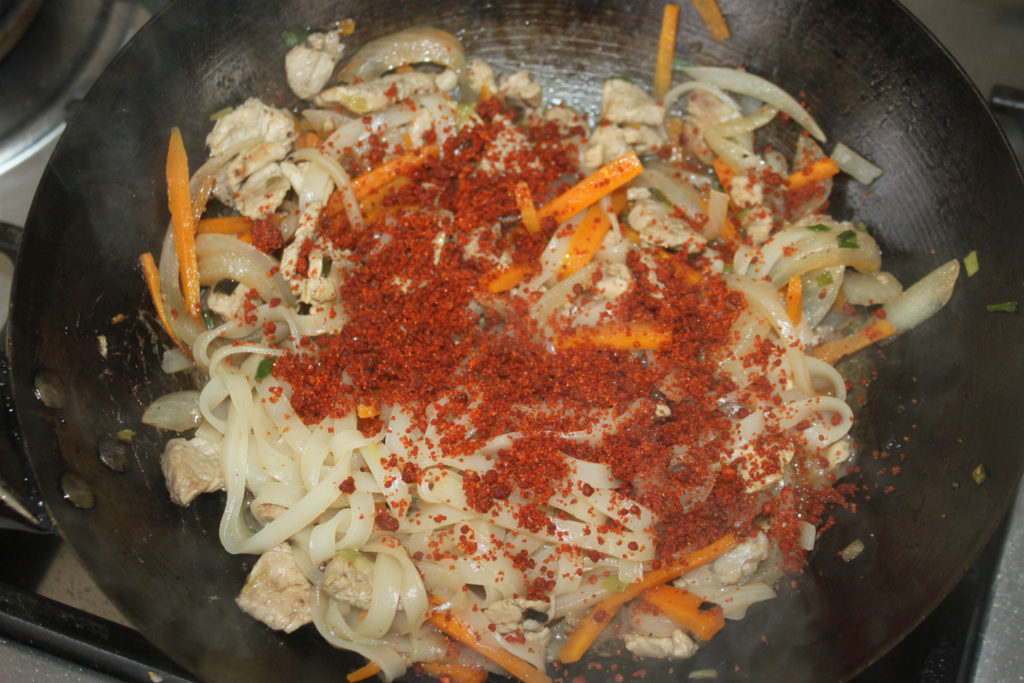
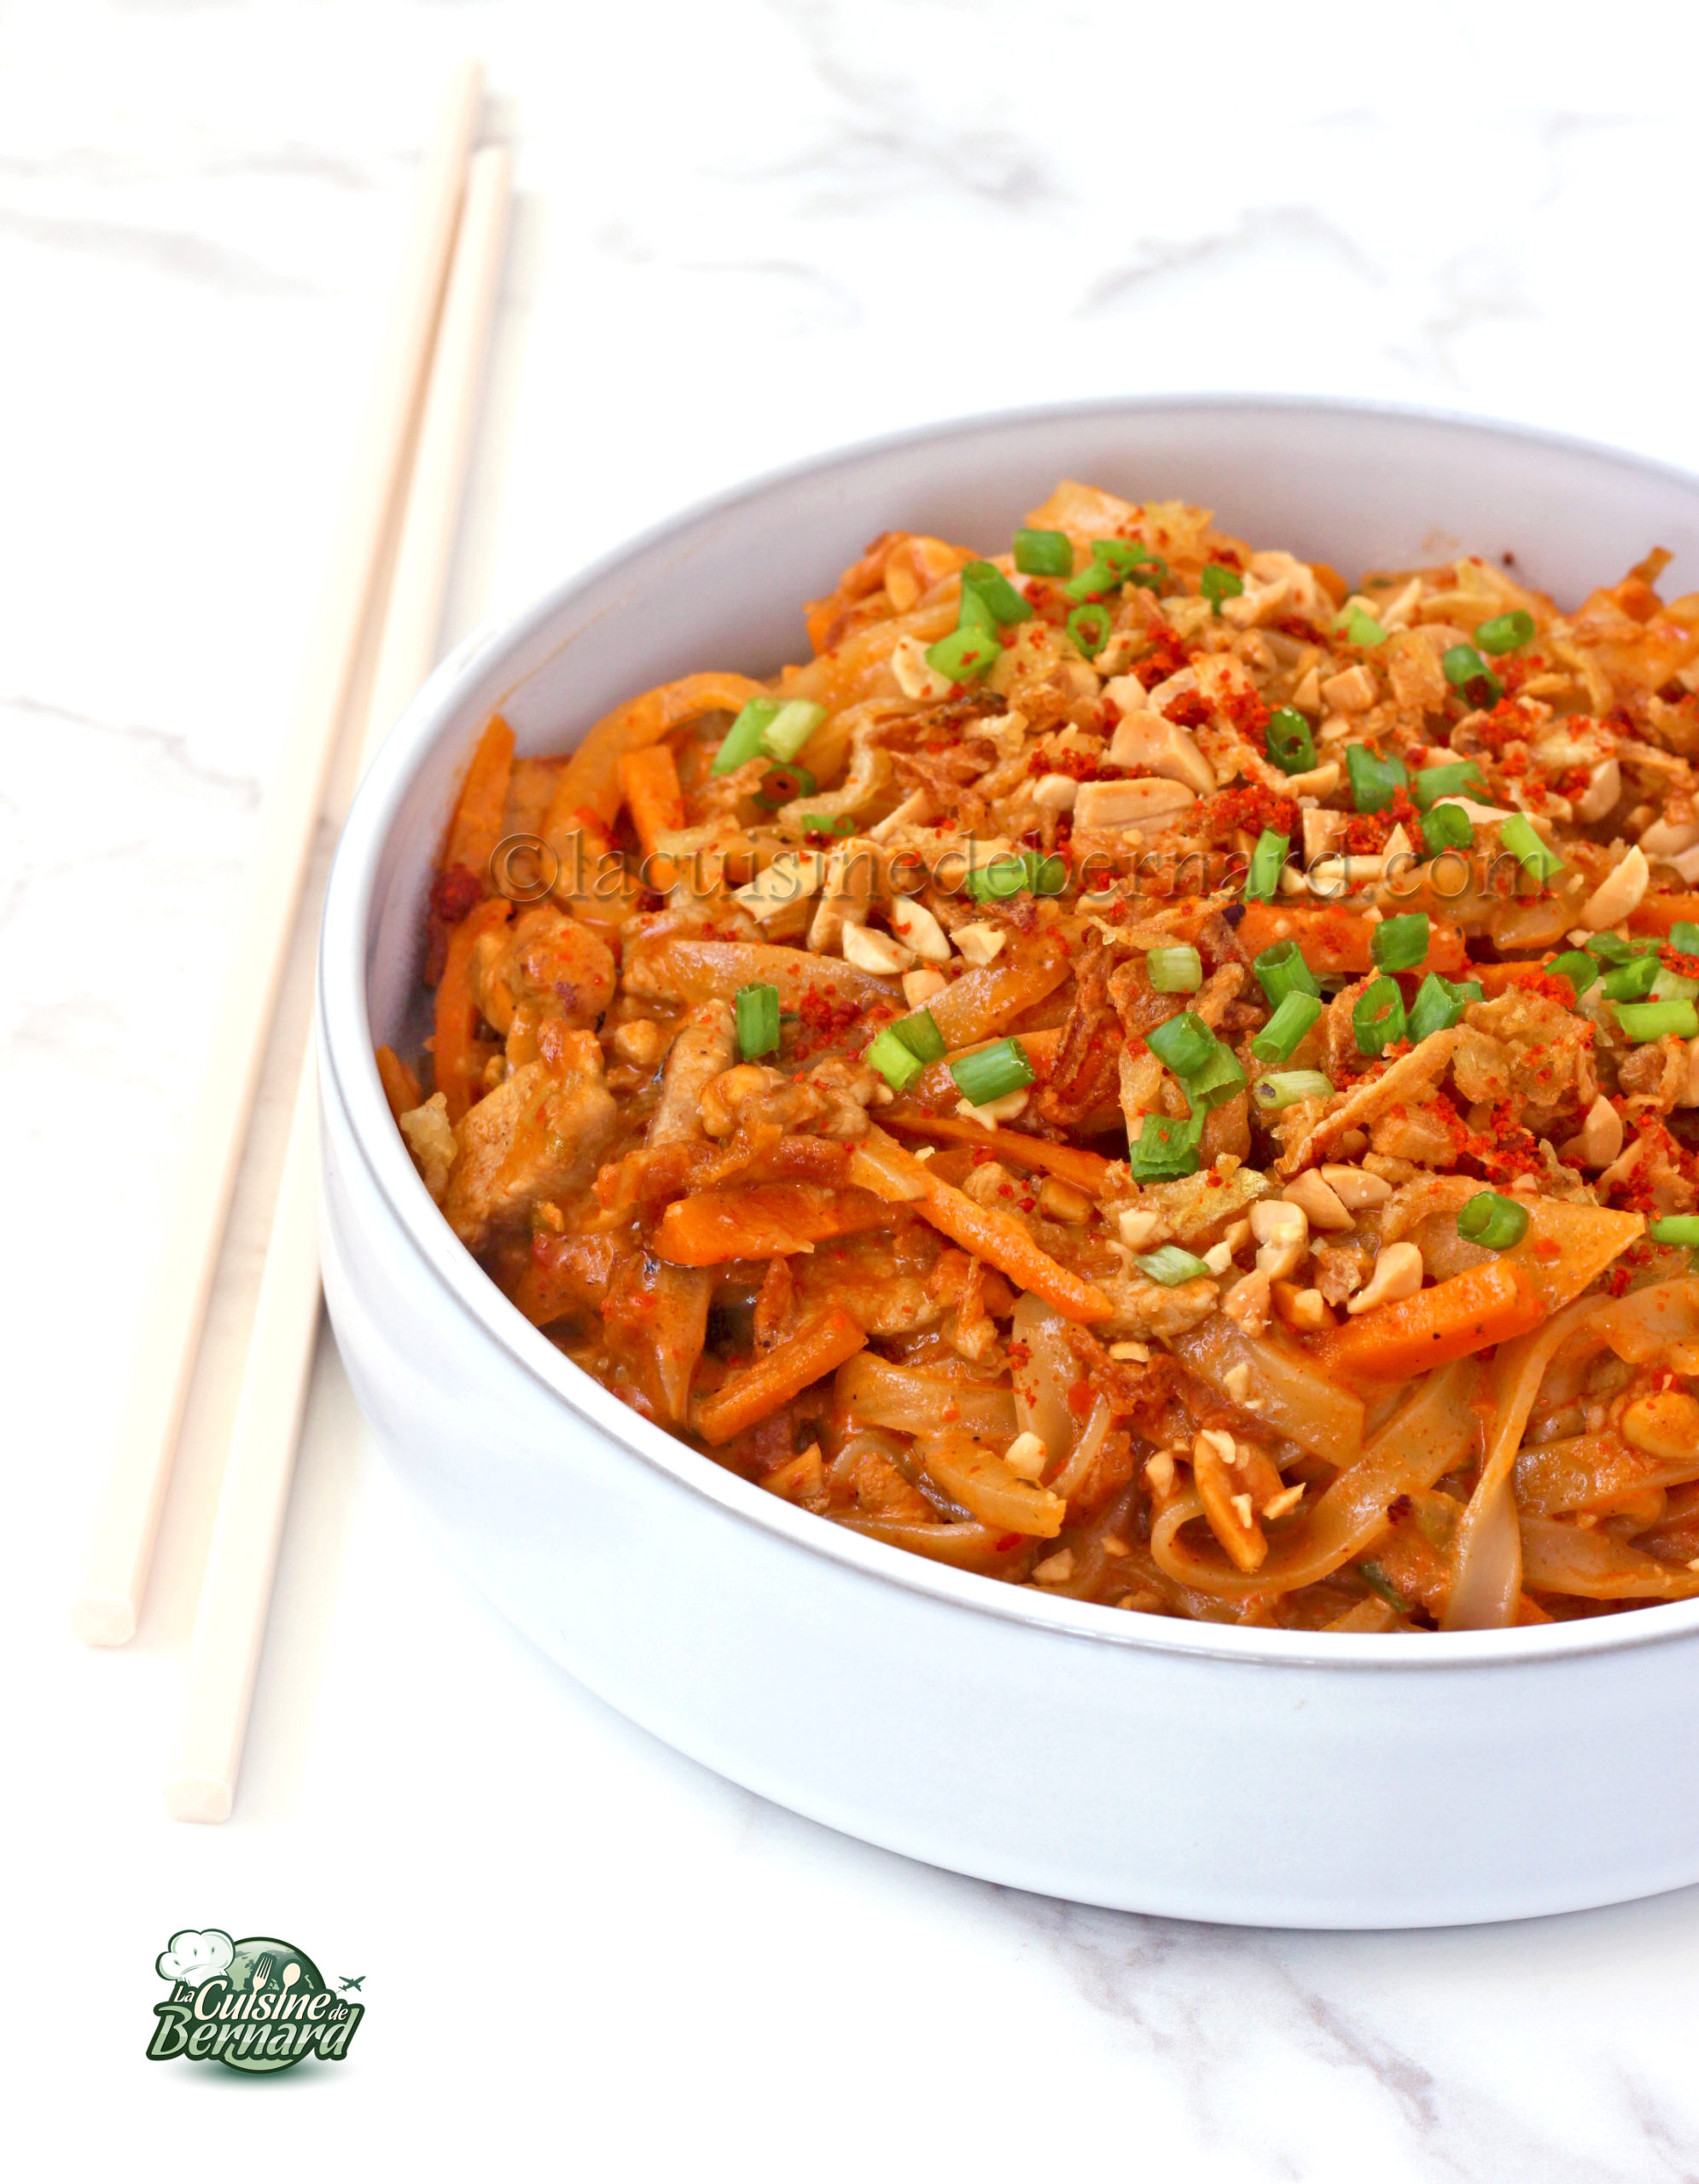
Finally, add chopped peanuts and serve hot with a little extra spring onion and fried onions!

For the color I put back a little satin powder.
Pâtes sautées au porc, satay et lait de coco
Ingredients
- 150 g porc
- 1/2 oignon blanc
- 1/2 carotte
- 2 ciboules chinoises
- 170 g nouilles de riz
- 3 c. à café poudre de satay
- 150 ml eau
- 150 ml lait de coco
- 40 g cacahuètes grillées
Instructions
- Coupez la viande choisie en petits morceaux. J'ai pris du filet mignon qui reste tendre malgré la cuisson.
- Épluchez le demi oignon blanc et coupez-le en lamelles, faites de même avec la demi-carotte à couper en bâtonnets. Hachez finement les ciboules en enlevant juste les petites racines. Mettez le tout dans un wok avec 3-4 cuillerées à soupe d'huile et le porc.
- Faites cuire sur feu assez vif. Si vous n'avez pas de wok, une sauteuse fera l'affaire, même une simple poêle !
- La viande doit cuire et un bon indicateur de cuisson sera aussi le changement de couleur de la carotte. Ajoutez alors les nouilles et l'eau.
- Mélangez et faites cuire jusqu'à disparition totale de l'eau. Les nouilles vont être parfaitement cuite une fois l'eau absorbée. Versez la poudre de saté et le lait de coco.
- Faites cuire de nouveau jusqu'à rendre le tout bien crémeux.
- Ajoutez enfin des cacahuètes hachées puis servez très chaud avec un peu de ciboule supplémentaire et d'oignons frits ! Pour la couleur je remets un peu de poudre de saté.
Nutrition

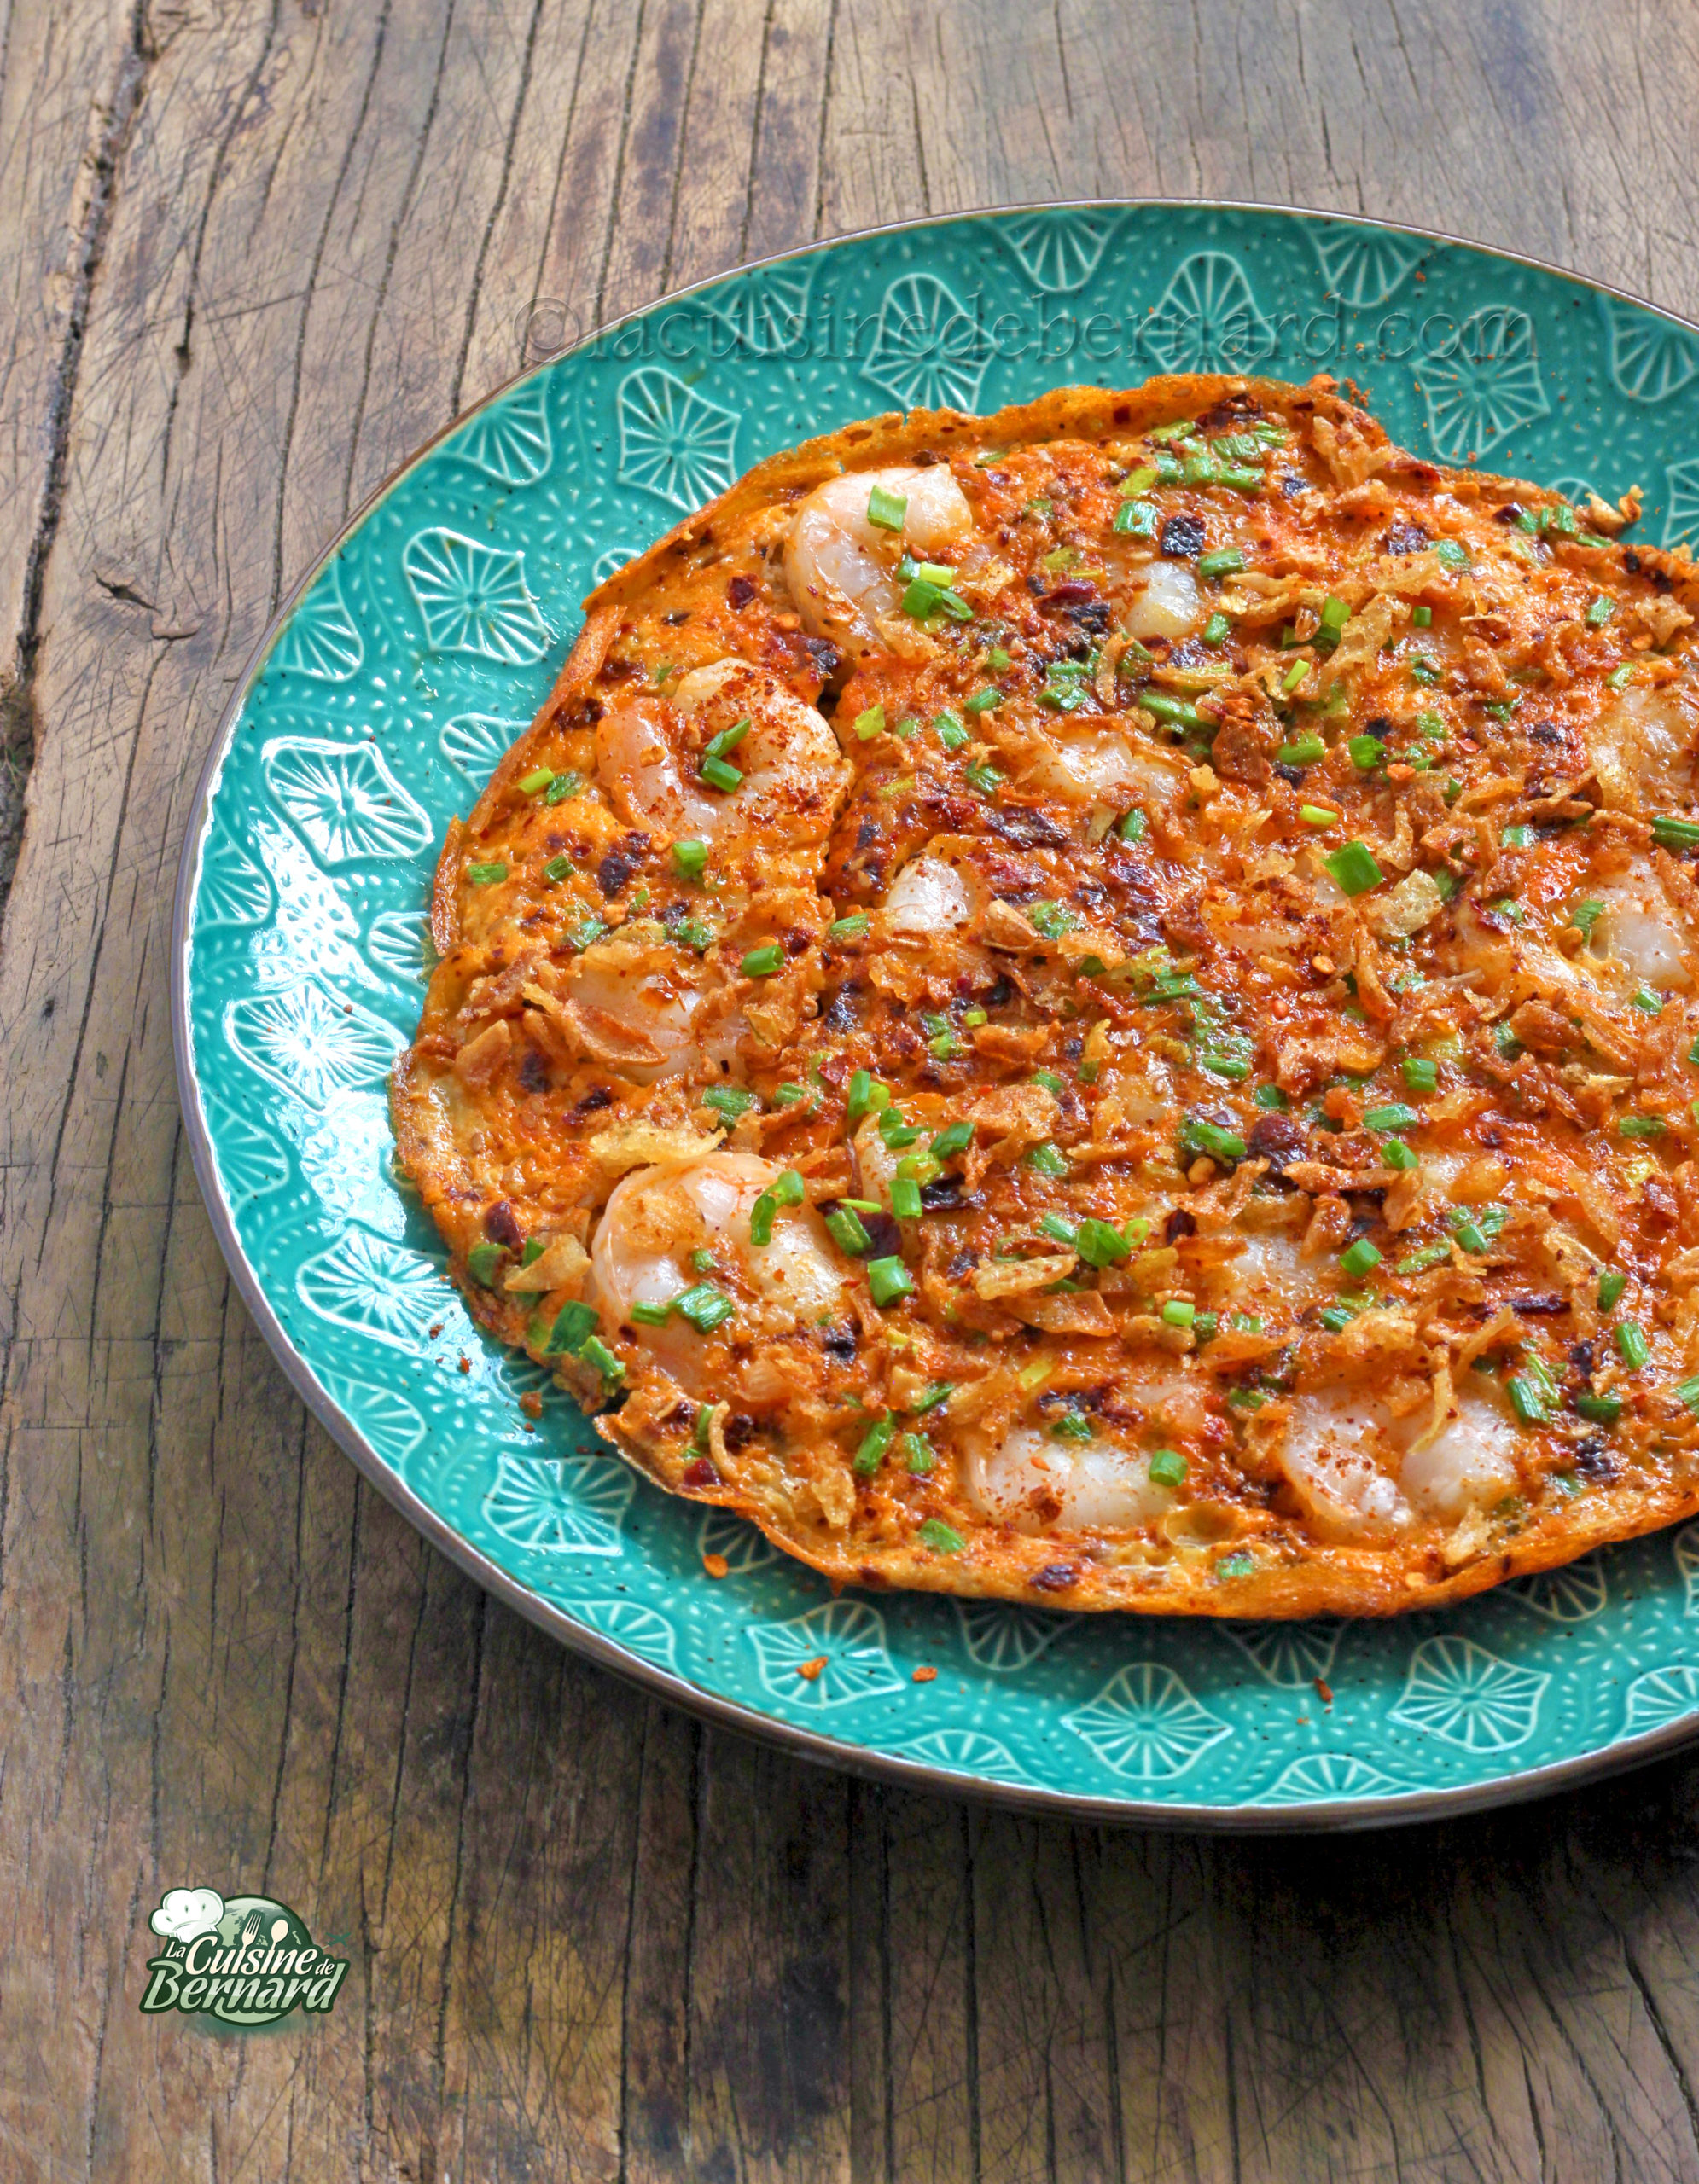
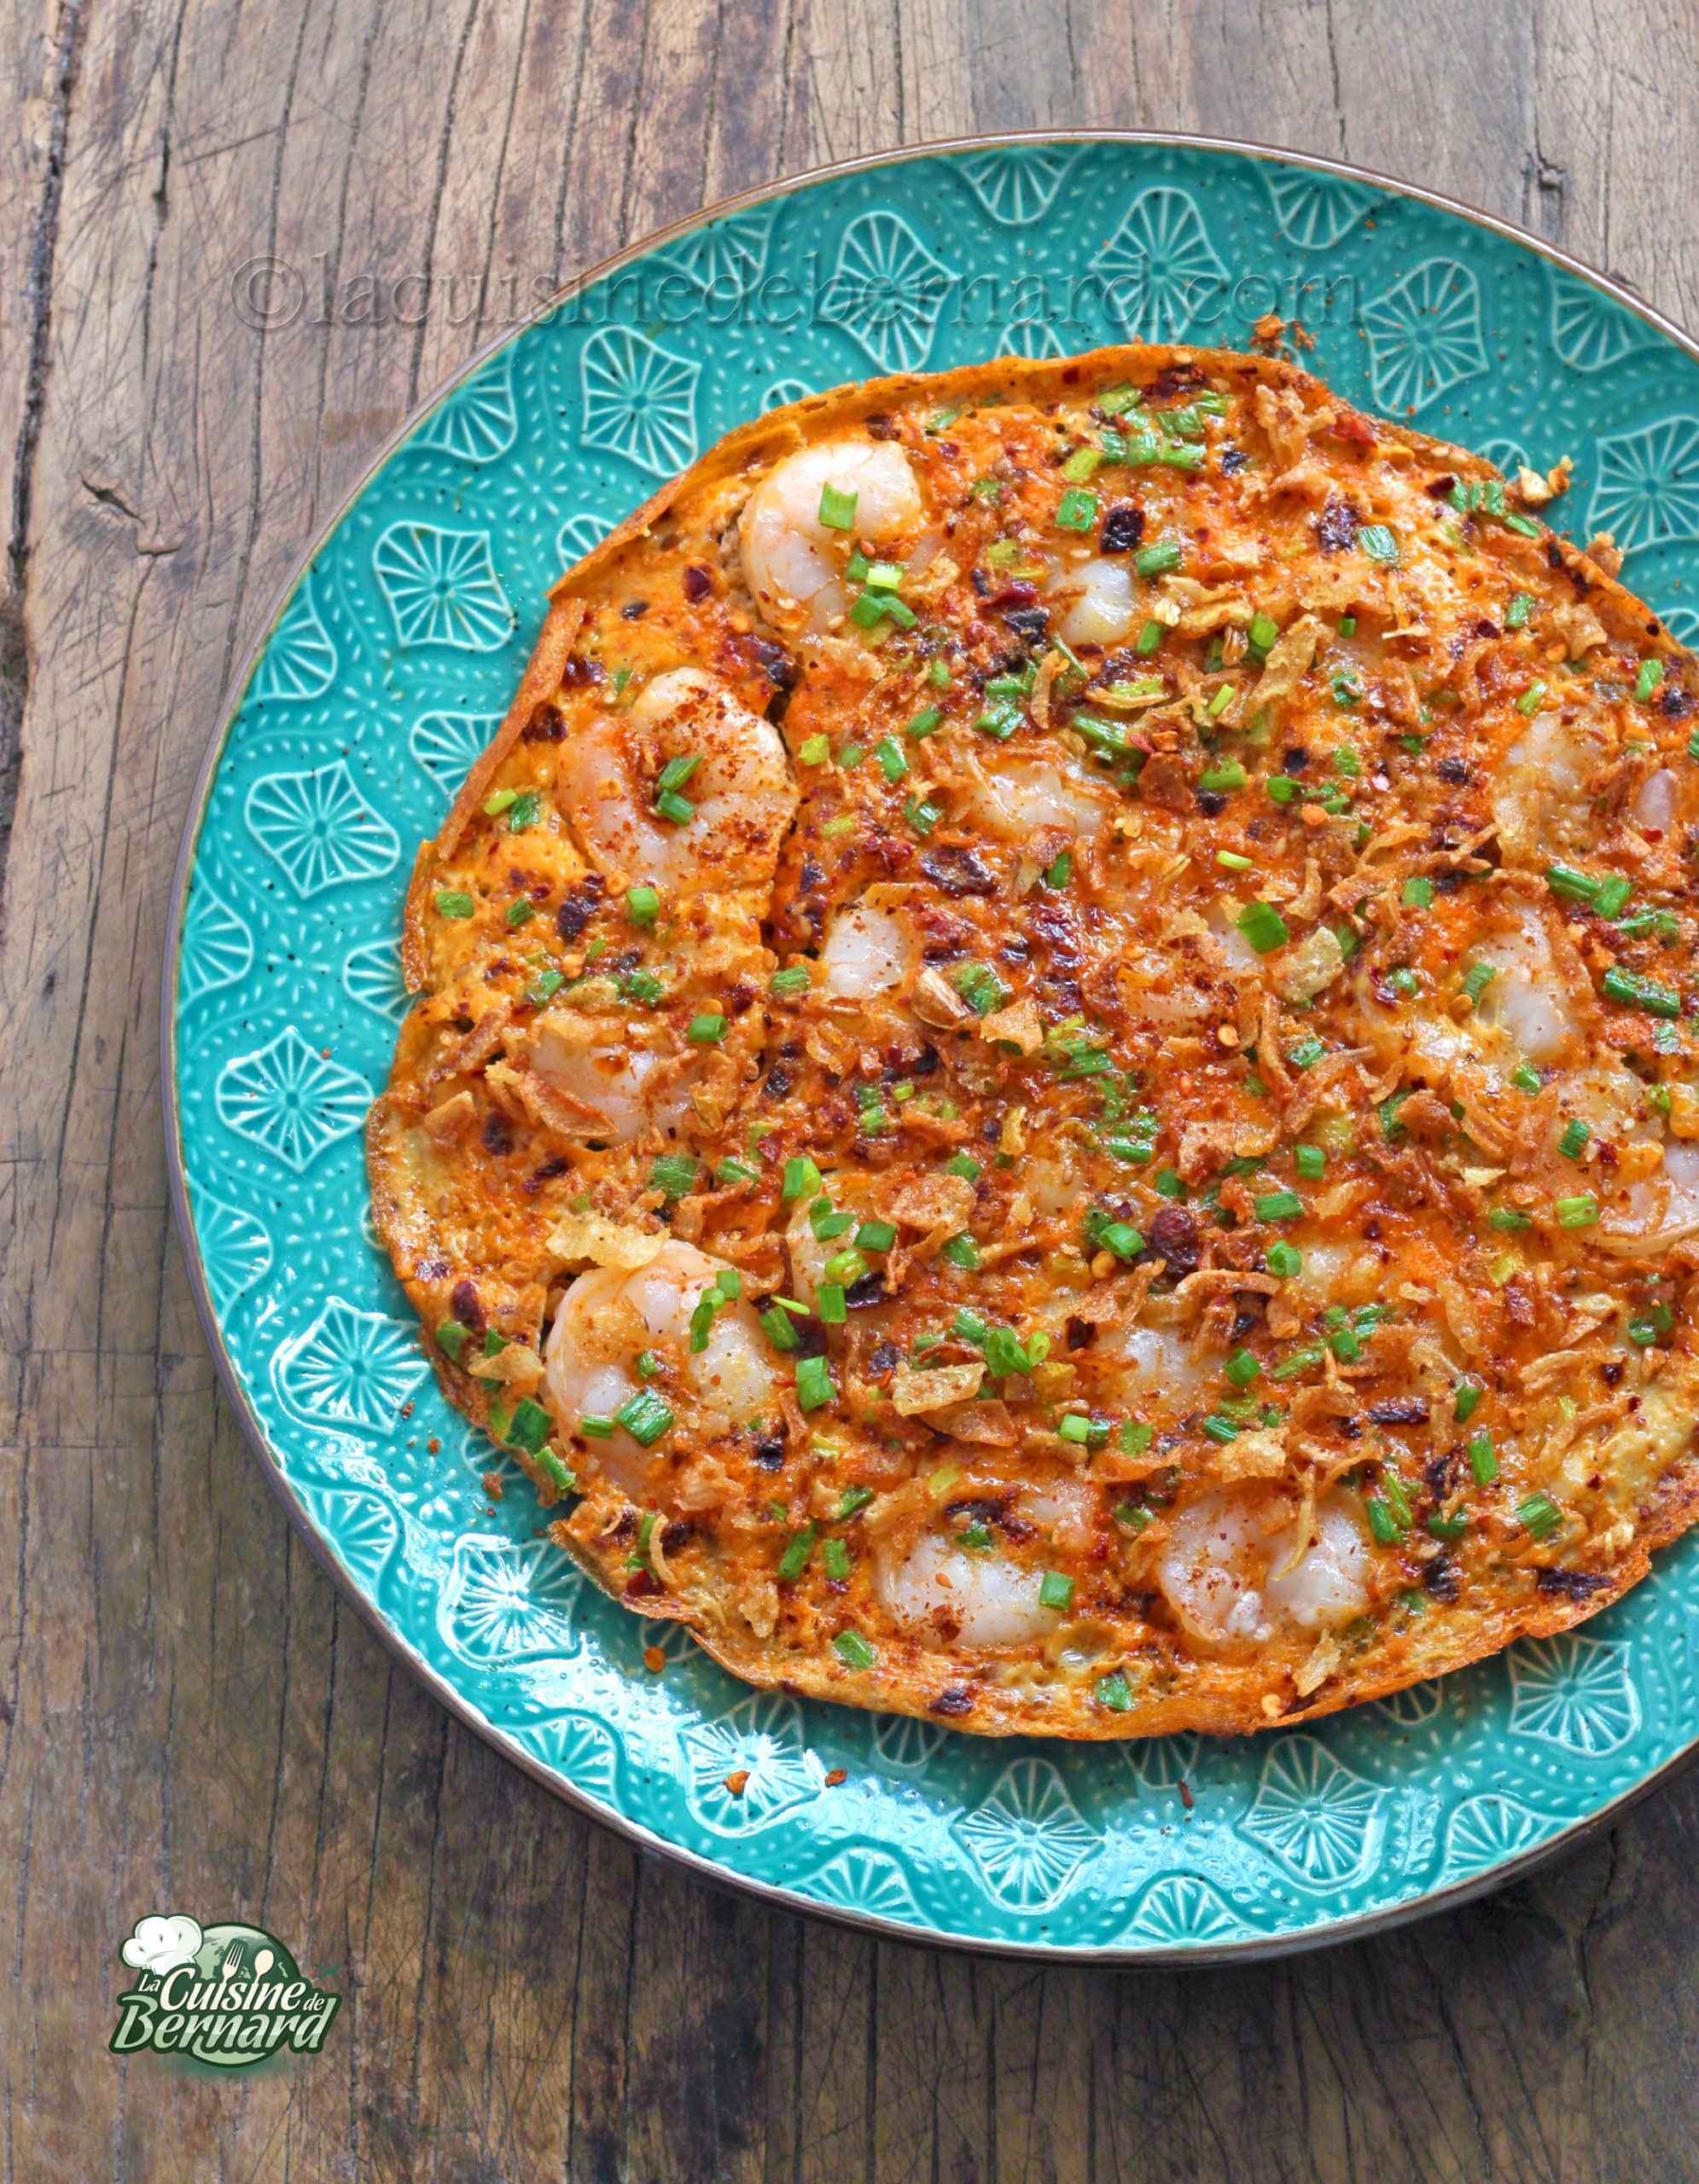
Une délicieuse omelette pimentée avec plein de crevettes ! Je la déguste sans rien d’autre, juste un peu de sauce soja, mais vous pourrez bien sûr l’accompagner de riz nature. Elle sera prête en moins de 10 minutes pour un repas express et plein de saveurs. C’est vraiment idéal pour faire le plein de protéines. À la maison, je me la fais souvent pour le repas du midi, entre deux séances de travail !
Pour 2 personnes :
- about 20 raw peeled shrimp
- 3 eggs
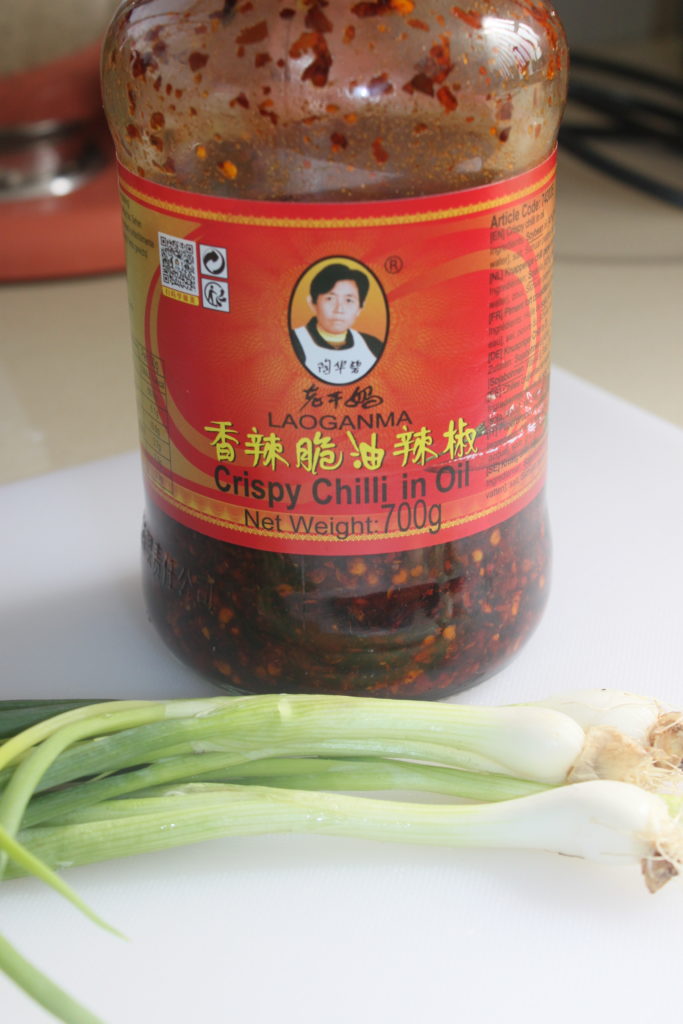
- 2 teaspoons of “crispy chili in oil” sauce
- 2 Chinese chives
- 1 teaspoon of toasted sesame seeds
- fried onions and soy sauce to serve
Voici la sauce “crispy chili in oil”. Je l’achète dans les supermarchés asiatiques, elle se trouve facilement. Tous mes amis qui y ont goutée, l’adorent instantanément. Elle est finalement peu pimentée !
Cassez les œufs dans un bol et versez les deux cuillerées à café de sauce.
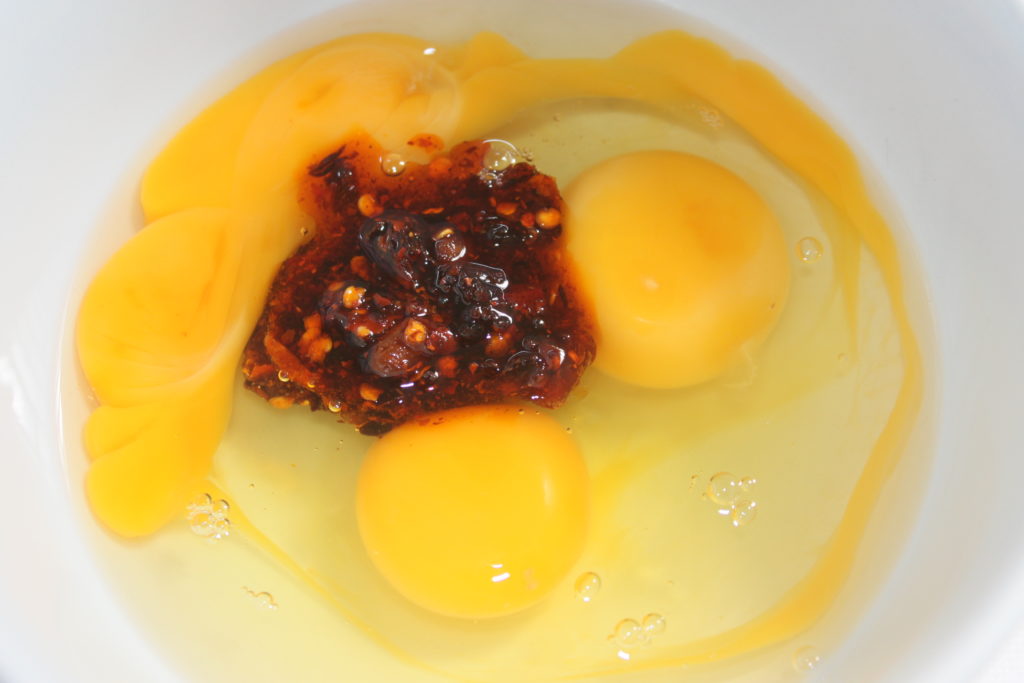
Ajoutez également les ciboules finement hachées.
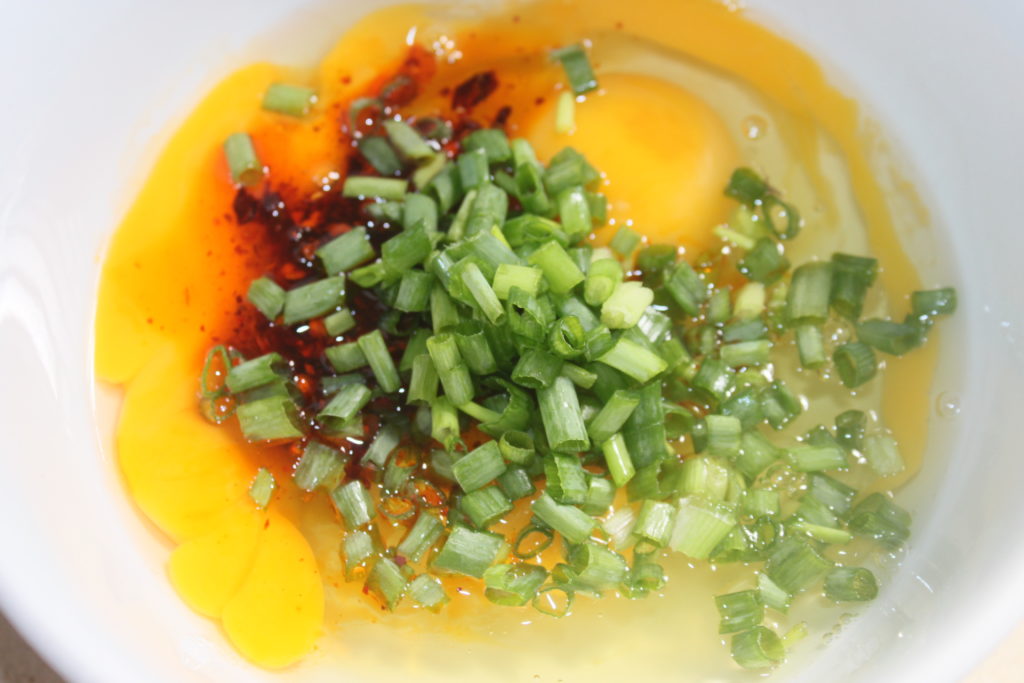
Mélangez en omelette à la fourchette.
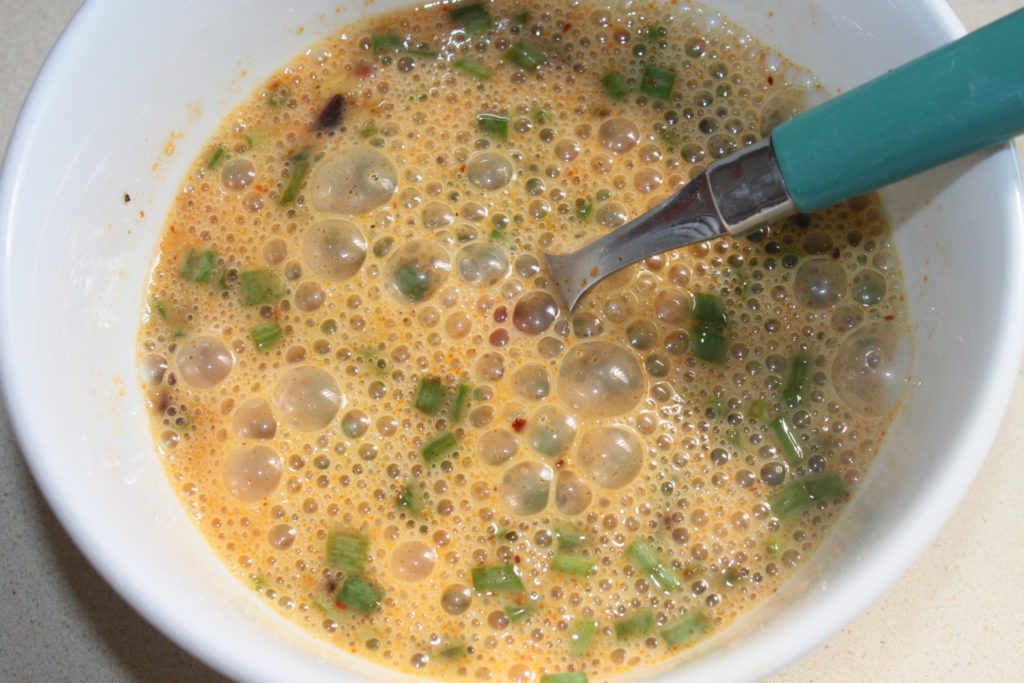
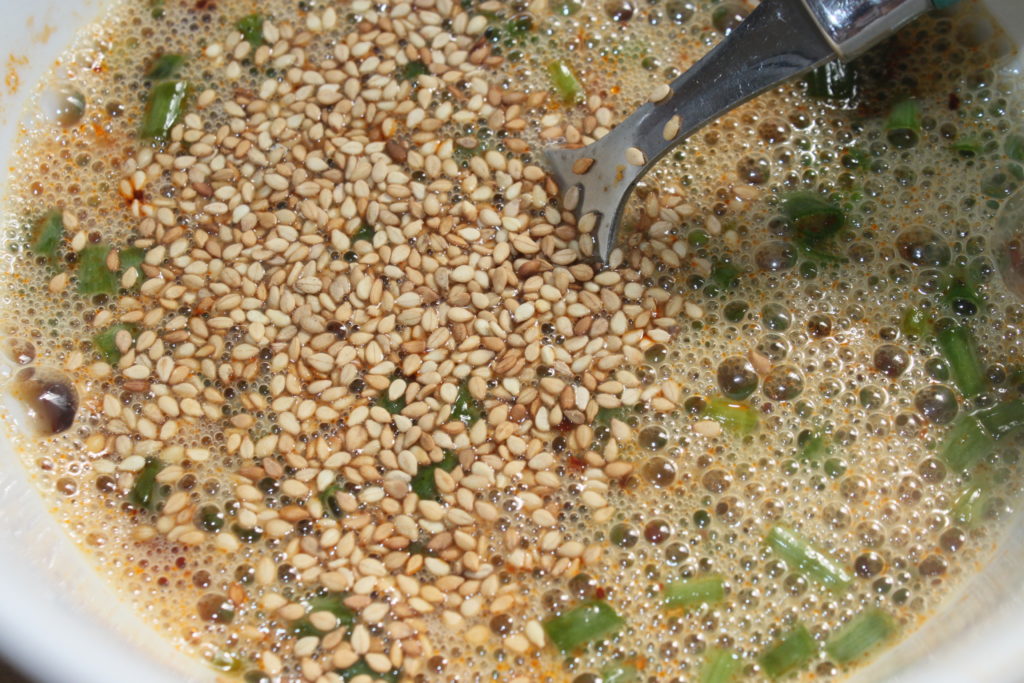
Versez le sésame et mélangez.
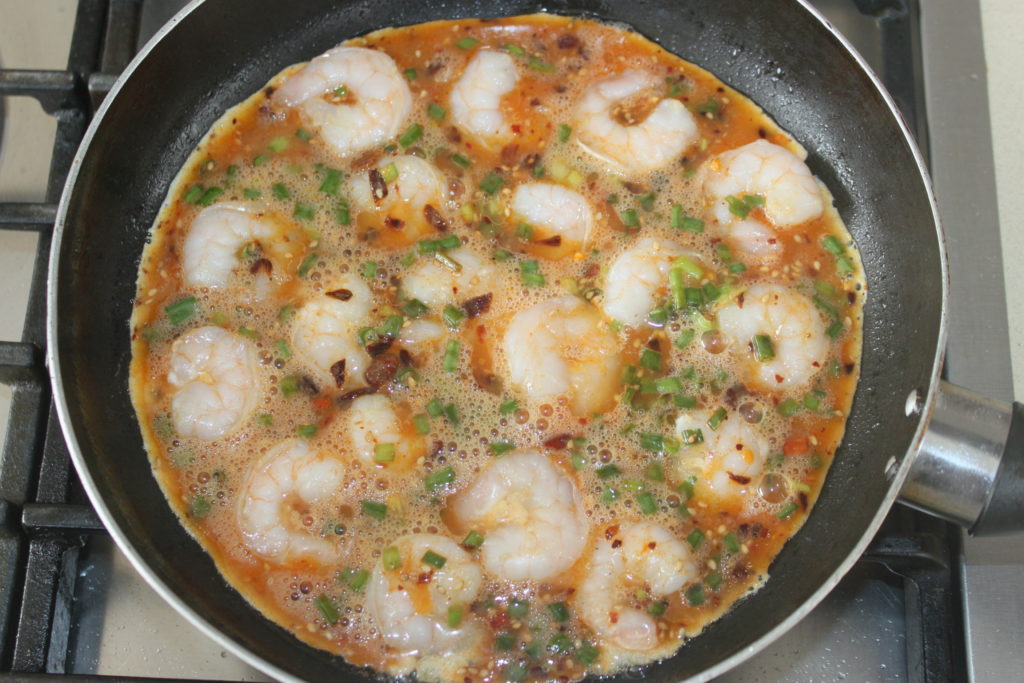
Prenez une poêle anti-adhérente de 20 cm diamètre et versez une cuillerée à soupe d’huile. Faites chauffer sur modéré et placez les crevettes crues.
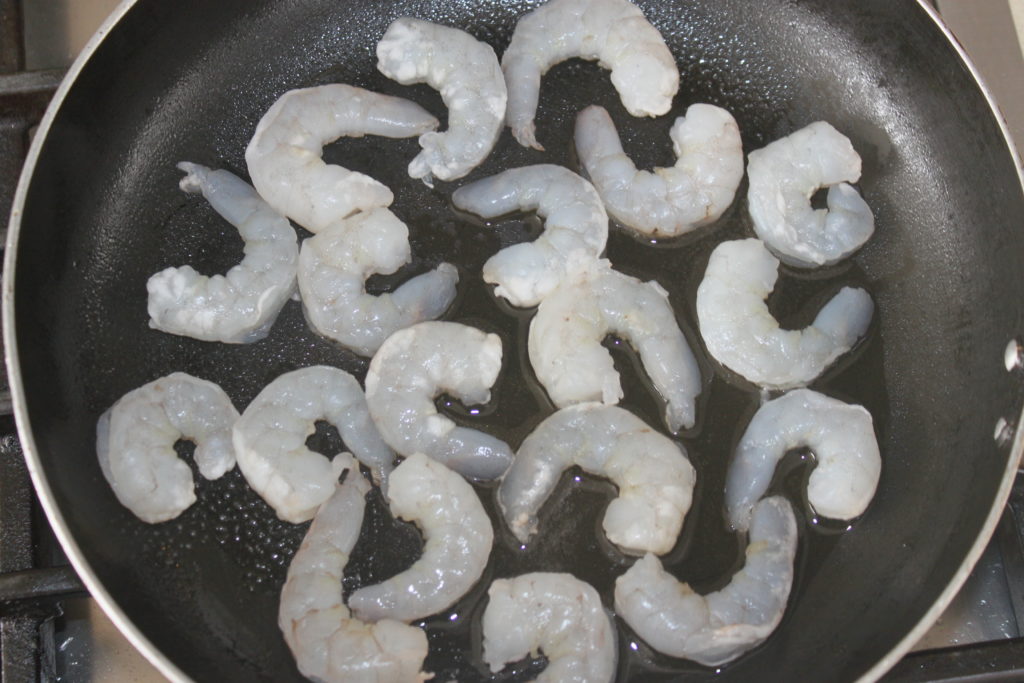
Laissez-les se saisir puis retournez-les La cuisson va durer 1 à 2 minutes maximum.
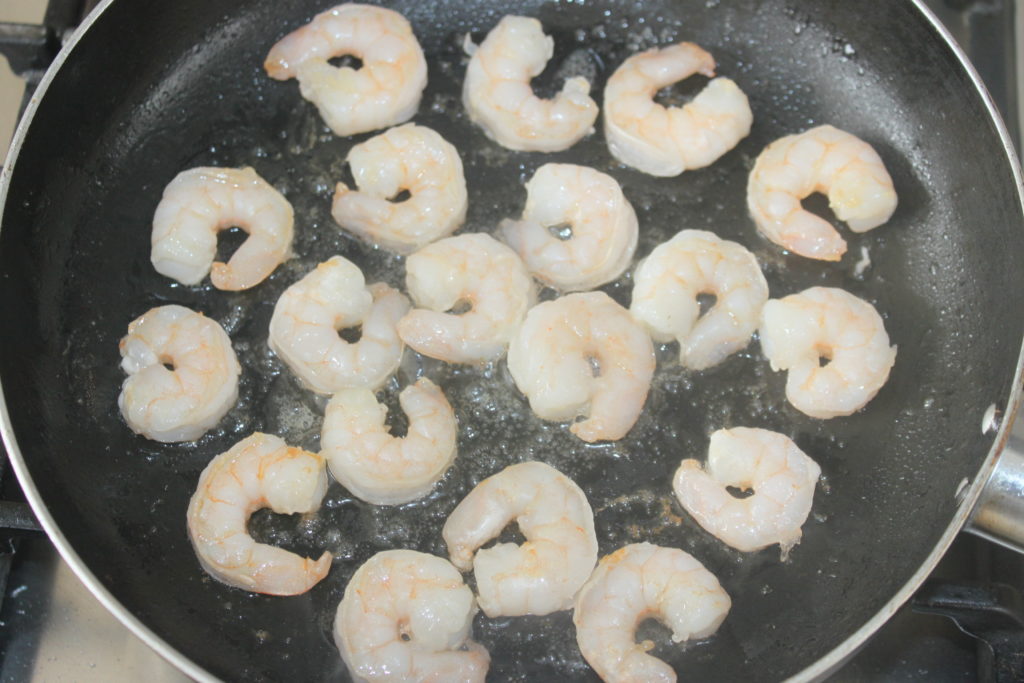
Versez l’omelette.
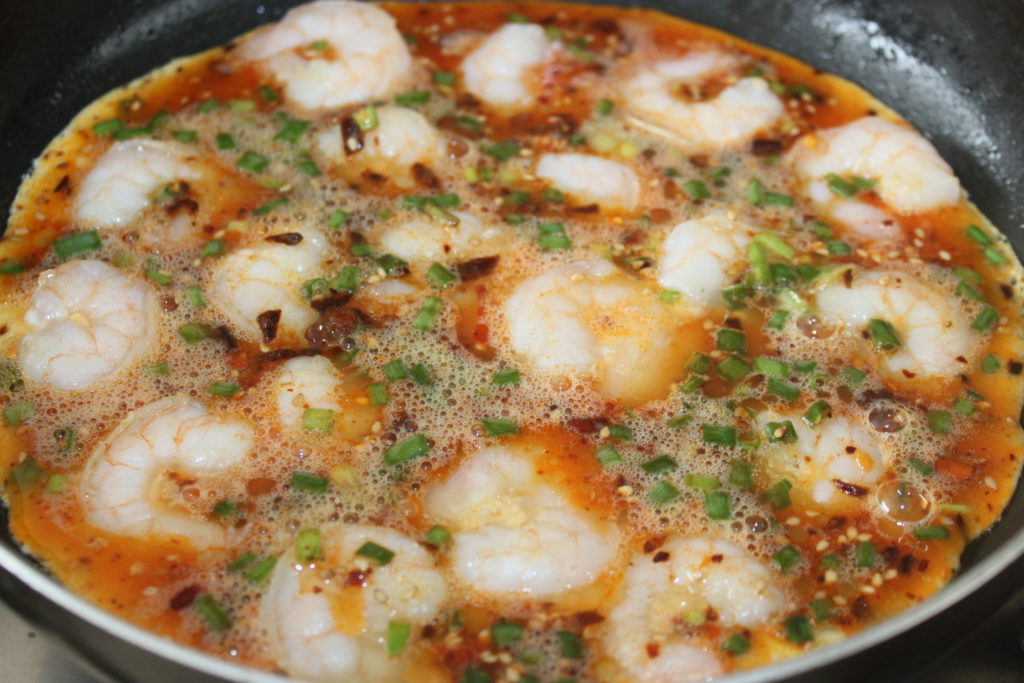
Posez un couvercle et baissez le feu. Je ne fais cuire qu’un côté de l’omelette. Avec le couvercle, la chaleur cuira sans problème le dessus.
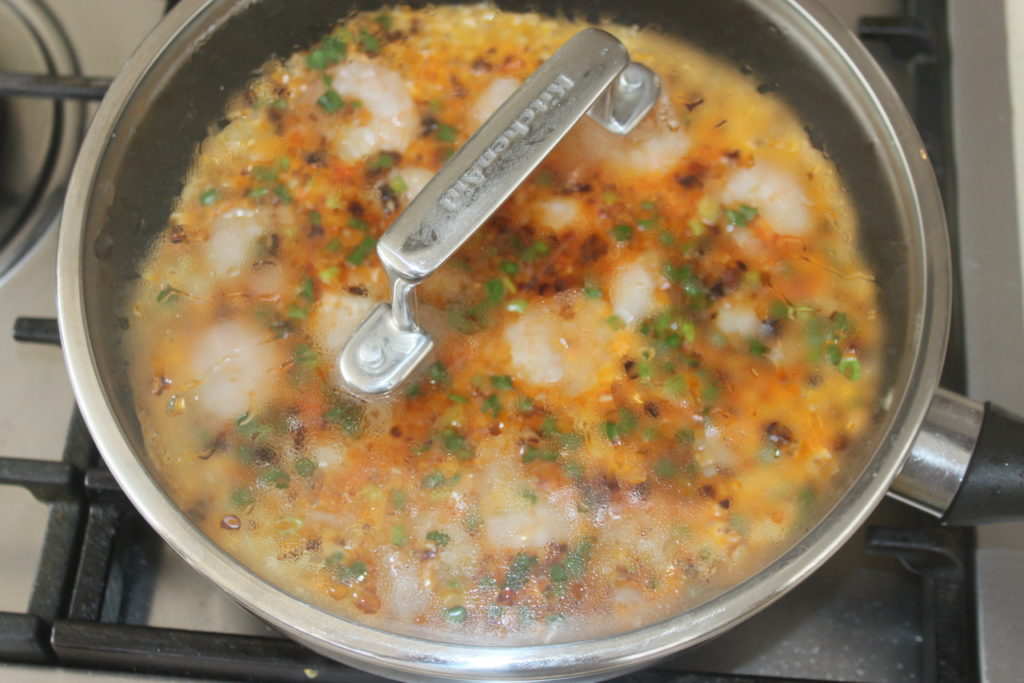
Si vous la retournez, vous risquez de la briser. Laissez cuire 7-8 minutes.
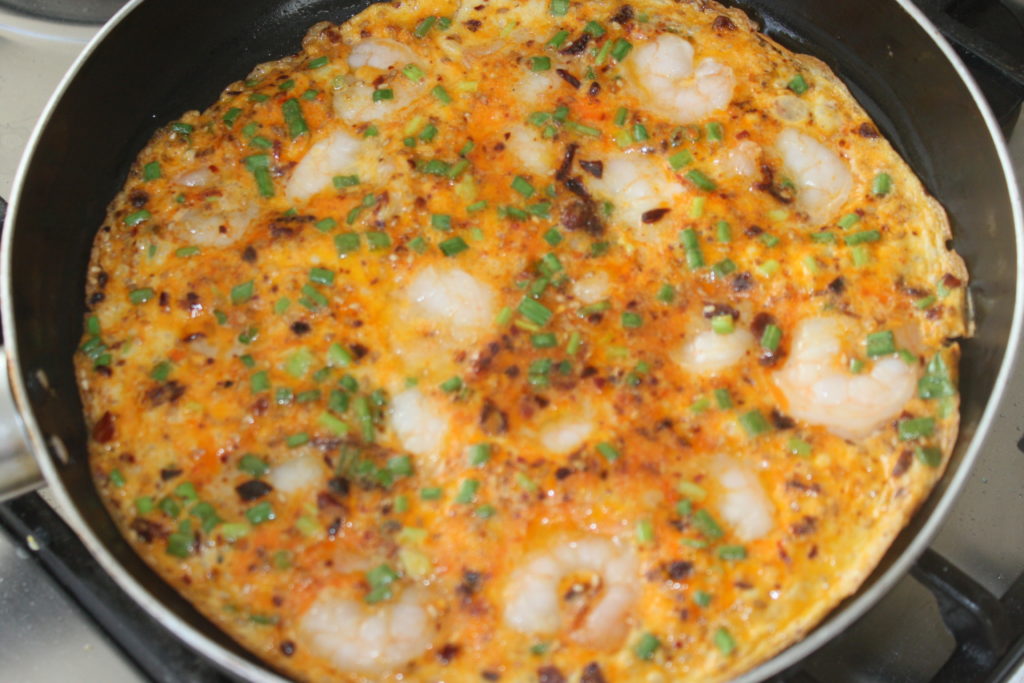
Versez dans un plat, ajoutez au besoin un peu d’oignon frit et dégustez avec de la sauce de soja.
Omelette pimentée aux crevettes
Ingredients
- 20 crevettes crues
- 3 œufs
- 2 c. à café d'huile pimentée crispy chili in oil
- 2 ciboules chinoises
- 1 c. à café sésame grillé
Instructions
- Cassez les œufs dans un bol et versez les deux cuillerées à café de sauce.
- Ajoutez également les ciboules finement hachées et le sésame.
- Prenez une poêle anti-adhérente de 20 cm diamètre et versez une cuillerée à soupe d'huile. Faites chauffer sur modéré et placez les crevettes crues.
- Laissez-les se saisir puis retournez-les La cuisson va durer 1 à 2 minutes maximum. Versez l'omelette.
- Posez un couvercle et baissez le feu. Je ne fais cuire qu'un côté de l'omelette. Avec le couvercle, la chaleur cuira sans problème le dessus.
- Si vous la retournez, vous risquez de la briser. Laissez cuire 7-8 minutes.
- Versez dans un plat, ajoutez au besoin un peu d'oignon frit et dégustez avec de la sauce de soja.
Nutrition


I propose you a recipe unpublished on the blog, but which I published in my book Scandalously Decadent, published by Flammarion, which you can find in your bookstore! This pie from Florida, USA, is simply magical! The raw cream is liquid, I don’t put an egg in it, and yet it congeals in an incredible way, the lemon juice coagulating the sweetened condensed milk and Greek yogurt. The result is a well-balanced pie, fresh, not so sweet thanks to the lime juice and melting in the mouth. It is traditionally made with small limes from the Keys, but I’ve never seen them here. You can replace them with classic limes without any problem. A delight, especially with a good lemon whipped cream!

Scandaleusement Décadent est disponible chez votre libraire et toutes les plateformes de vente. Ce livre est un condensé de gourmandise, surtout avec les photos que Claire Curt a réalisées. J’assume ici tout ce que j’aime : du gourmand, du savoureux, du moelleux, du croustillant, du fondant mais surtout du réalisable et du délicieux. Ce sont près de 100 recettes non censurées et scandaleusement décadentes qui vous attendent dans ce très beau livre ! J’ai aussi eu la chance d’avoir 4 invités sur mon livre : Aurélien Cohen (son Instagram ICI) qui propose sa recette de tartelettes Cara’huètes, Christophe Amav (son Instagram ICI) avec des délicieux choux pistache framboise, Hamaid, alias Jekocat (son Instagram ICI) avec une adaptation encore plus folle de mon cake ultime aux noisettes et enfin Frédéric Leguen Geffroy (son Instagram ICI) avec un incroyable pâté en croûte au chocolat !!

Dough:
- 250g of digestive cookies
- 25g of sugar
- 100g of semi-salted butter
Lemon Cream:
- 175g of lime juice
- zest of 4 Key Limes or 2 limes
- 2 boxes of 397g each of sweetened condensed milk
- 270g of Greek yogurt
Chantilly
- 250g of cold liquid cream
- 75g of cold mascarpone
- 30g of powdered sugar
- zest of 1 lime or 2 key limes
Prepare the dough by mixing the digestive cookies. Pour the powder obtained into a container and add the sugar and the semi-salted butter previously melted.
Mix well. Take a 22cm mould with a removable bottom to facilitate removal from the mould. Cut a piece of parchment paper into a circle the same diameter as the pan, and place it in the bottom. Sprinkle with the sandy dough and spread carefully in an even layer, going well up the sides. This is what ultimately takes the most time.
Bake for 15 minutes in a preheated oven at 180°C on revolving heat.
Meanwhile, prepare the cream: squeeze the limes to obtain 175g of juice. Pour the juice into a container with the zest, sweetened condensed milk and Greek yogurt. Mix well, the cream is very liquid. Don’t worry!
Pour into the pre-cooked pastry base, then put back into the oven, still at 180°C for 20 minutes. Small bubbles will appear on the top and the center should still shake slightly.
Remove from oven and let cool completely to room temperature before chilling for at least 3 hours.
Prepare the whipped cream by whisking all the ingredients together. Spoon it into the center of the unmolded cake. Sprinkle with a little lime zest and serve chilled!
Key Lime Pie
Ingredients
Pour la pâte :
- 250 g biscuits digestives
- 25 g sucre
- 100 g beurre demi-sel
Crème au citron
- 175 g jus de citron vert
- 4 zestes de citron key lime ou 2 zestes de citrons verts
- 794 g lait concentre sucré 2 boites de lait de 397g
- 270 g yaourt grec
Chantilly
- 250 g crème liquide bien froide
- 75 g mascarpone bien froid
- 30 g sucre glace
- 1 zeste citron vert
Instructions
- Préparez la pâte en mixant les biscuits digestives. Versez la poudre obtenue dans un récipient et ajoutez le sucre et le beurre demi-sel préalablement fondu.
- Mélangez bien. Prenez un moule de 22cm dont le fond est amovible pour faciliter le démoulage. Coupez un morceau de papier sulfurisé en un cercle de même diamètre que le moule, et placez-le dans le fond. Parsemez avec la pâte sableuse et étalez-la soigneusement en une couche uniforme en remontant bien sur les côtés. C’est ce qui prend finalement le plus de temps.
- Mettez à cuire 15 minutes dans un four préchauffé à 180°C sur chaleur tournante.
- Pendant ce temps préparez la crème : pressez les citrons verts pour avoir 175g de jus. Versez le jus dans un récipient avec le zeste, le lait concentré sucré et le yaourt grec. Mélangez bien, la crème est très liquide. Pas d’inquiétude !
- Versez dans le fond de pâte précuit, puis remettez au four, toujours à 180°C pendant 20 minutes. De petite bulles vont apparaître sur le dessus et le centre doit encore trembloter légèrement.
- Sortez du four et laissez complètement refroidir à température ambiante avant de mettre au frais pour au moins 3 heures.
- Préparez la chantilly en fouettant tous les ingrédients ensemble. Versez-la à la cuillère au centre du gâteau démoulé. Parsemez d’un peu de zeste de citron vert et servez bien frais !
Nutrition

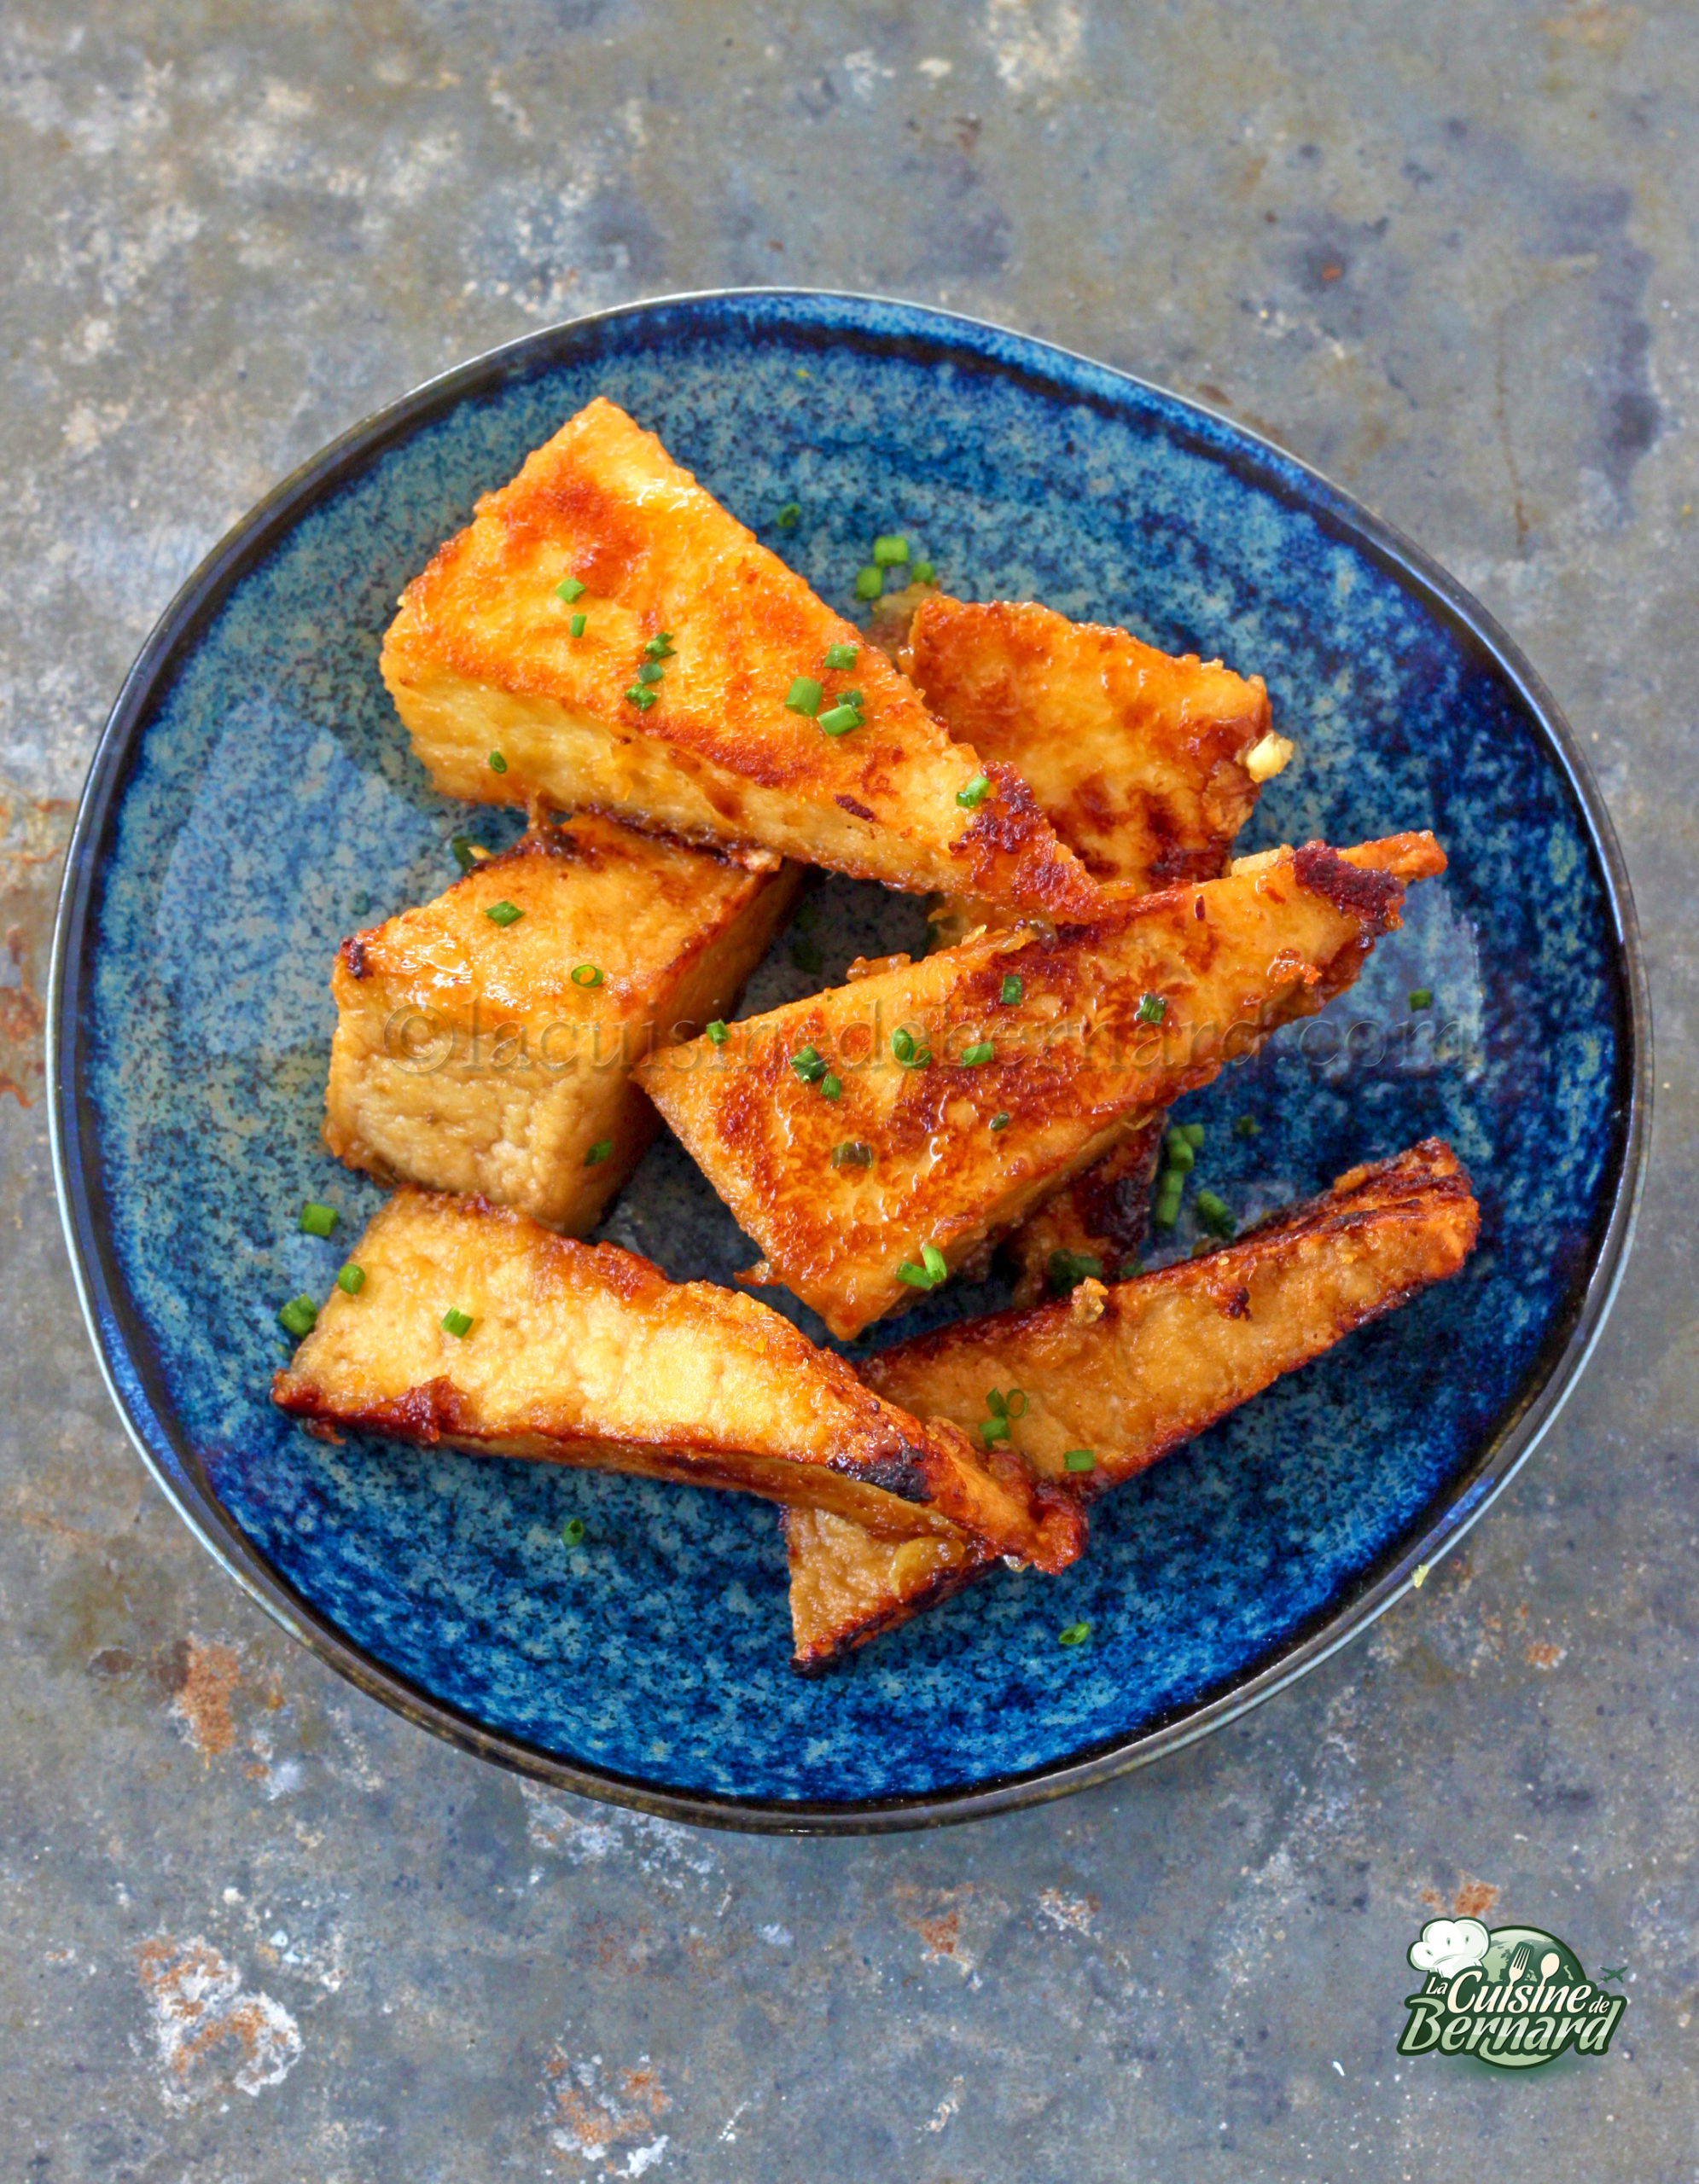
I’m not the biggest tofu fan in the world, but tofu atsuage has become a must for me. It is a Japanese tofu,“atsuage” meaning “thick and fried”. Pan-fried, with a miso-based sauce, it gives a truly excellent result! You can serve it with whatever you want: vegetables, rice etc. In addition, this dish is suitable for totally vegan people.
Recipe for 300g of tofu atsuage :
- 300g of tofu atsuage
- oil and salt
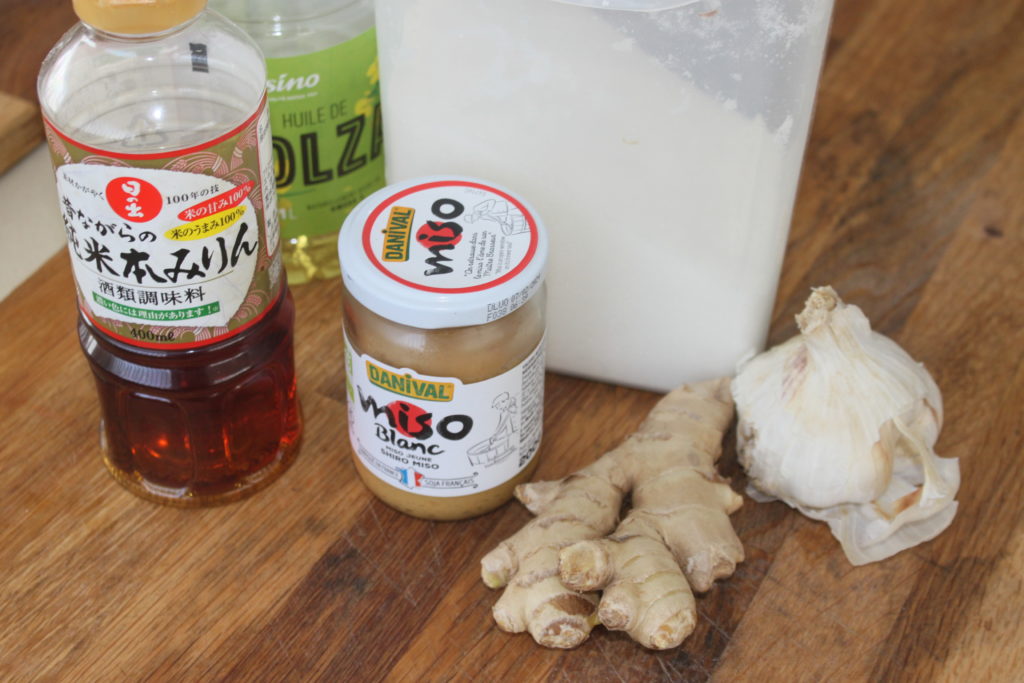
For the sauce:
- 20g of sugar
- 10g of mirin
- 60g of miso paste of your choice
- 20g of water
- 30g of oil
- 2 cloves of garlic
- 3-4cm of ginger
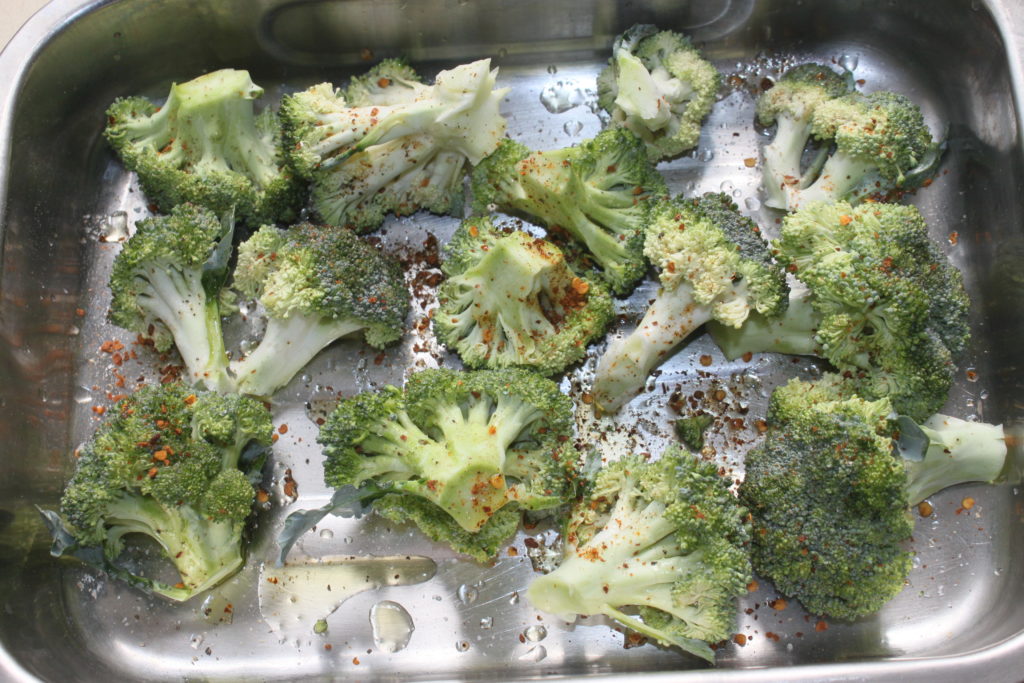
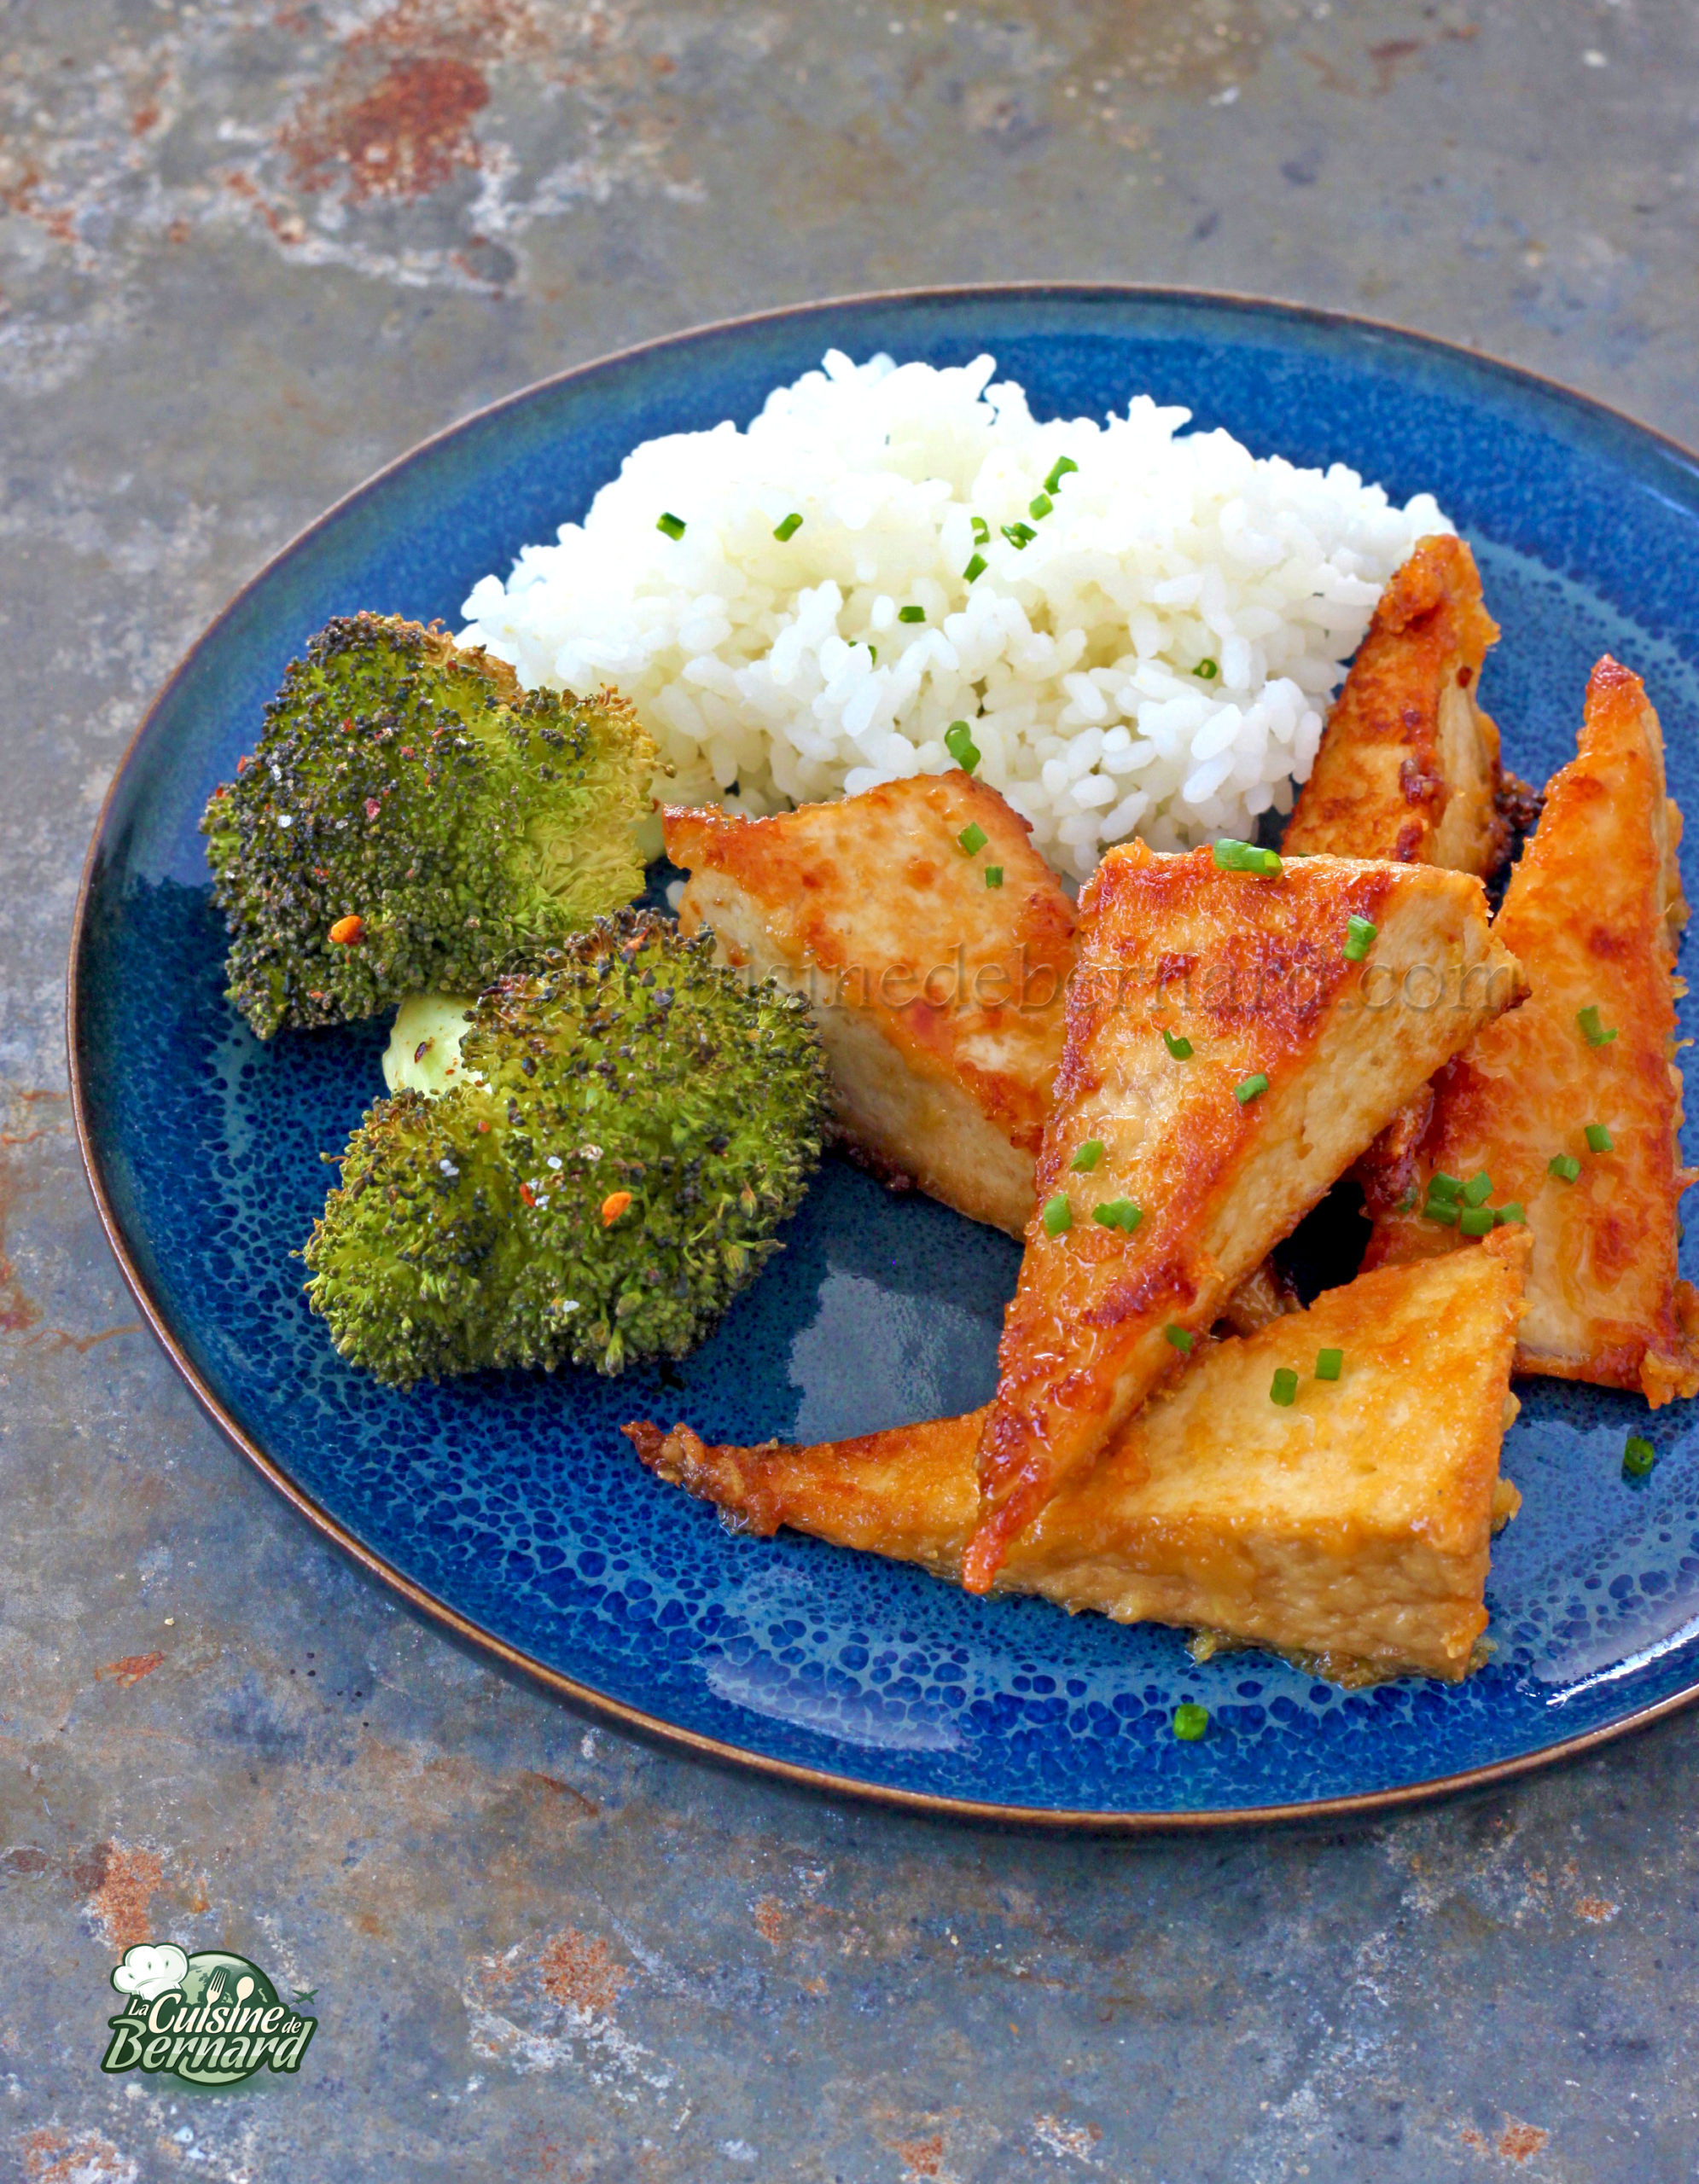
For this recipe, I cook broccoli in the oven at 190°C for 25 to 30 minutes. I sprinkle with a little olive oil, salt and pepper and a little chili powder. Also put plain rice of your choice to cook.
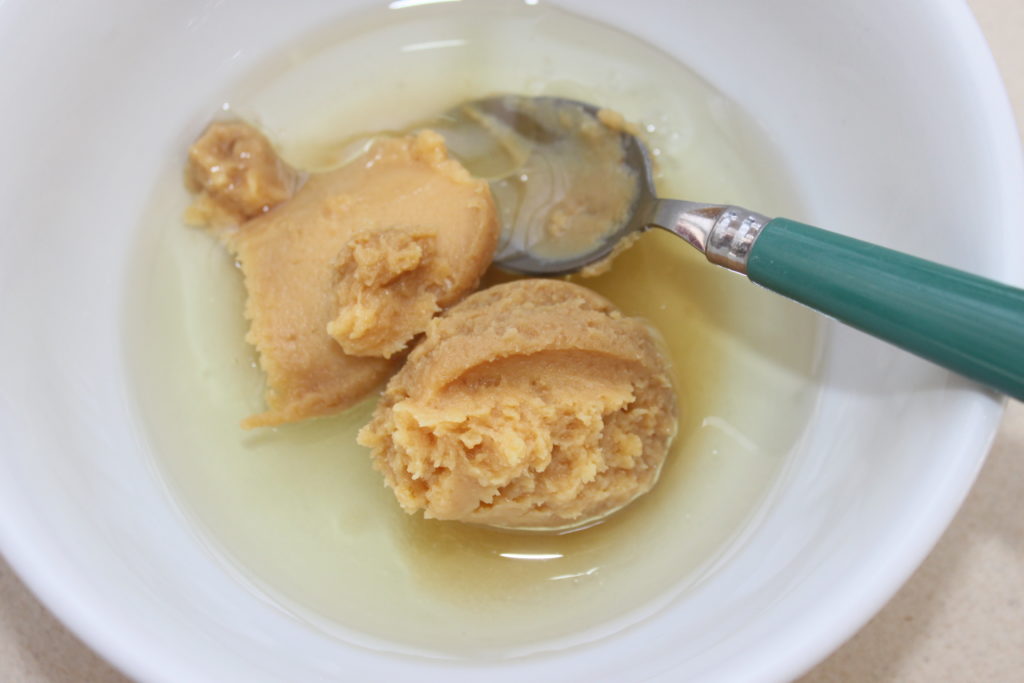
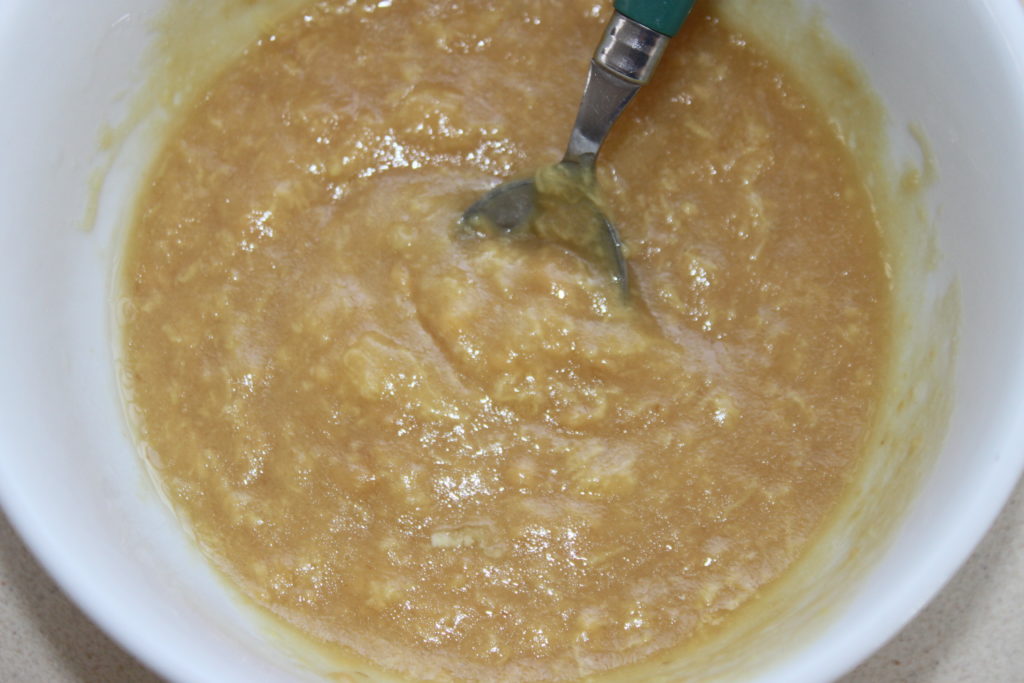
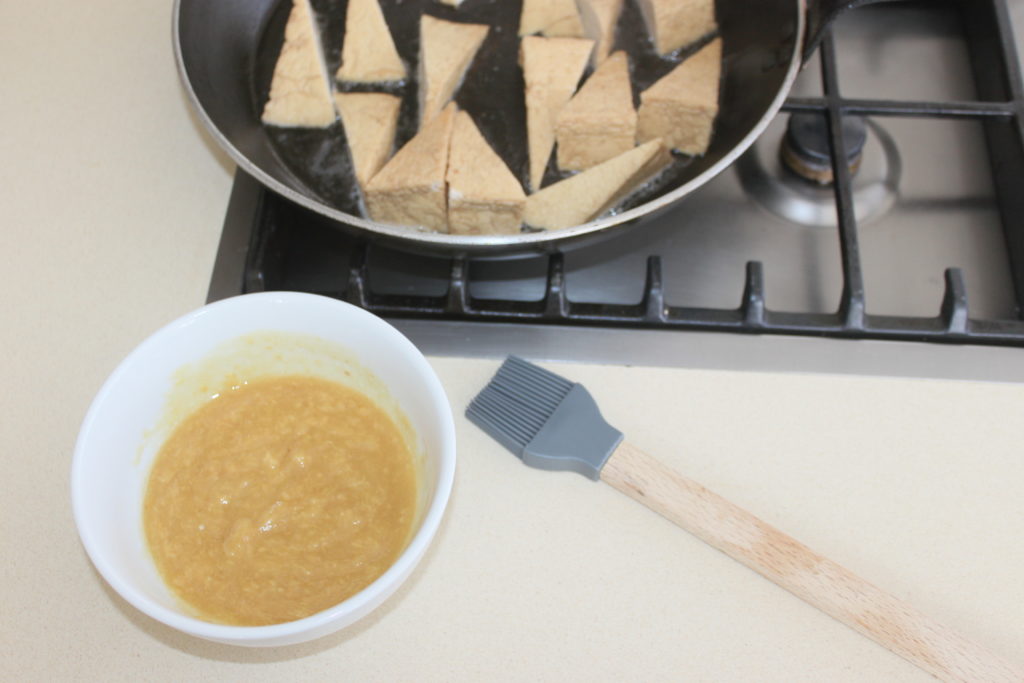
For the sauce, you need it all!
Put all ingredients in a bowl and mix well.
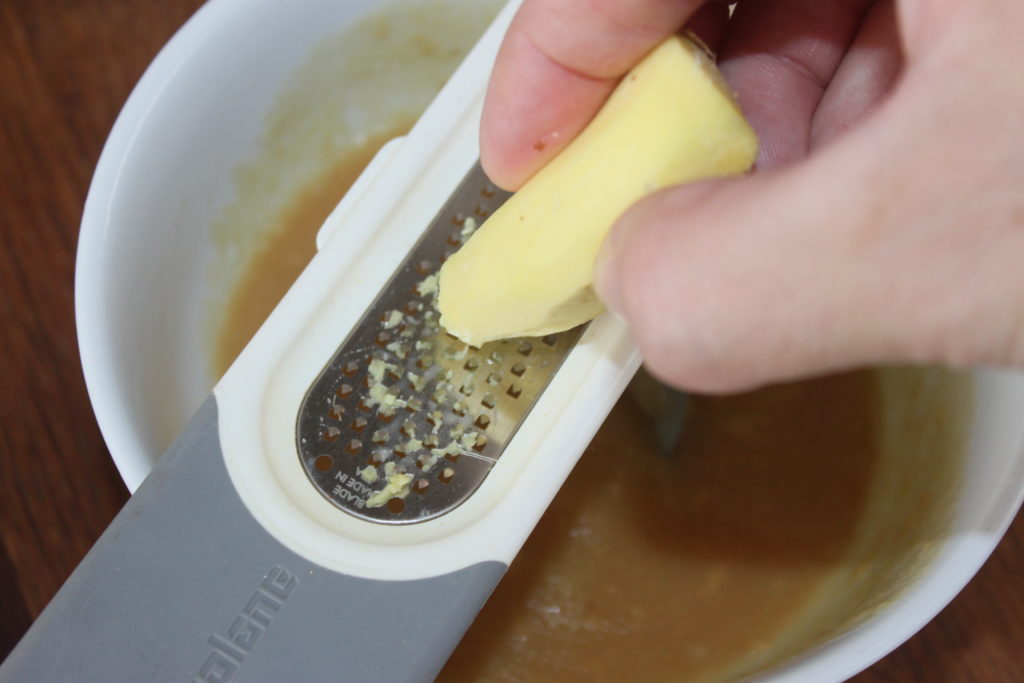
Add the peeled and crushed garlic cloves and the freshly grated ginger.
The sauce is ready.
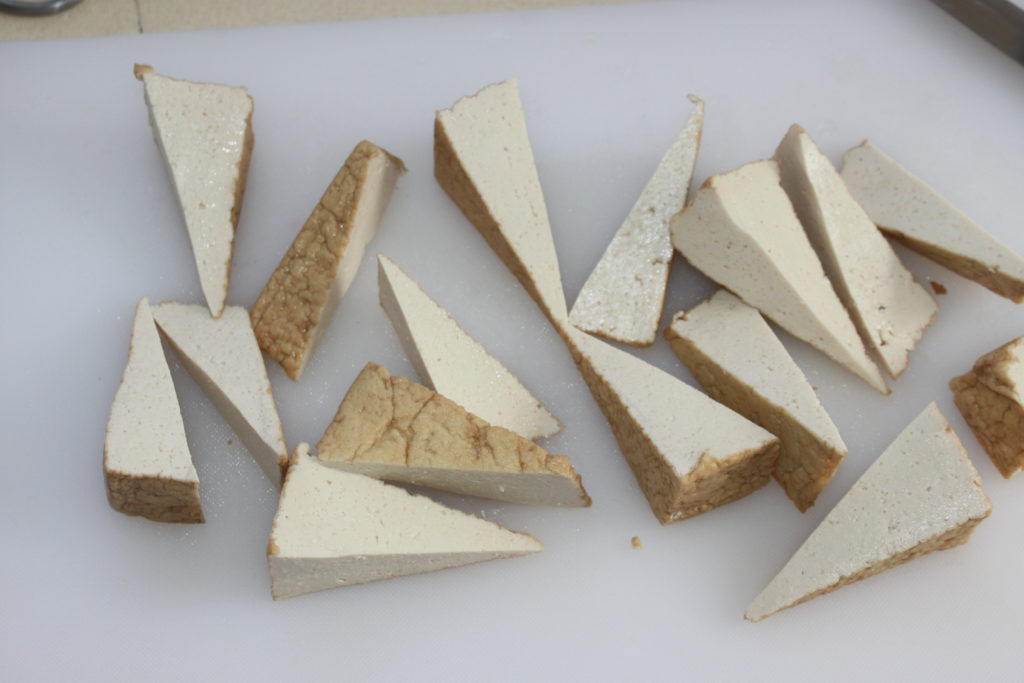
This is the tofu atsuage that I buy in Japanese grocery stores or online.
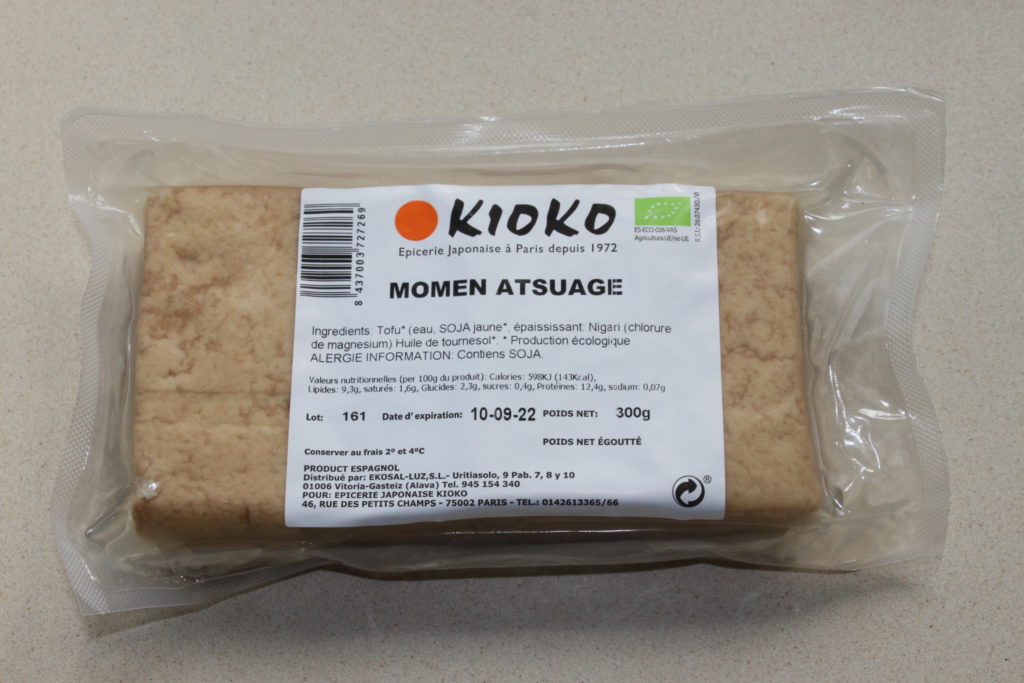
With this brand (I’m not sponsored at all!) we get 4 rectangles of tofu per package.
I cut diagonally once, then diagonally again each half obtained.
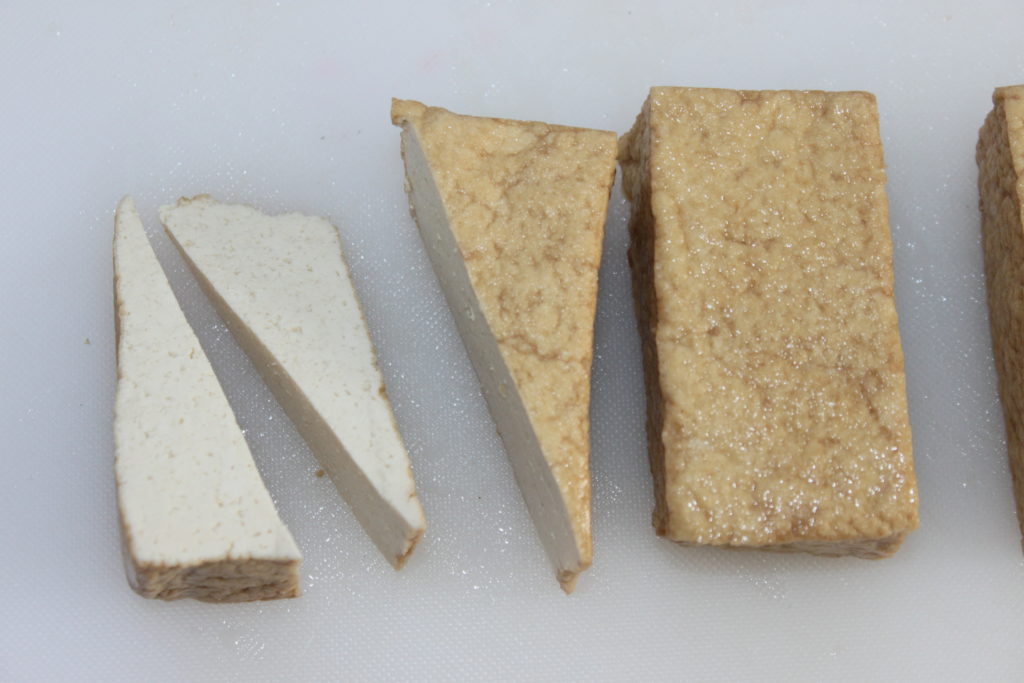
Do the same for all the tofu.
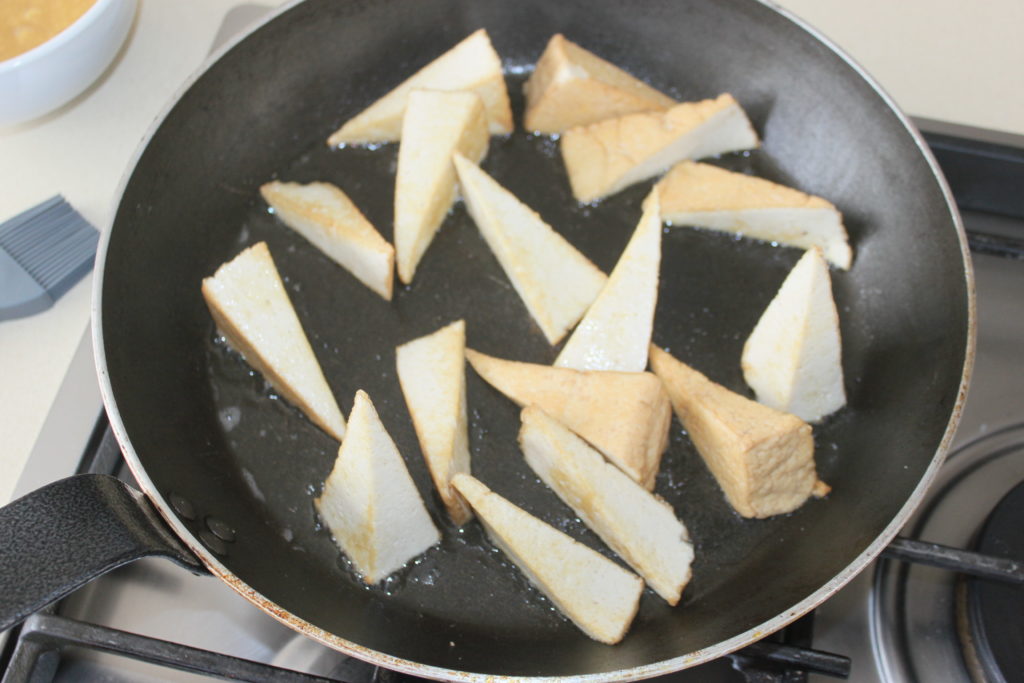
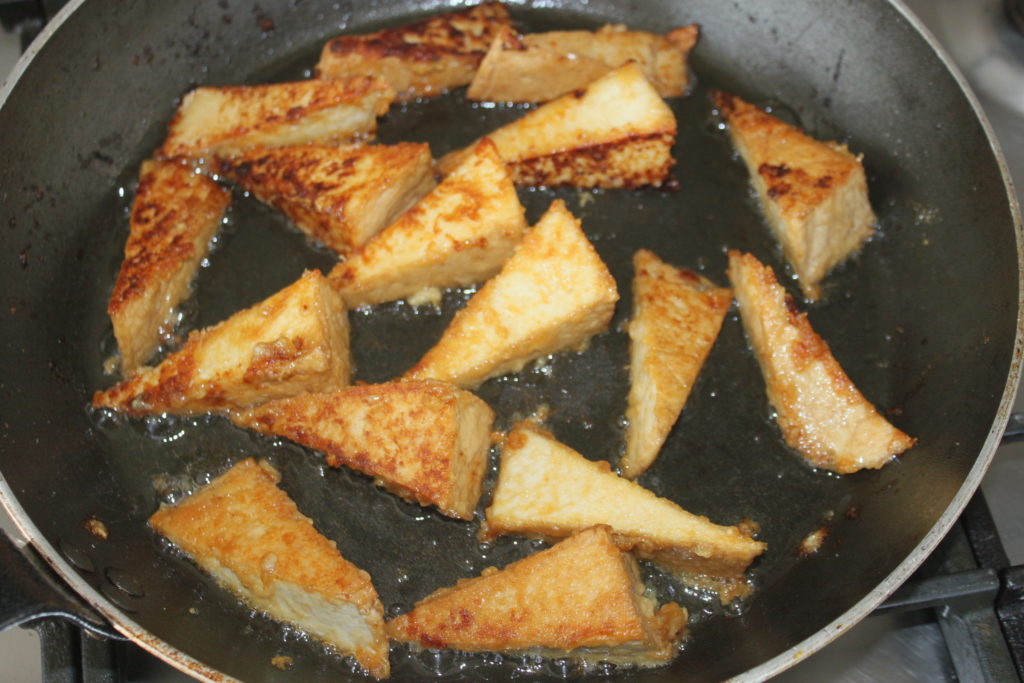
Heat a large skillet over moderate heat with a little oil. Place the tofu pieces in it and have the sauce and a kitchen brush nearby.
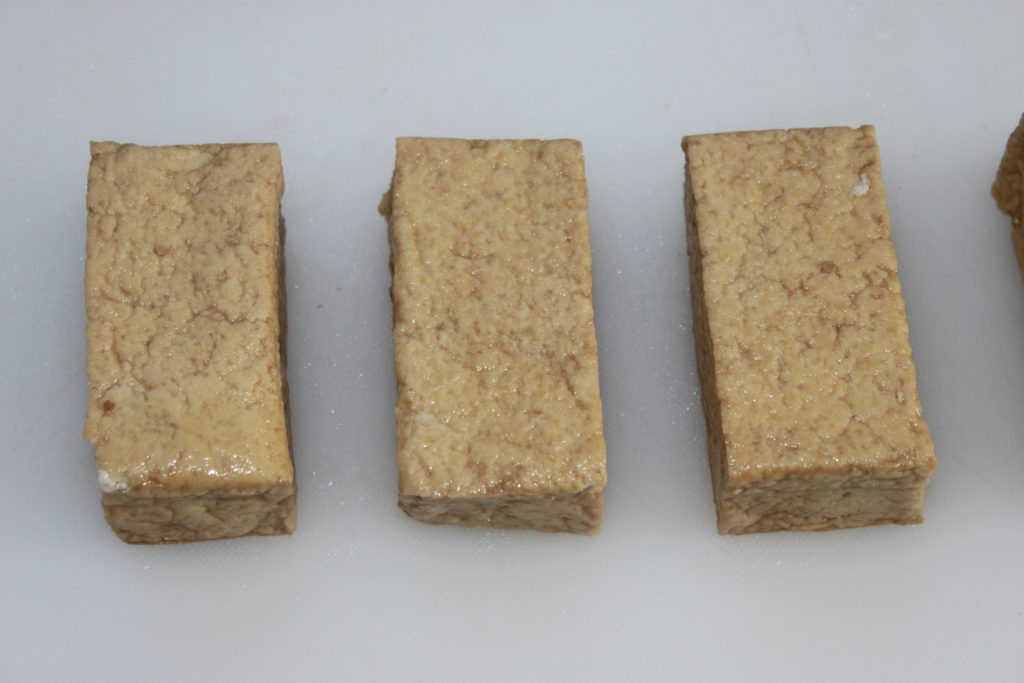
Brown the tofu on all sides. This will take about 10 minutes in total.
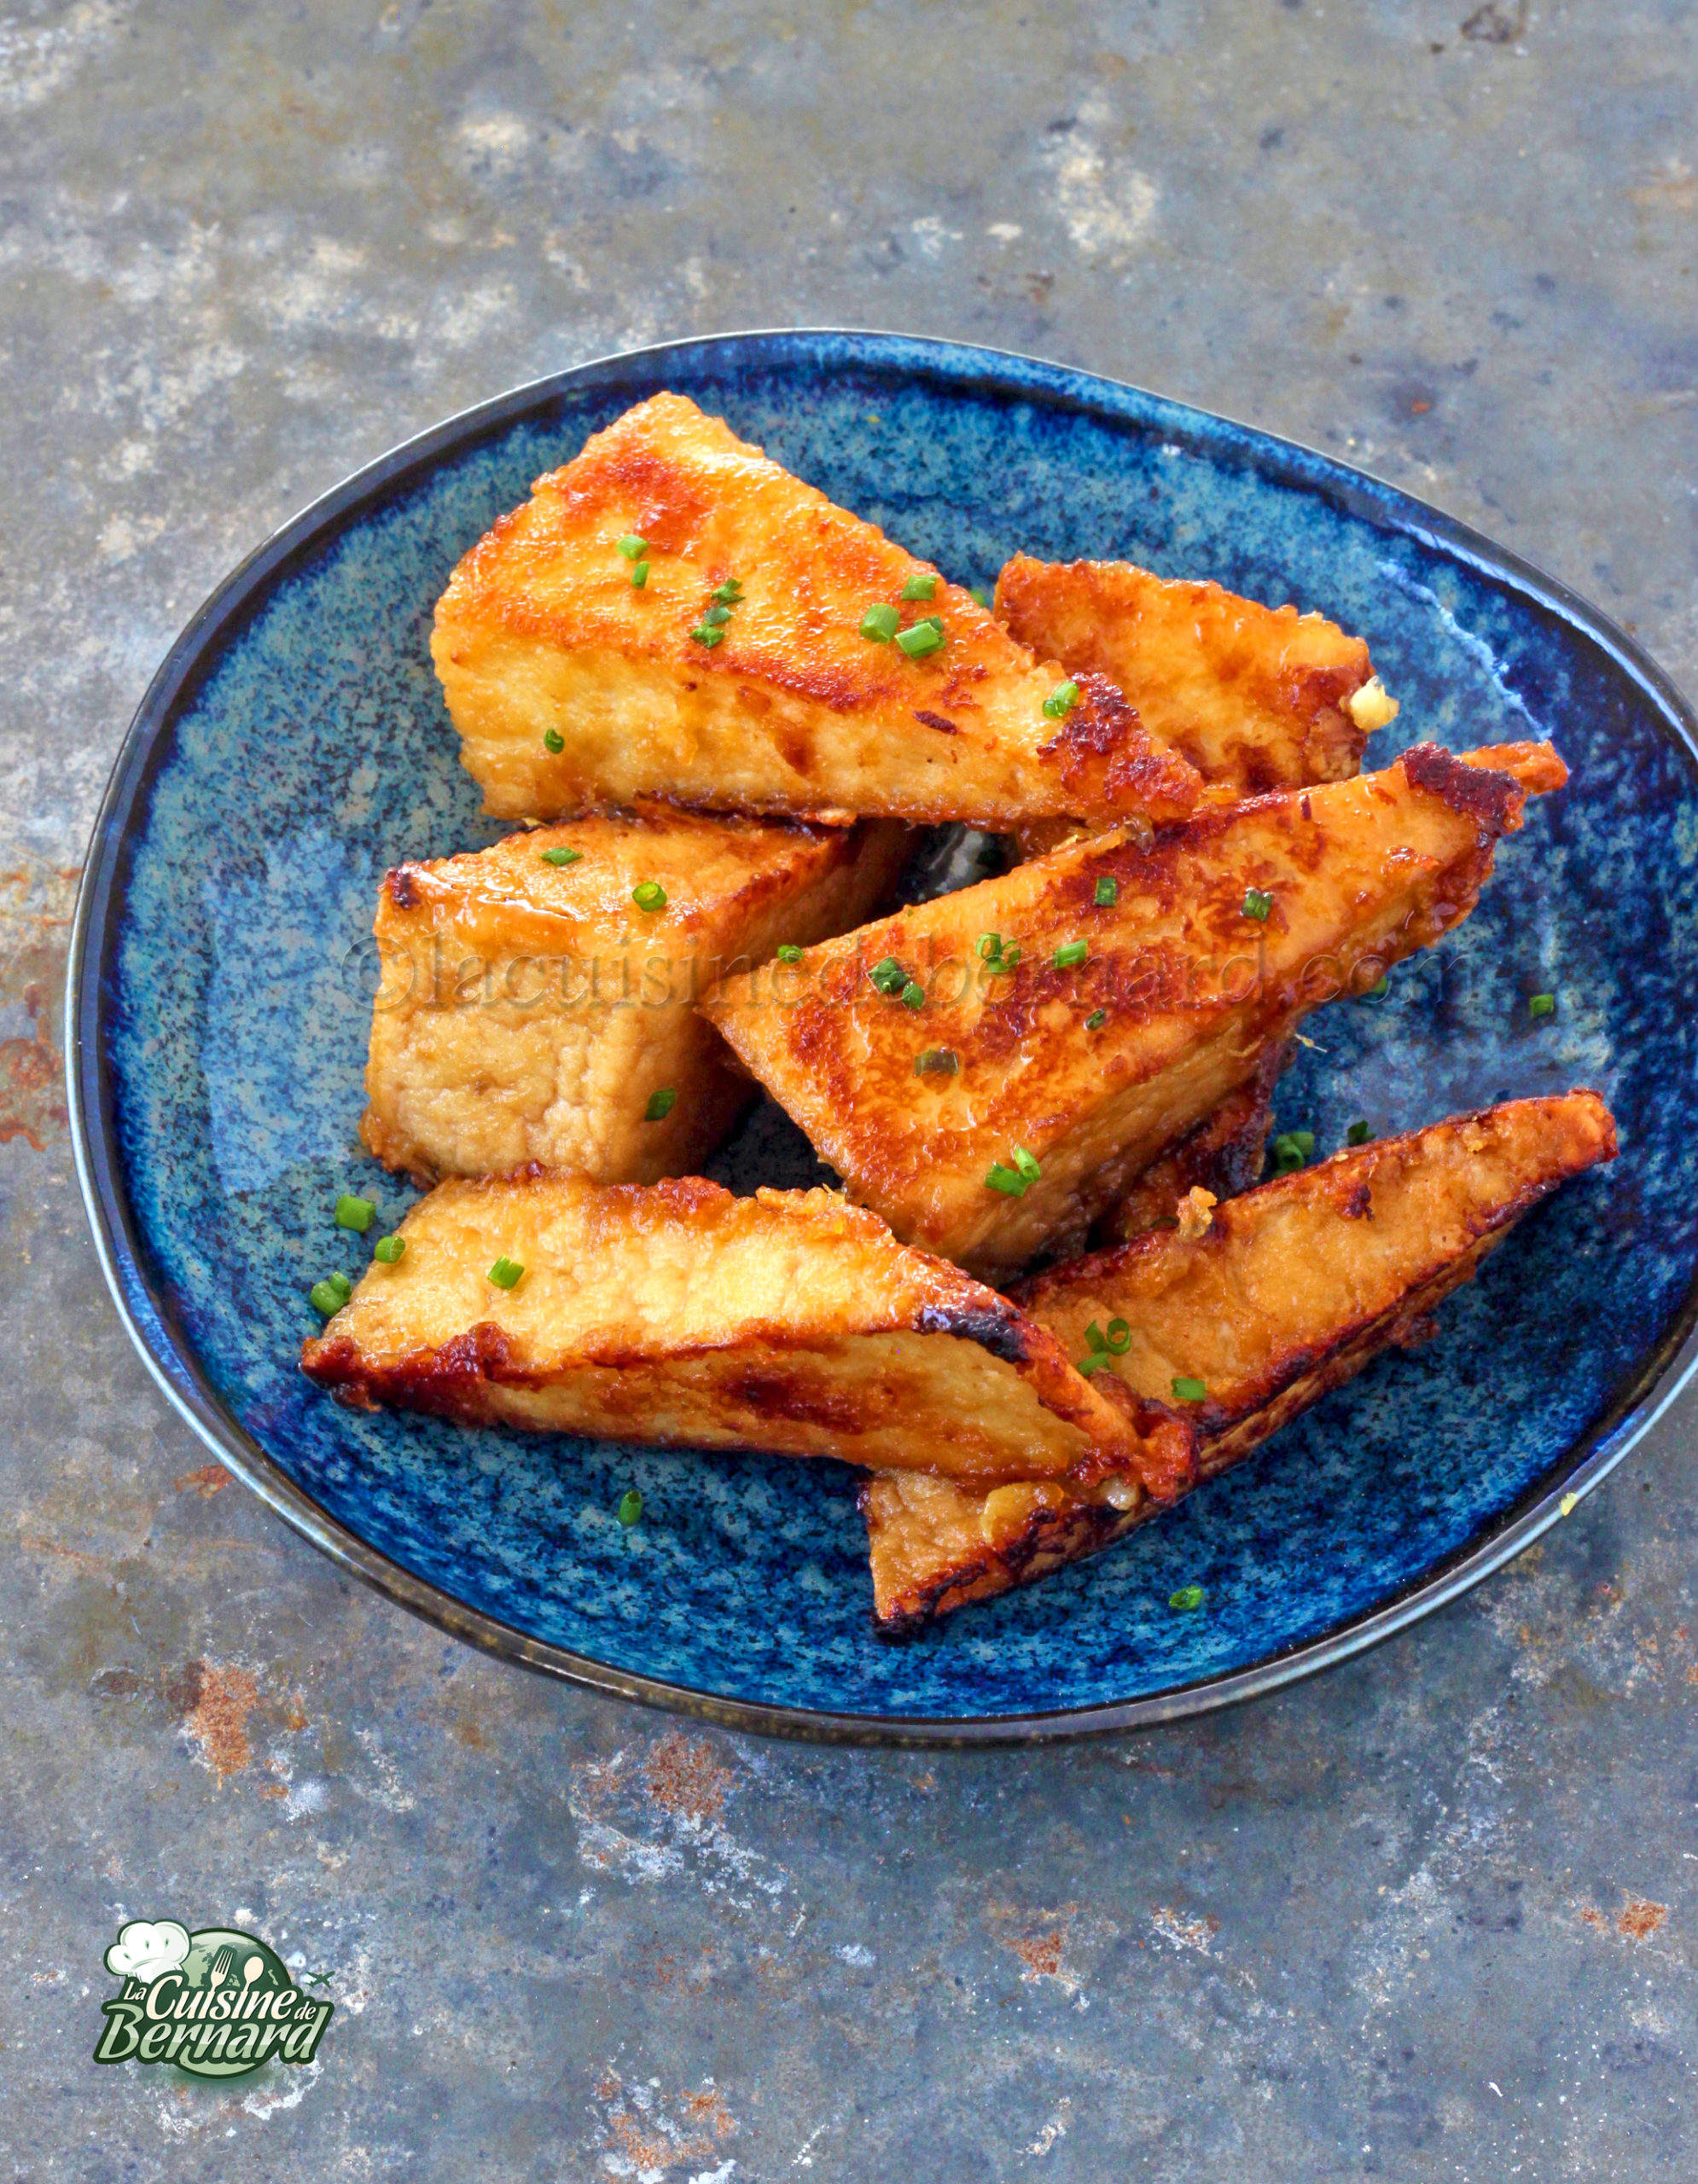
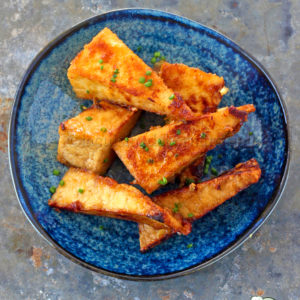
When the tofu is lightly browned all over, coat it with the sauce on all sides.
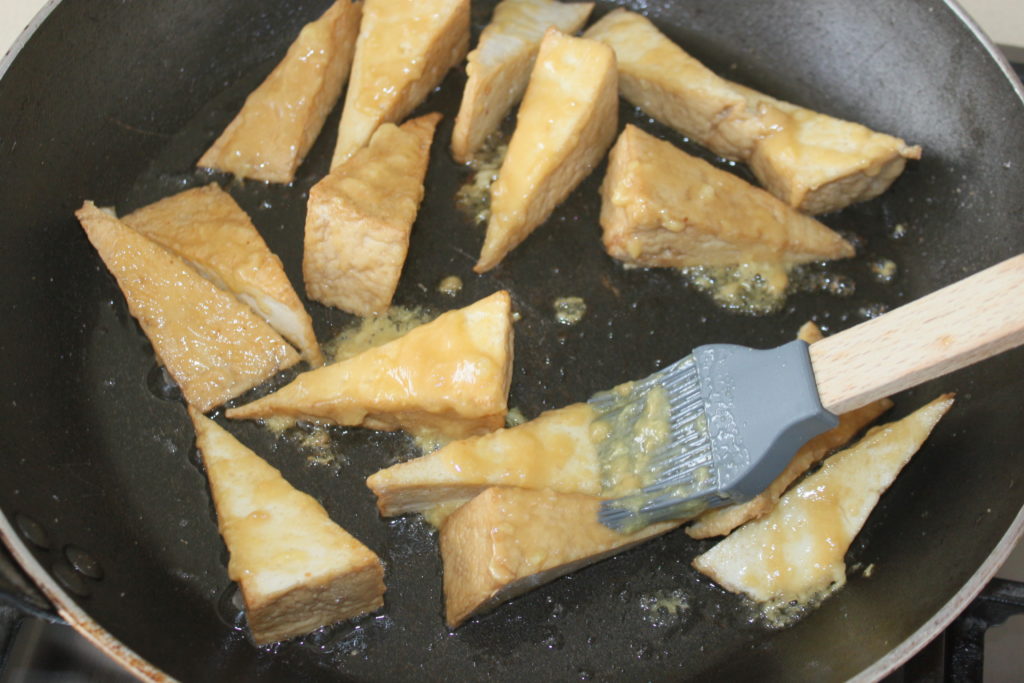
I put the sauce and let it cook and brown. It can be added regularly during cooking and there will usually be no sauce left in the bowl. As soon as you add this slightly sweet sauce, the tofu will brown much more, so you have to control the temperature. Add salt to taste.
Serve hot with plain rice and vegetables.
Tofu Atsuage sauce miso ail gingembre
Ingredients
Instructions
- Pour cette recette, je fais cuire des brocolis au four, à 190°C pour 25 à 30 minutes. J'arrose d'un peu d'huile d'olive, de sel et poivre et d'un peu de piment en poudre. Mettez également un riz nature de votre choix à cuire.
- Mettez tous les ingrédients de la sauce dans un bol et mélangez bien.
- Ajoutez les gousses d'ail épluchées et écrasées au presse-ail, et le gingembre fraichement râpé.
- Avec cette marque de tofu, on a 4 rectangles de tofu par paquet. Je coupe en diagonale une première fois, puis à nouveau en diagonale chaque moitié obtenue. Faites de même pout tout le tofu.
- Faites chauffer une grande poêle sur feu modéré, avec un peu d'huile. Placez les morceaux de tofu dedans et ayez à proximité la sauce et un pinceau de cuisine.
- Faites dorer le tofu sur tous les côtés. Cela prendra une dizaine de minutes en tout.
- Quand le tofu est légèrement doré partout, nappez-le de sauce sur tous les côtés. Je mets puis je laisse cuire et dorer. On peut en ajouter régulièrement pendant la cuisson et il ne restera normalement plus de sauce dans le bol. Dès qu'on ajoute cette sauce légèrement sucré, le tofu va dorer beaucoup plus, il faut donc bien contrôler la température. Salez légèrement à votre goût.
- Servez bien chaud, avec un riz nature et des légumes.
Nutrition

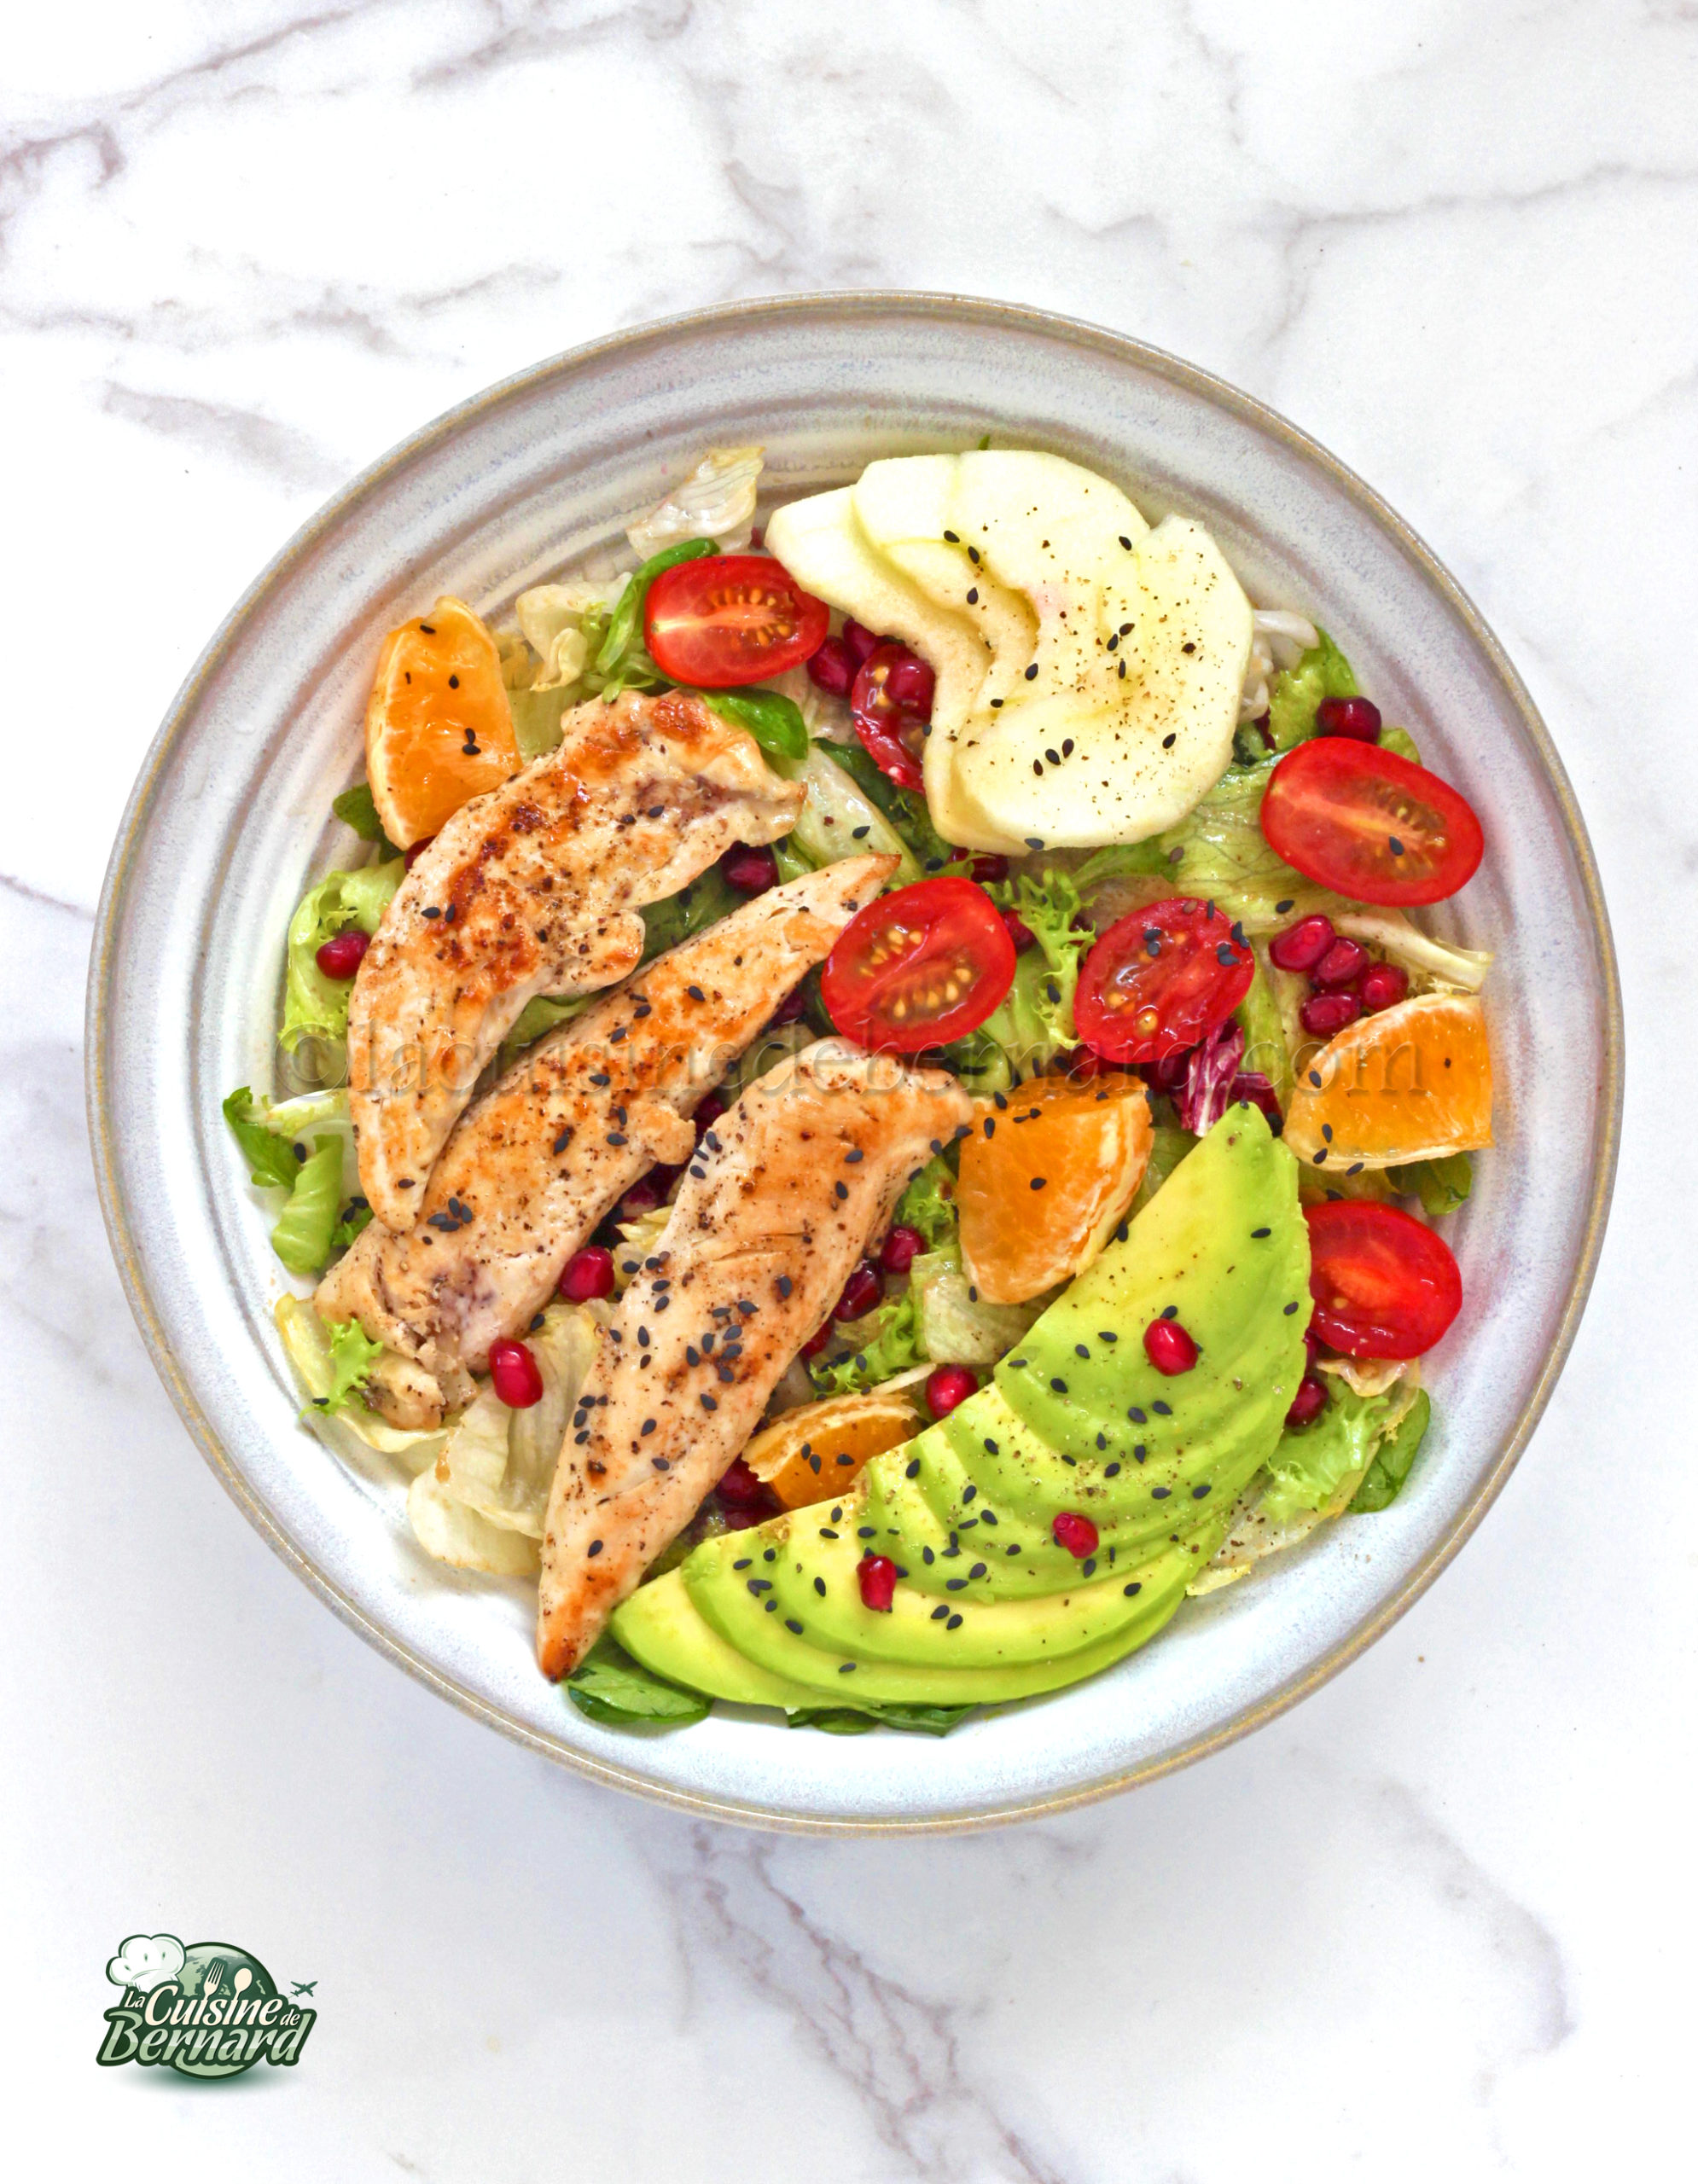
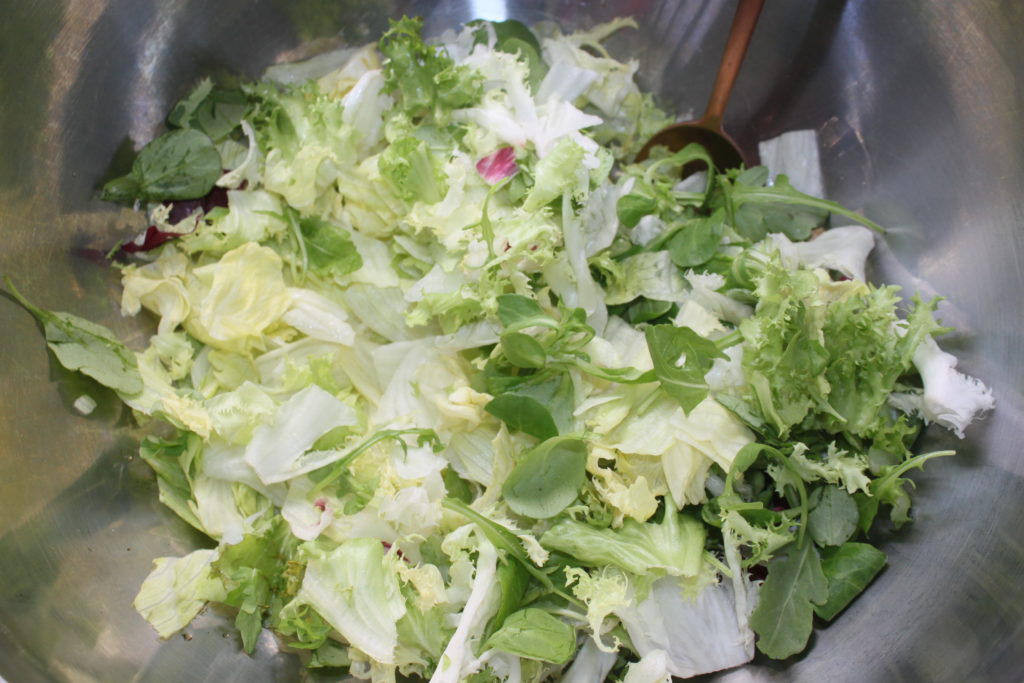
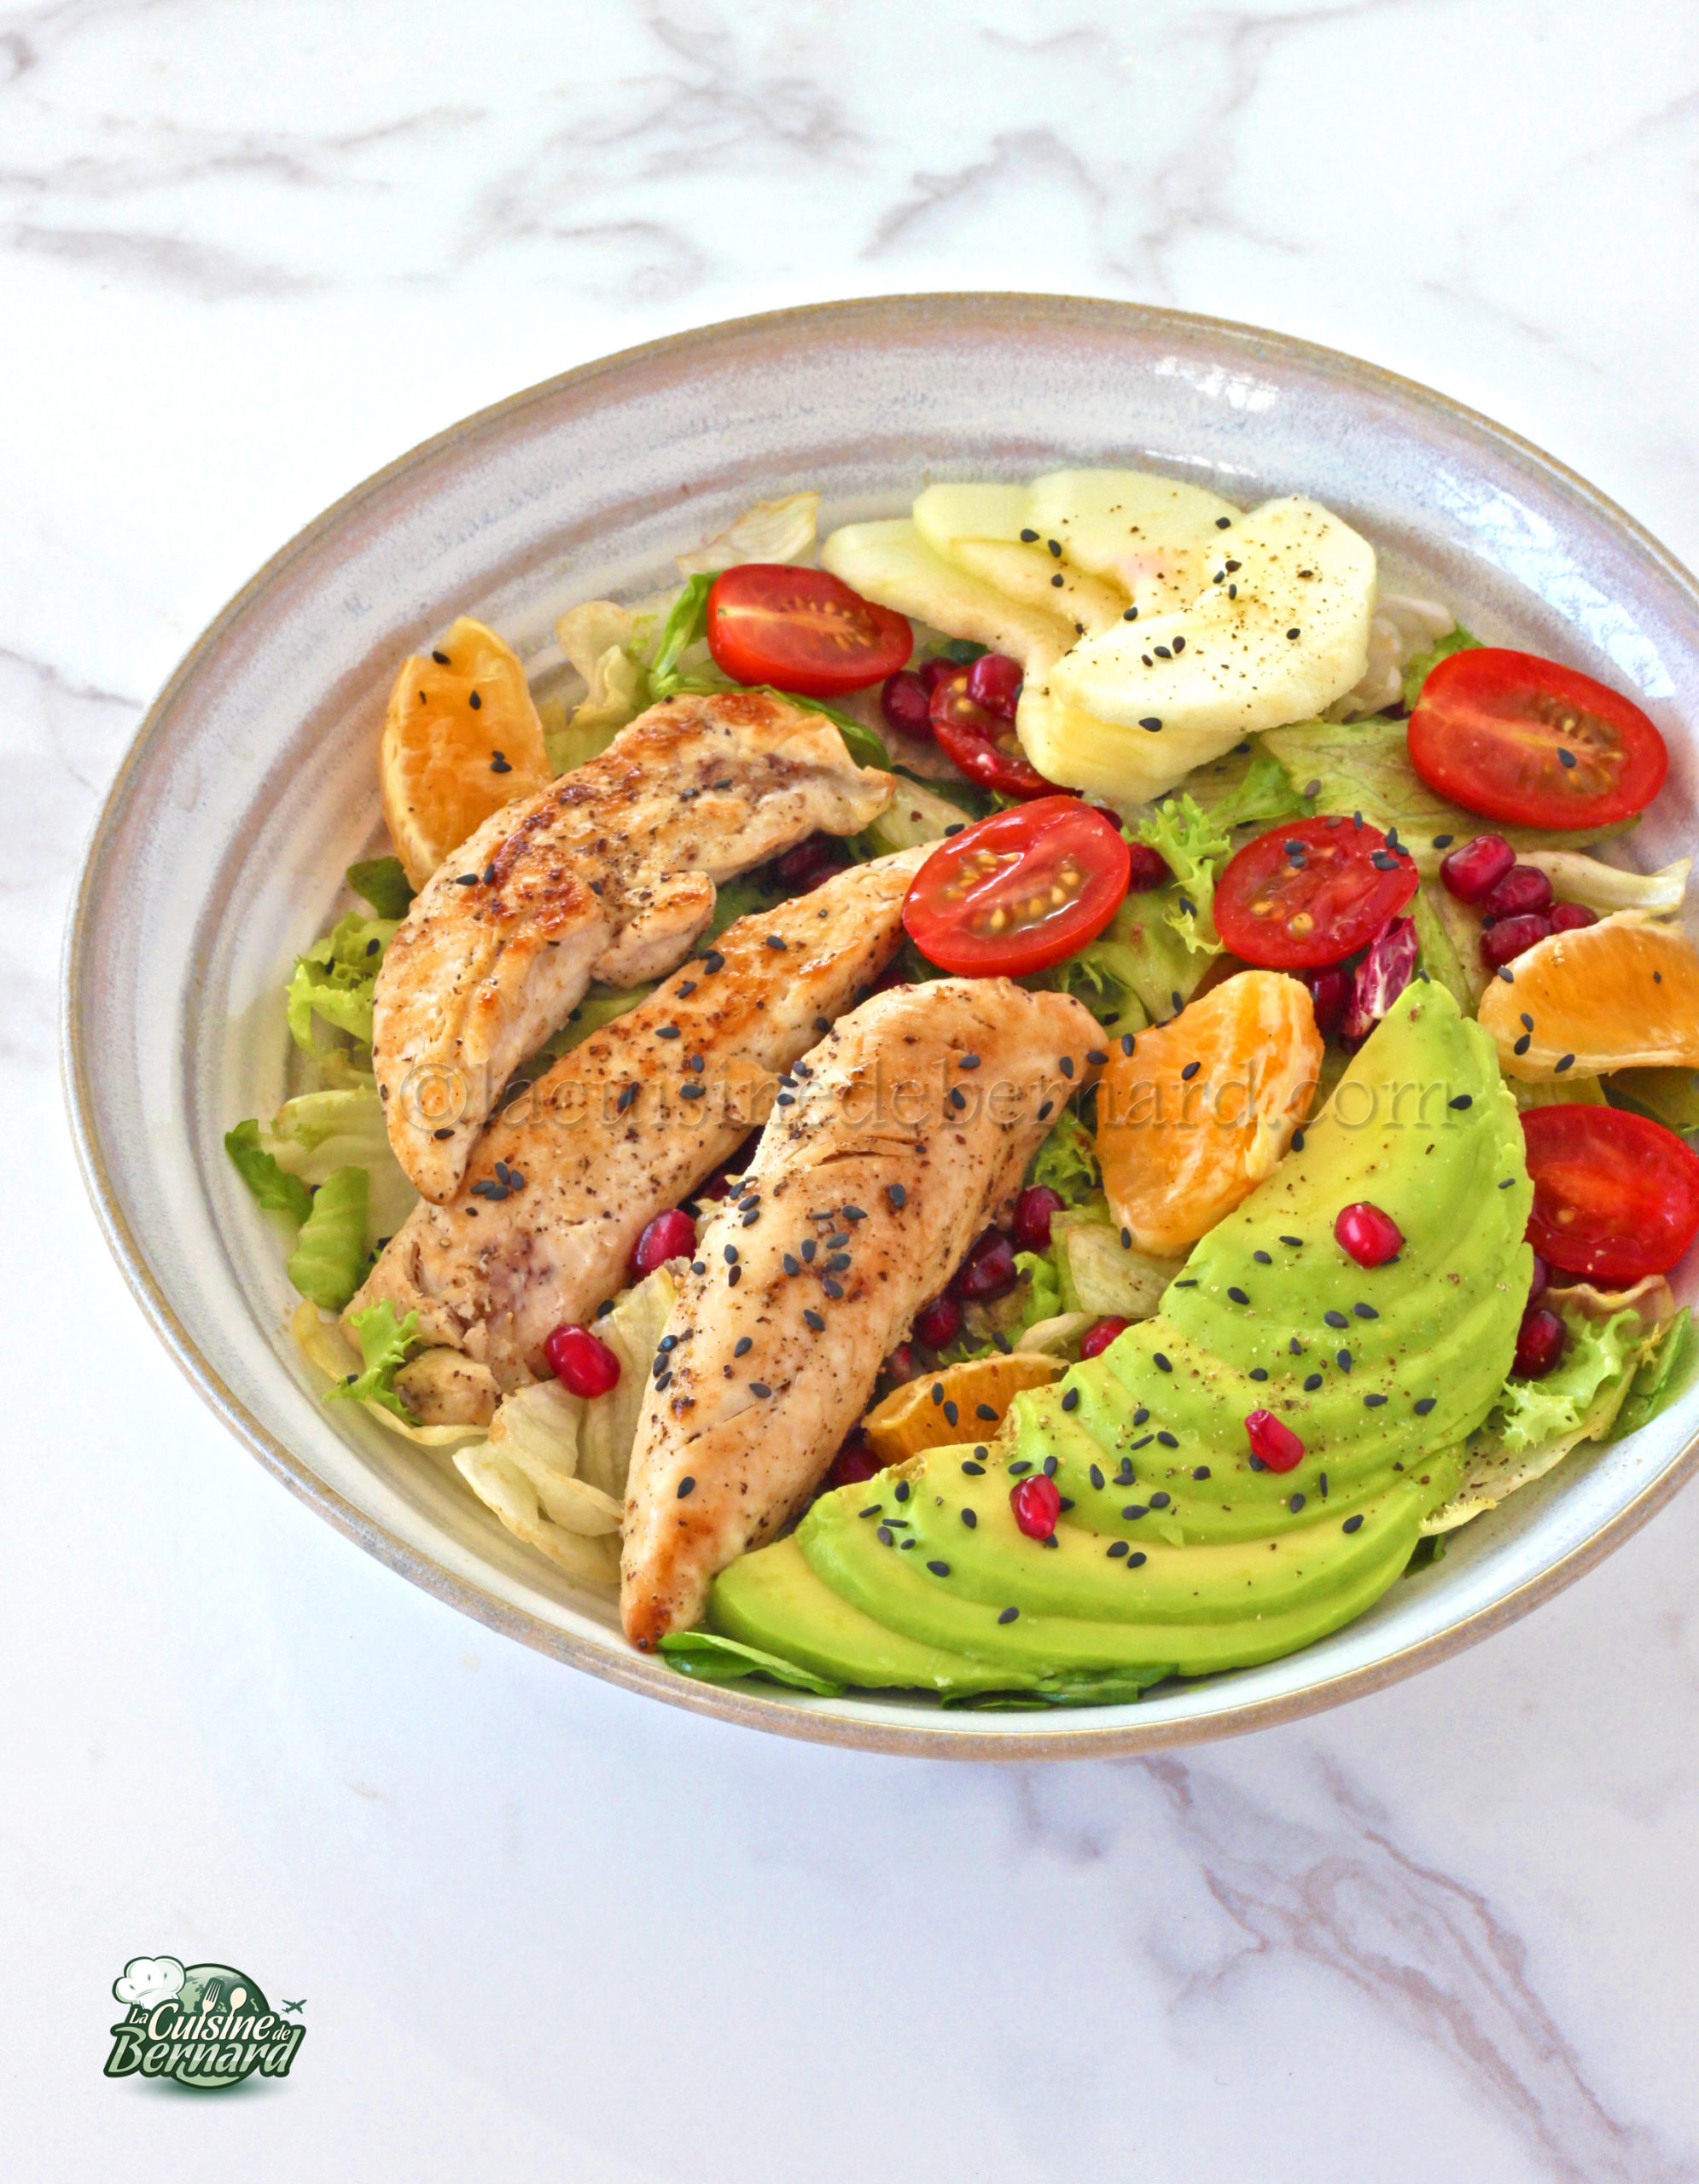
It’s still summer vacation and I want to extend the feeling a little bit! This is not strictly speaking a recipe, but an idea for a salad where the elements work well together! It’s fresh, light and absolutely delicious and nourishing. The sauce, with its touch of toasted sesame oil, will give the whole a beautiful exotic tone. Don’t hesitate to add dried fruits, such as peanuts or roasted almonds, and aromatic herbs!
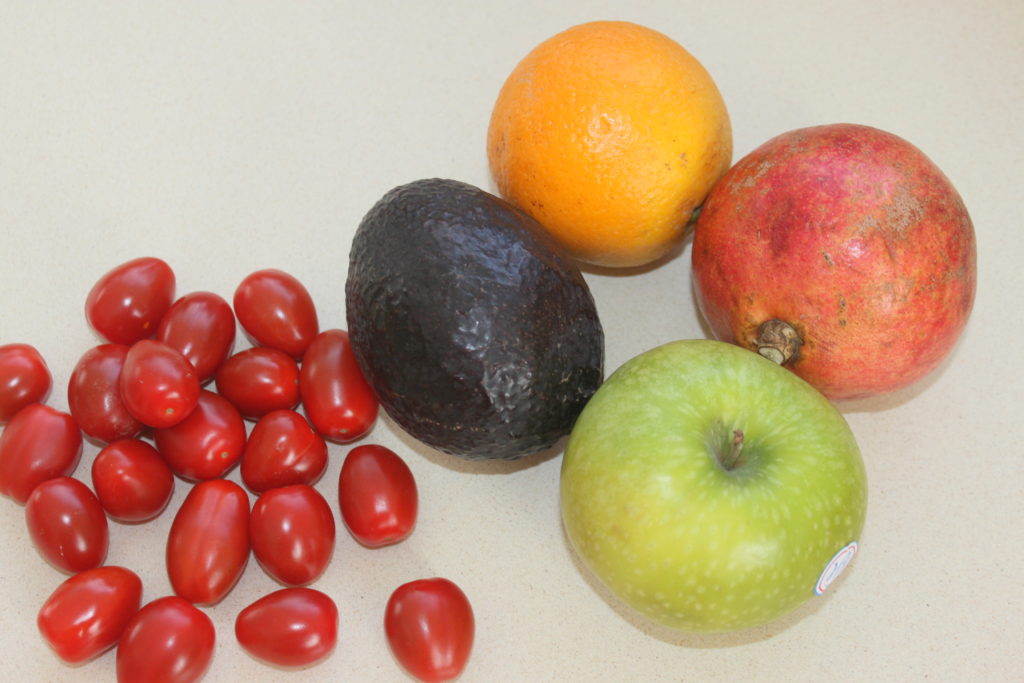
For 4 people :
- 12 to 16 chicken strips
- 1 apple
- 1 pomegranate
- 1 lawyer
- 1 orange
- 250g of cherry tomatoes
- black sesame seeds
- peanuts, coriander
- green salad
For the sauce:
- 1 clove of garlic
- 1 teaspoon of honey
- 1 tablespoon of balsamic vinegar
- 2 tablespoons of orange juice
- 4 tablespoons of olive oil
- 1 to 2 teaspoons of toasted sesame oil
- salt pepper
Prepare all the fruit. Wash the tomatoes and cut them in half. Peel the apple and cut it into quarters, then into thinner slices. Do the same for the avocado.
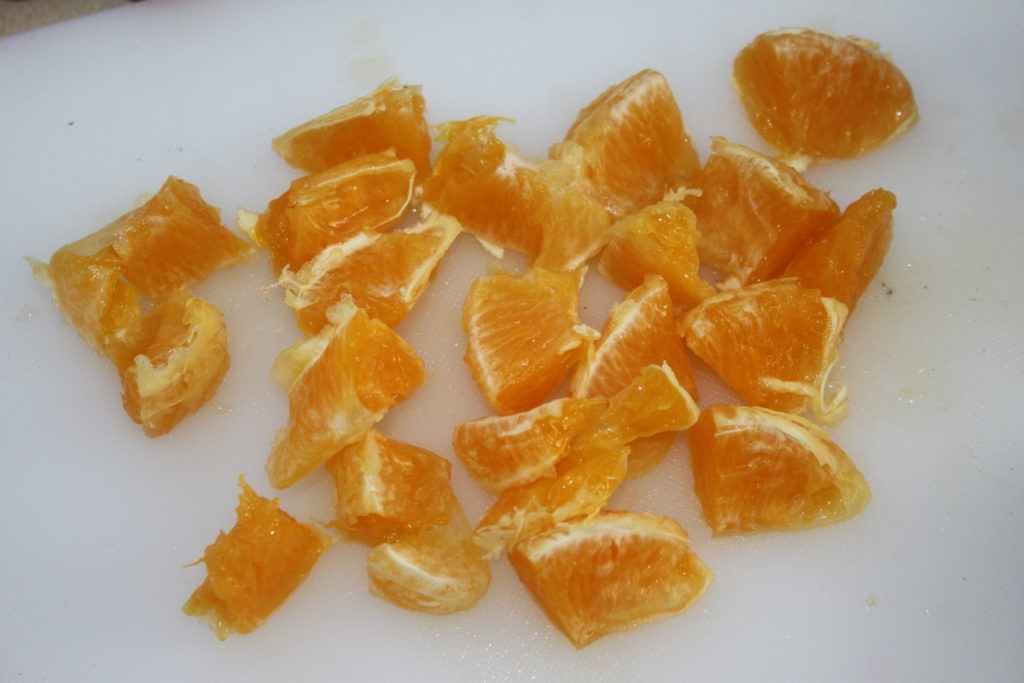
Peel the orange and cut the segments in half.
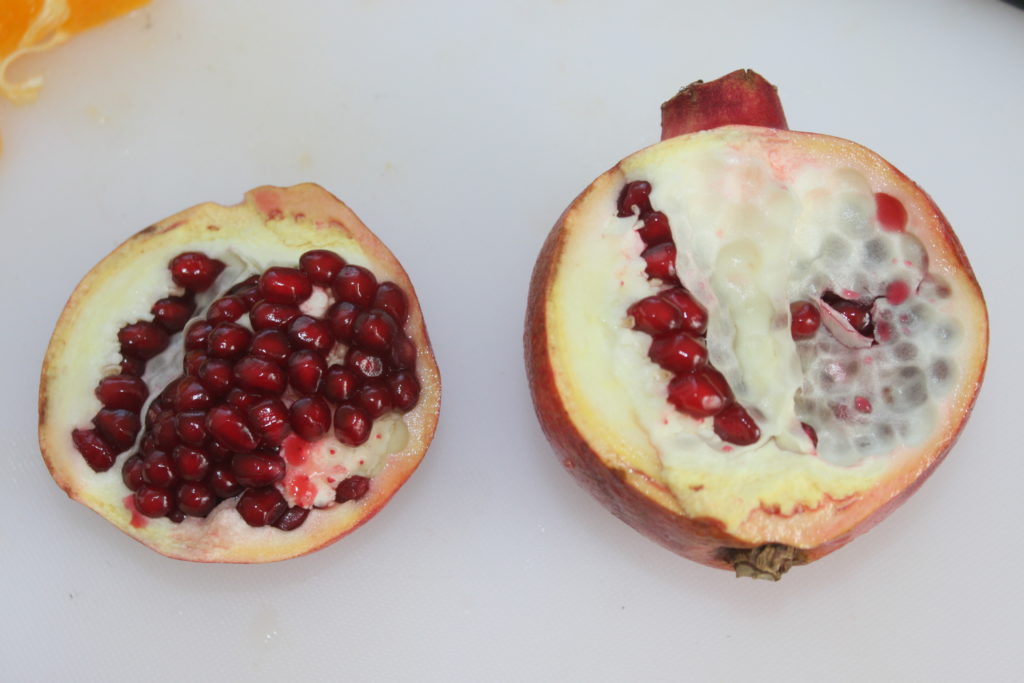
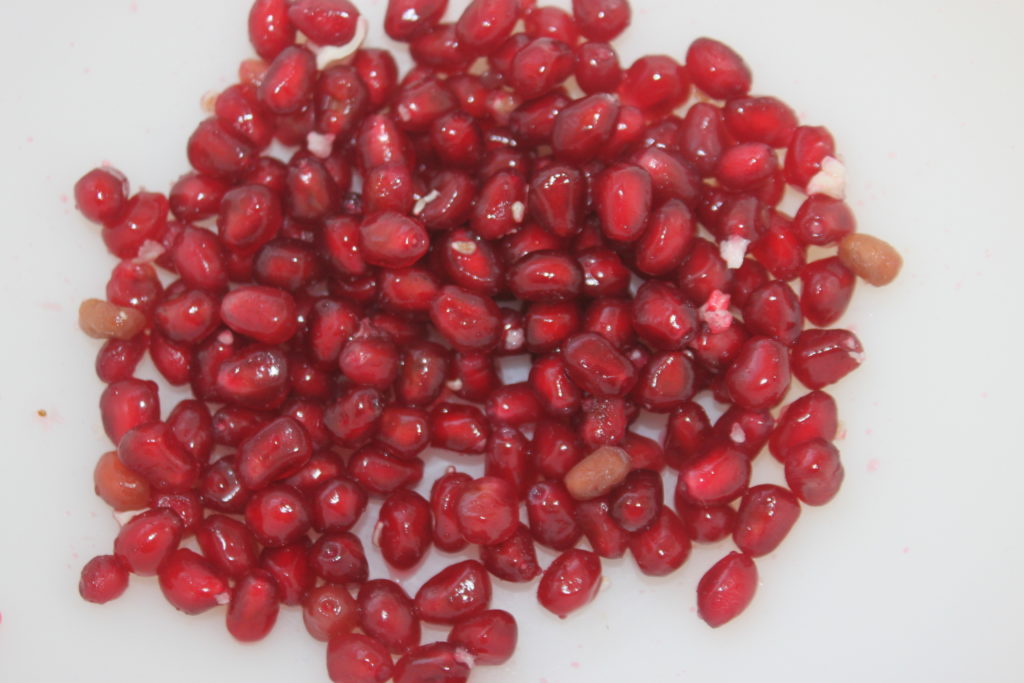
Open the grenade. Then put one piece upside down in the palm of your hand over a container, and with the other, tap the skin with a spoon to make the seeds fall out.

Nothing could be easier in the end!
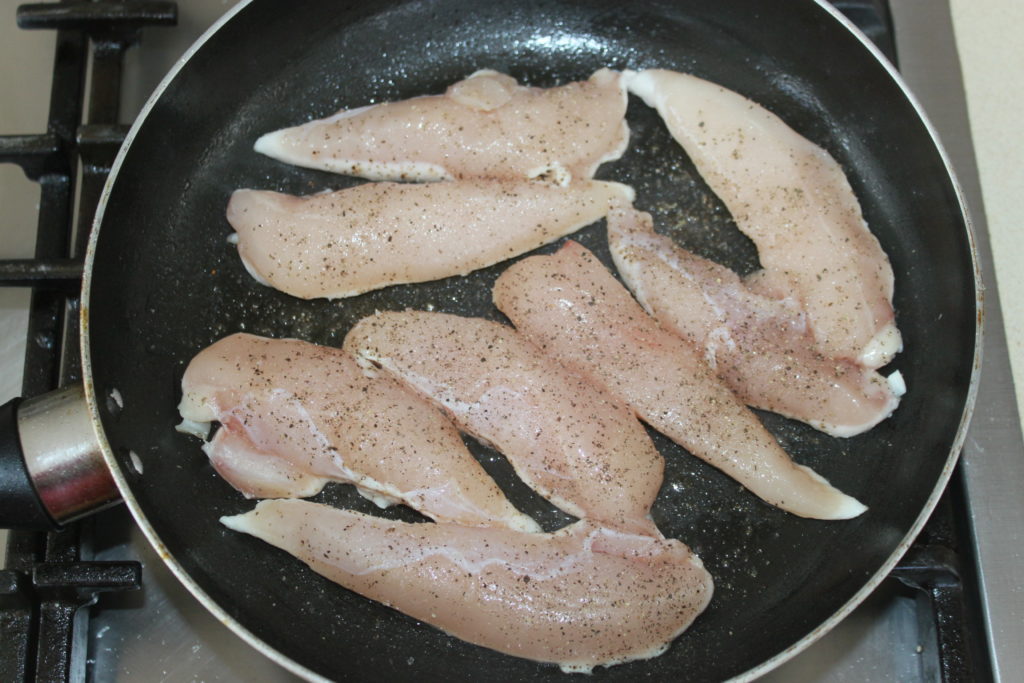
Cook the chicken aiguillettes over a high heat with a drizzle of olive oil. Put salt and pepper at your taste.
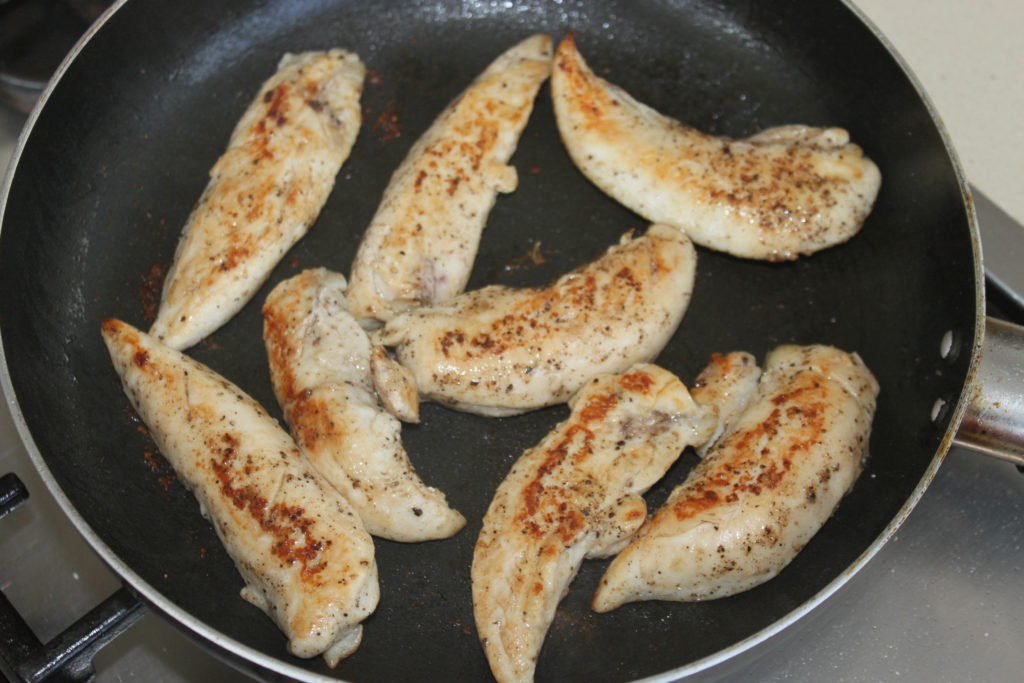
Turn over to cook the other side. The meat must be cooked through.
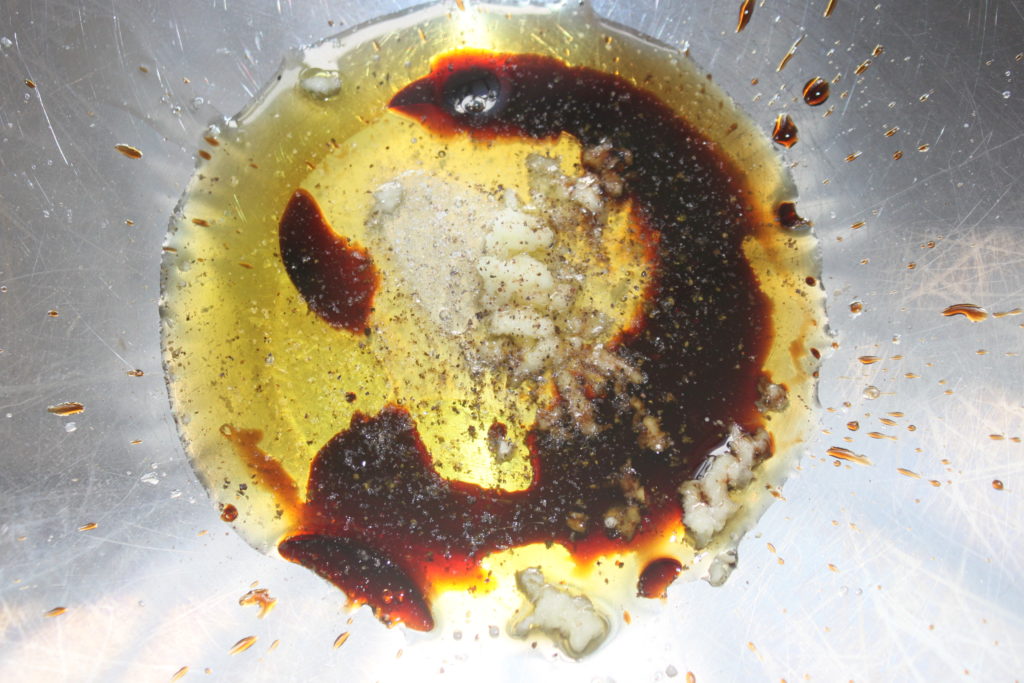
Put the ingredients for the sauce in a large bowl. For the garlic clove, peel it and crush it with a garlic press.
Add the salad of your choice. Mix well.
You can add all the ingredients or you can assemble the plates to make them more attractive.
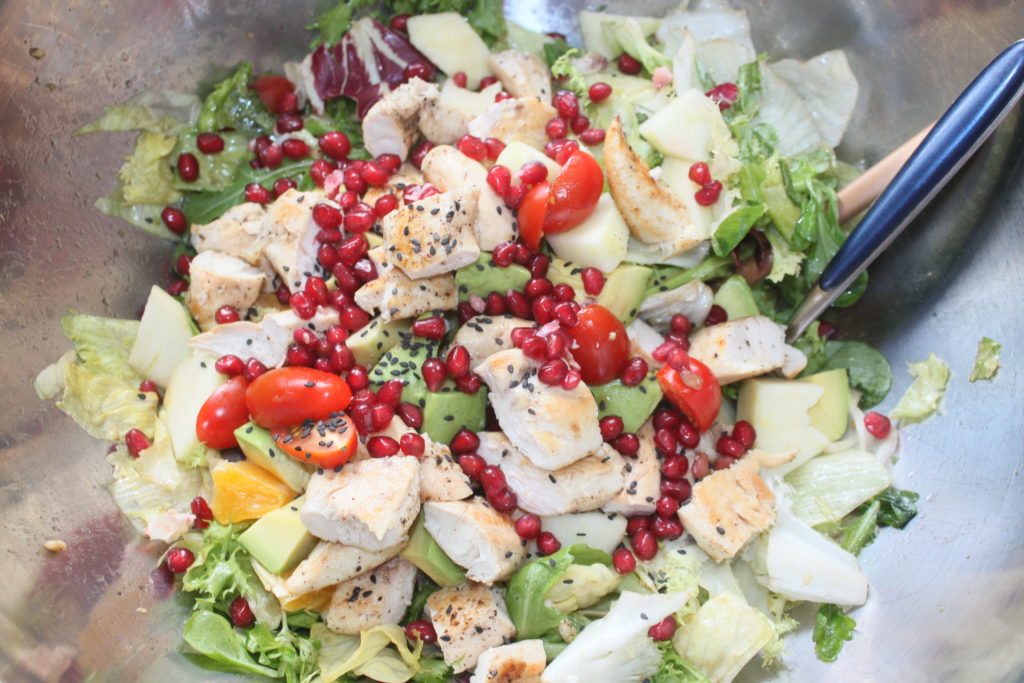
I didn’t put on the already busy photo, but you can add cilantro and roasted peanuts!
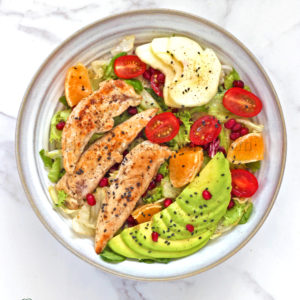
Salade au poulet et orange
Ingredients
- 400 g aiguillettes de poulet
- 1 pomme
- 1 grenade
- 1 avocat
- 1 orange
- 250 g tomates cerises
- 400 g salade verte
Sauce:
- 1 gousse d'ail
- 1 c. à café miel
- 1 c. à soupe vinaigre balsamique
- 2 c. à soupe jus d'orange
- 4 c. à soupe huile d'olive
- 1 à 2 c. à café huile de sésame grillé
- sel, poivre
Instructions
- Préparez tous les fruits. Lavez les tomates et coupez-les en deux. Épluchez la pomme et coupez-la en quartiers puis en tranches plus fines, faites de même pour l'avocat. Épluchez l'orange et coupez les quartiers en deux.
- Ouvrez la grenade. Puis mettez un morceau à l'envers dans la paume de votre main, au dessus d'un récipient, et avec l'autre, tapez avec une cuillère sur la peau pour faire tomber les graines. Rien de plus facile au final !
- Faites cuire sur feu soutenu les aiguillettes de poulet, avec un filet d'huile d'olive. Salez et poivrez à votre goût.
- Retournez pour cuire l'autre côté. La viande doit être cuite à cœur.
- Mettez les ingrédients de la sauce dans un grand saladier. Pour la gousse d'ail, épluchez-la et écrasez-la au presse ail.
- Ajoutez la salade de votre choix. Mélangez bien.
- Vous pouvez ajouter tous les ingrédients ou alors monter les assiettes pour les rendre plus jolies.
- Je n'ai pas mis sur la photo déjà bien chargée, mais vous pouvez ajouter de la coriandre et des cacahuètes grillées !
Nutrition

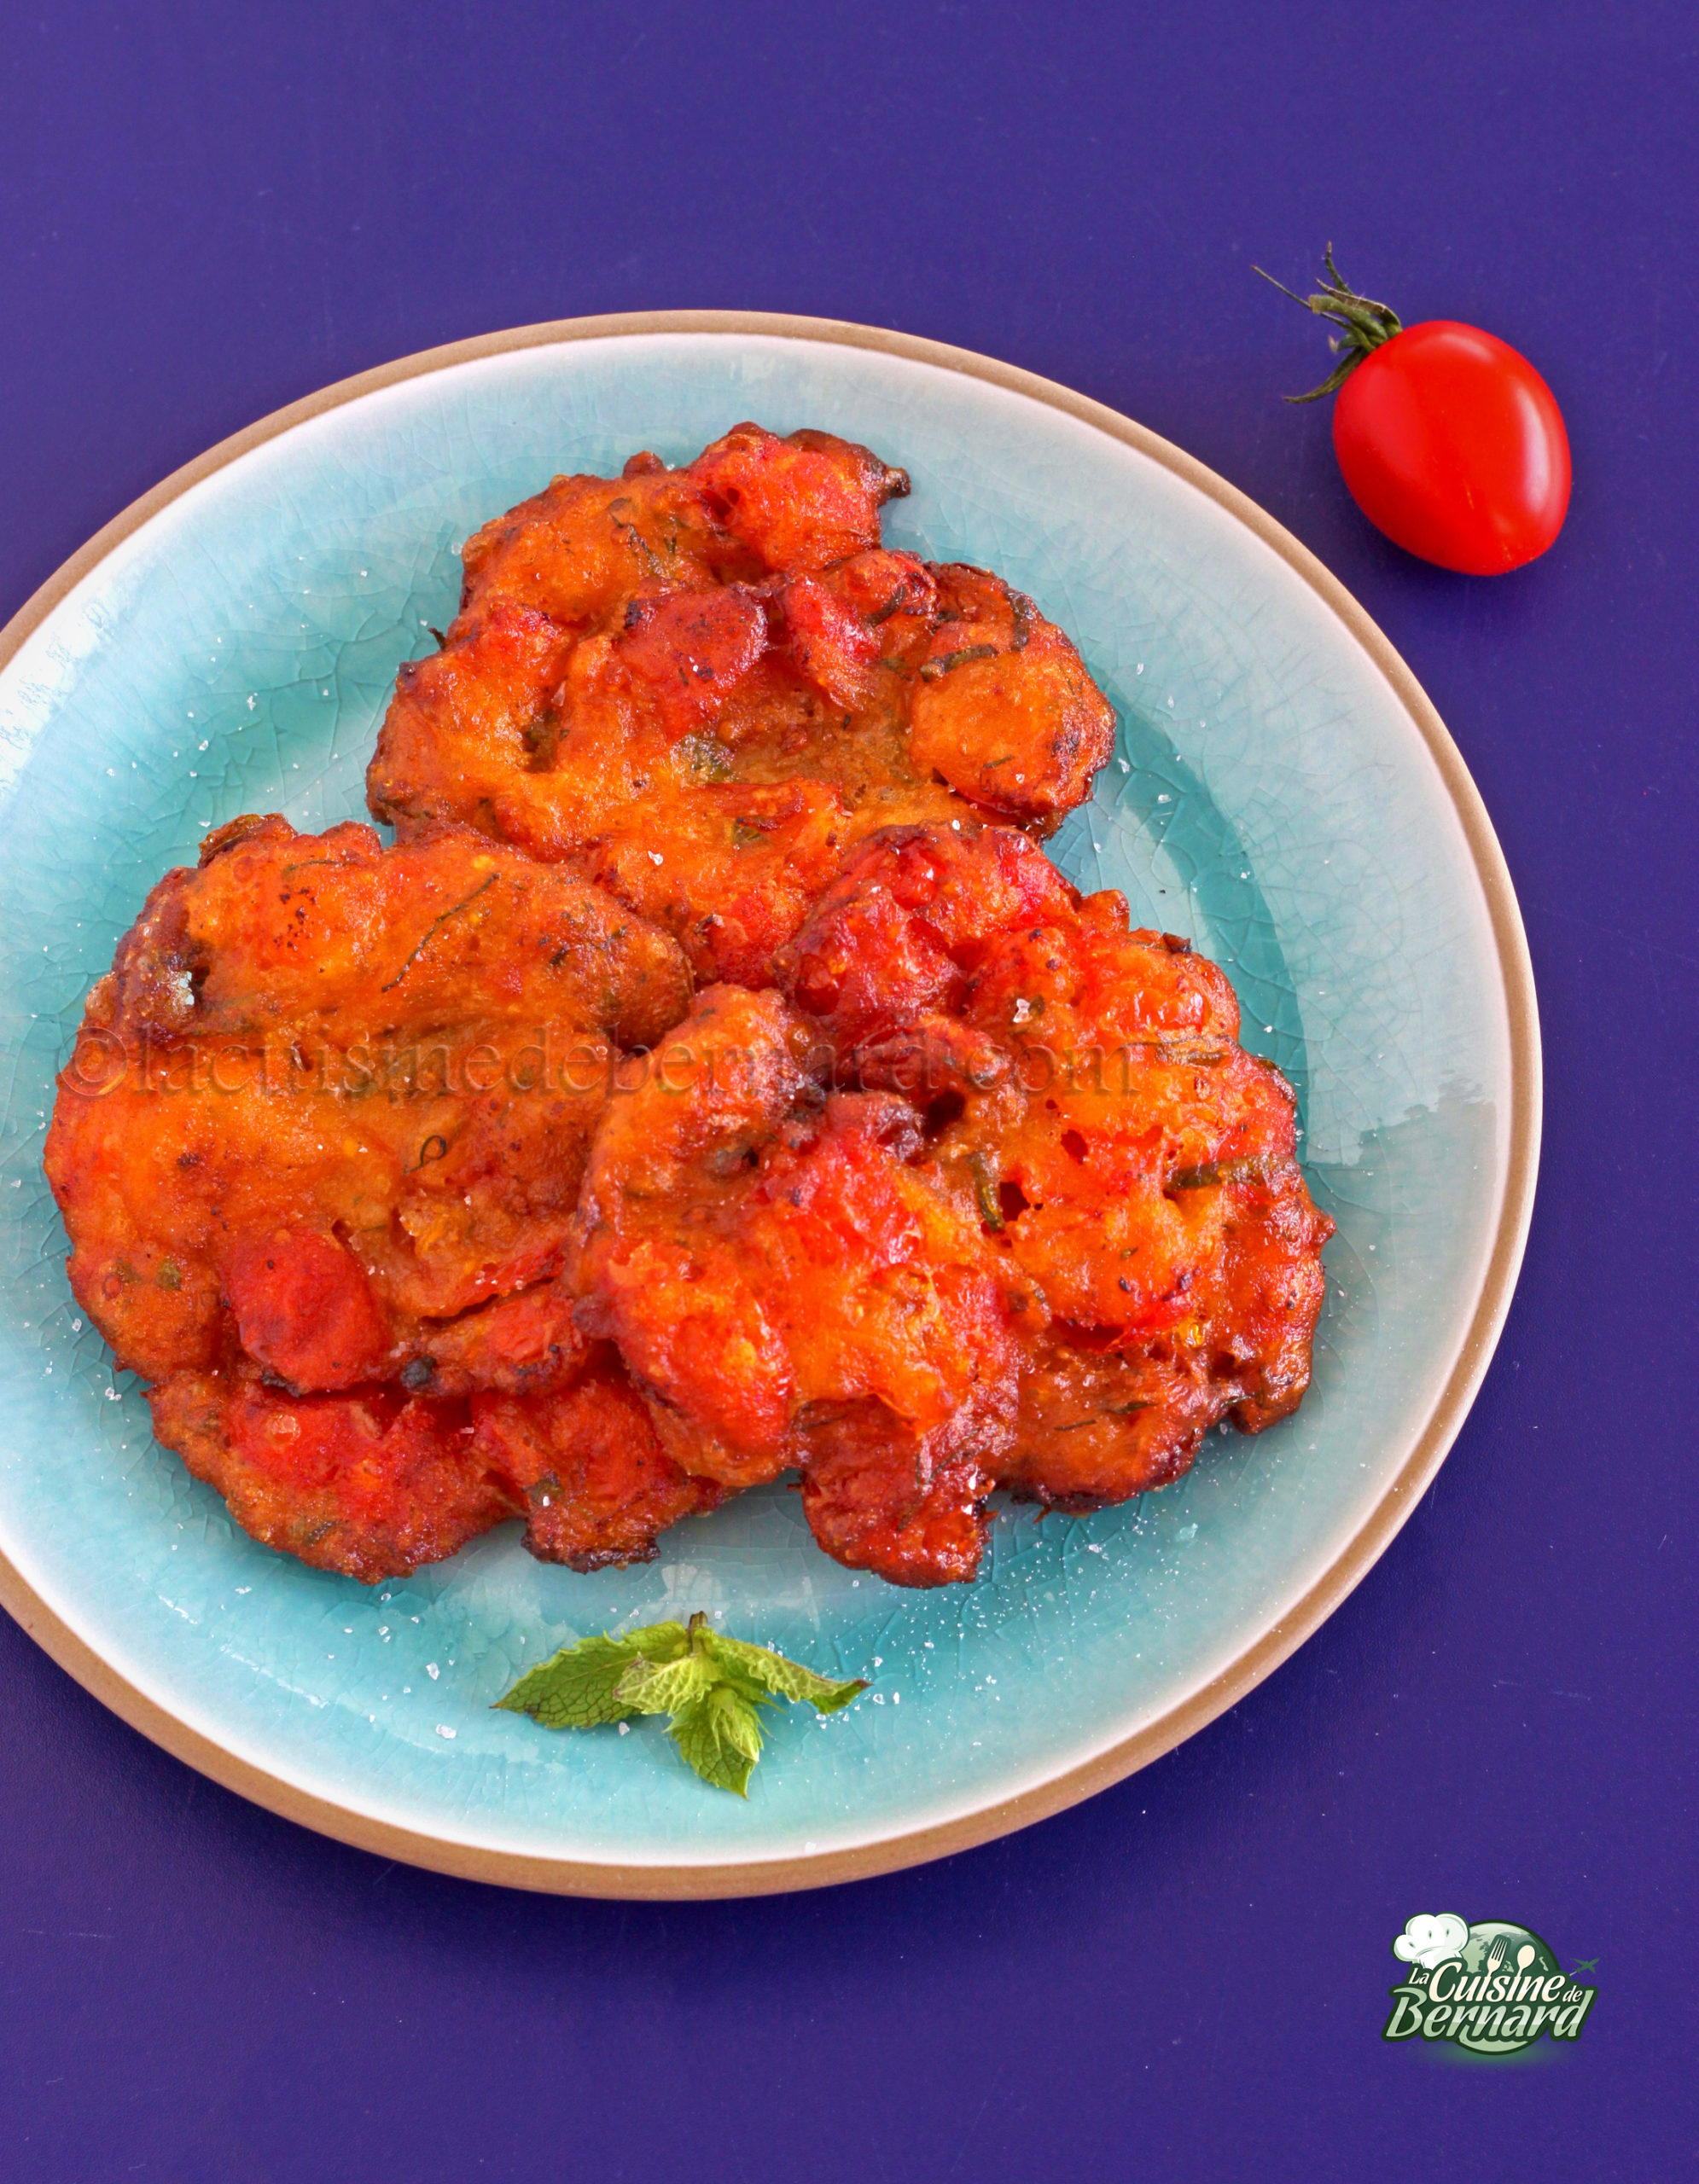
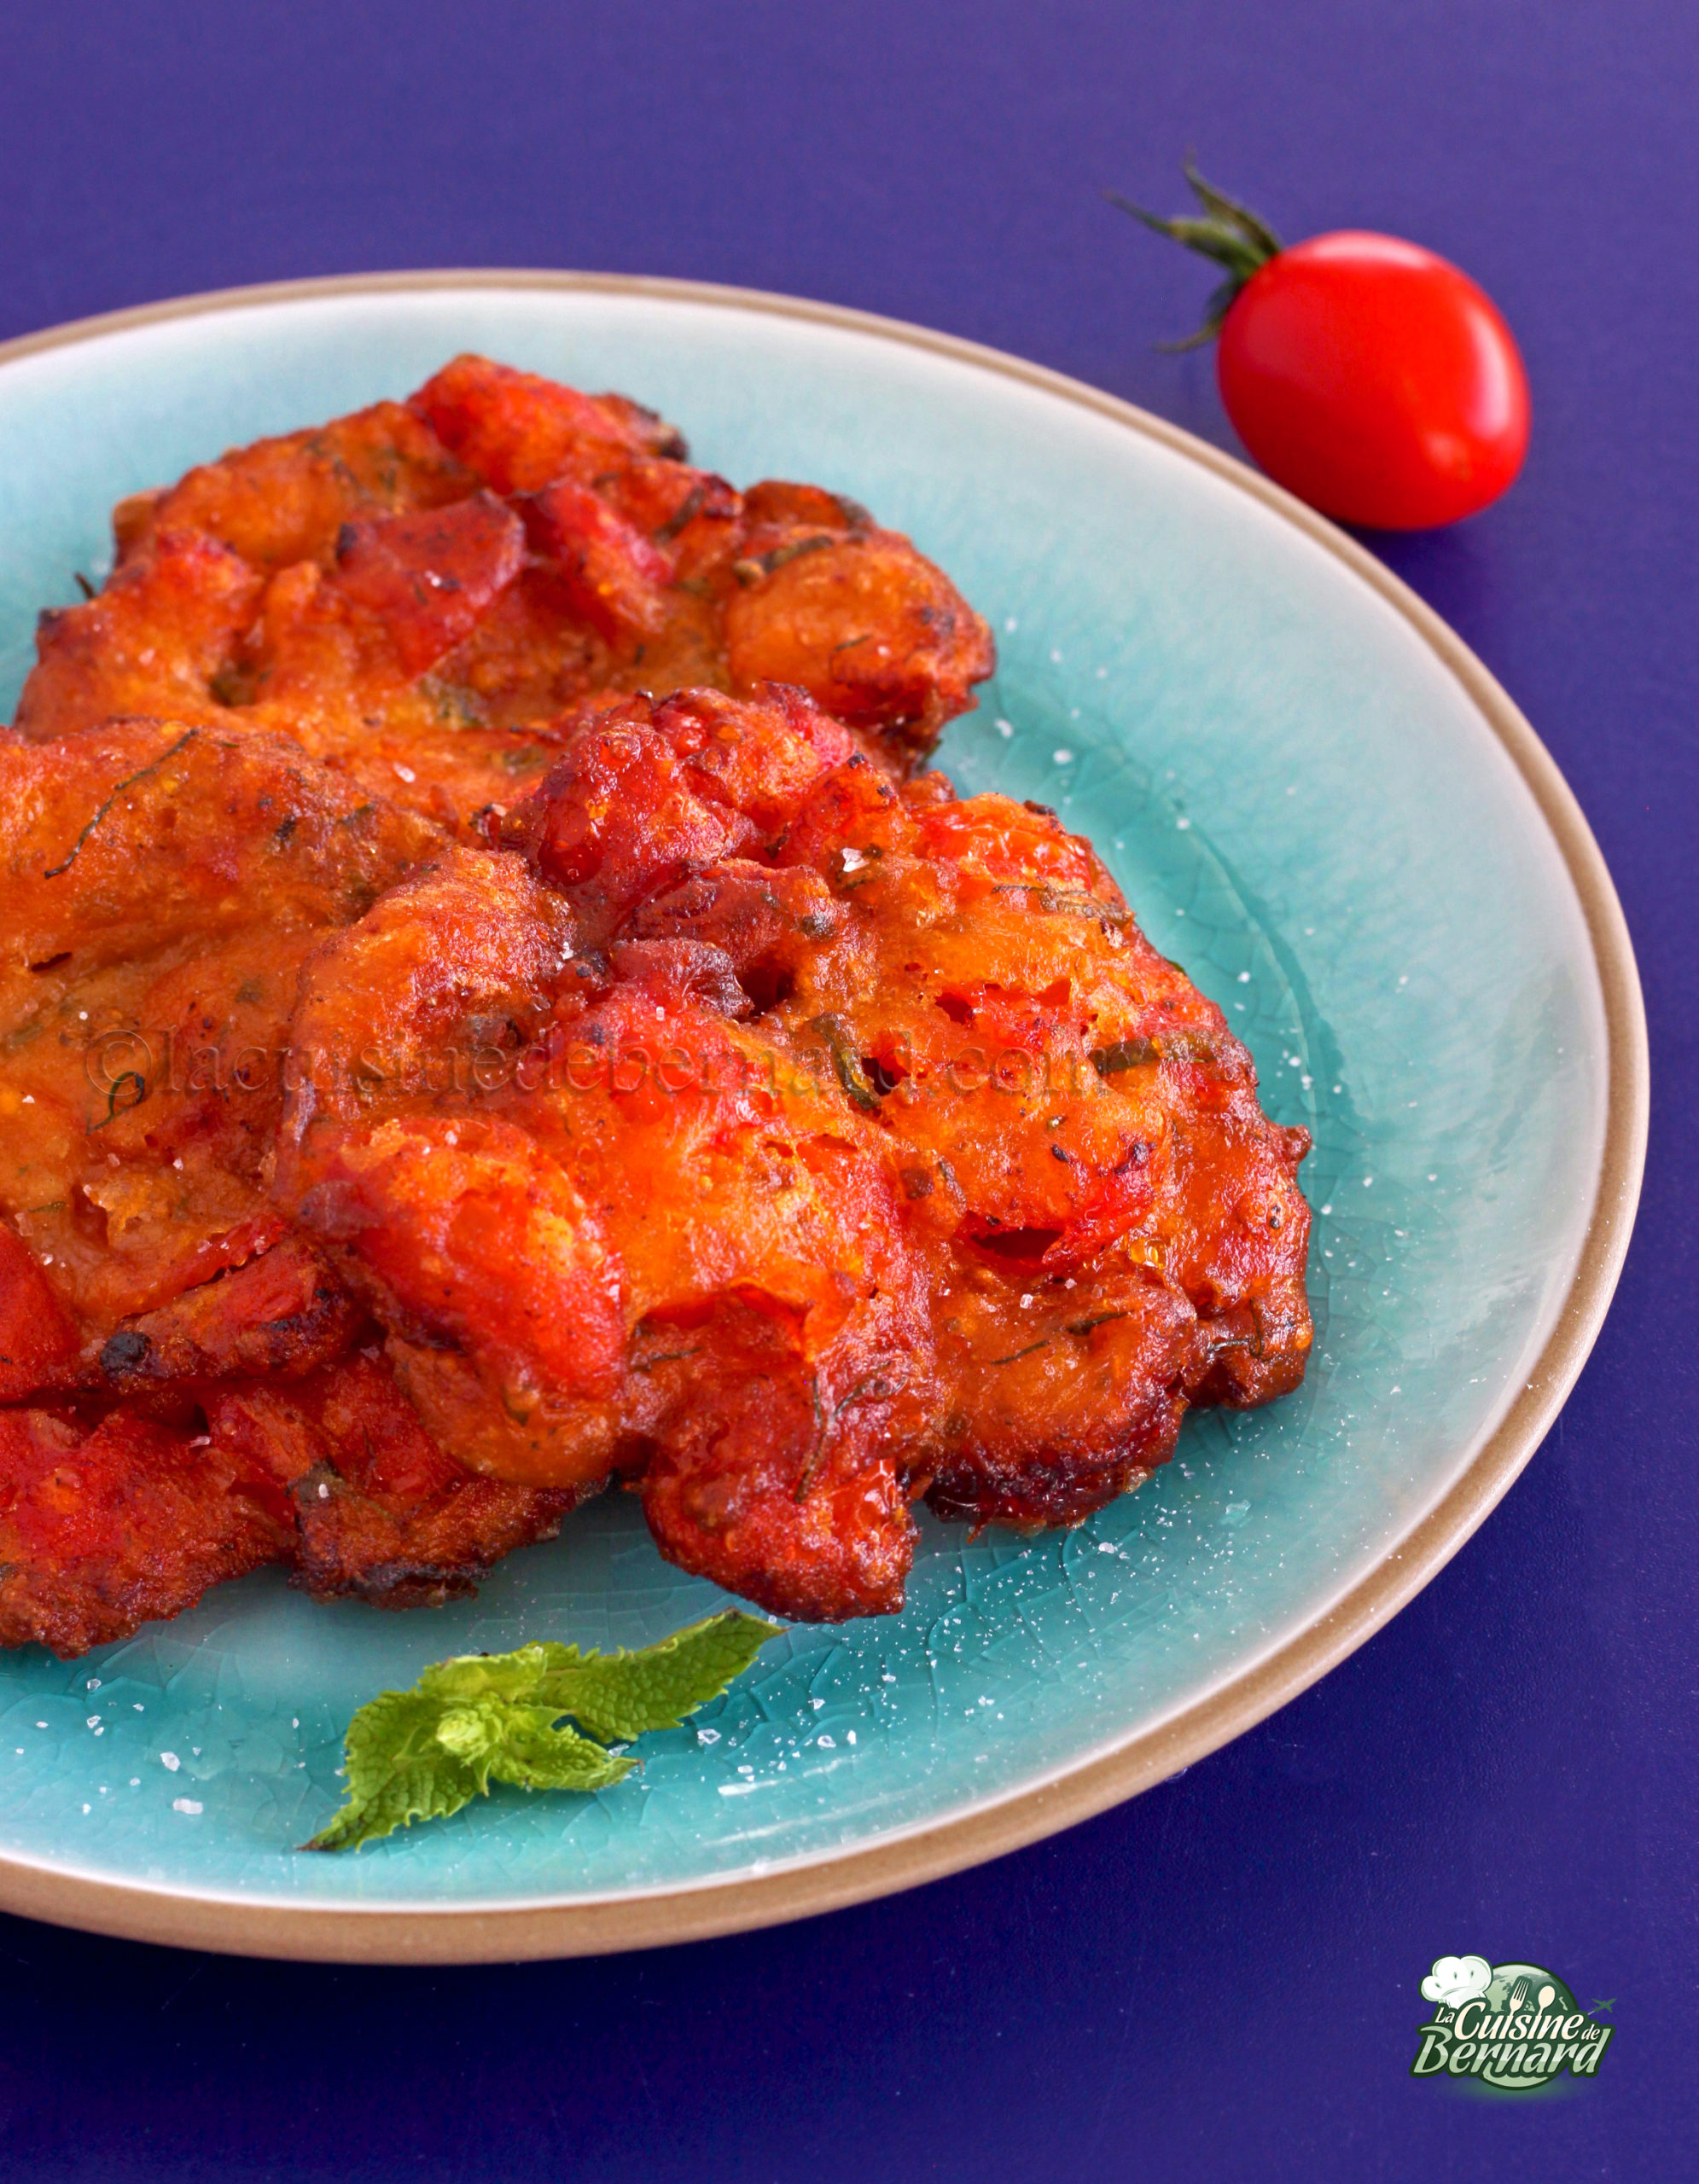
These are the deliciously tasty Greek tomato fritters, domatokeftedes. I made them with cherry tomatoes, but you can make them with large tomatoes. The advantage is that they are completely vegan. Very crispy, I find them irresistible!
- 400g of cherry tomatoes or ripe tomatoes
- 1/2 teaspoon oregano
- 1 shallot
- 1 large clove of garlic
- a dozen mint leaves
- a dozen basil leaves
- 100g of flour
- salt pepper
Wash and de-stem your tomatoes. I had cherry tomatoes that were sweeter than the large tomatoes.
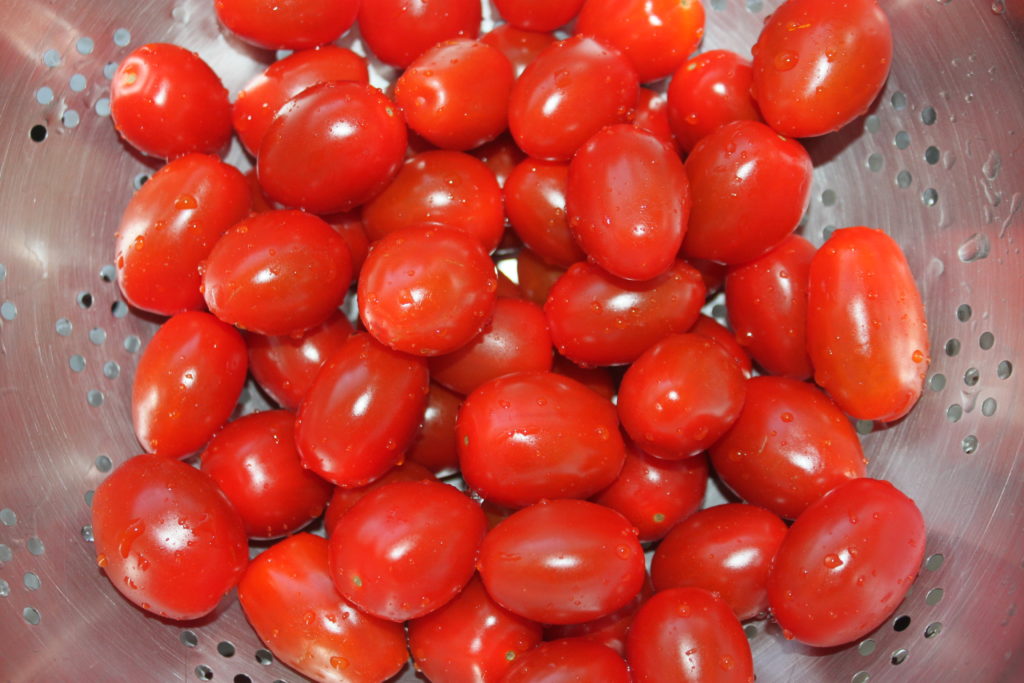
Cut into pieces, roughly into 4 for the cherry tomatoes.
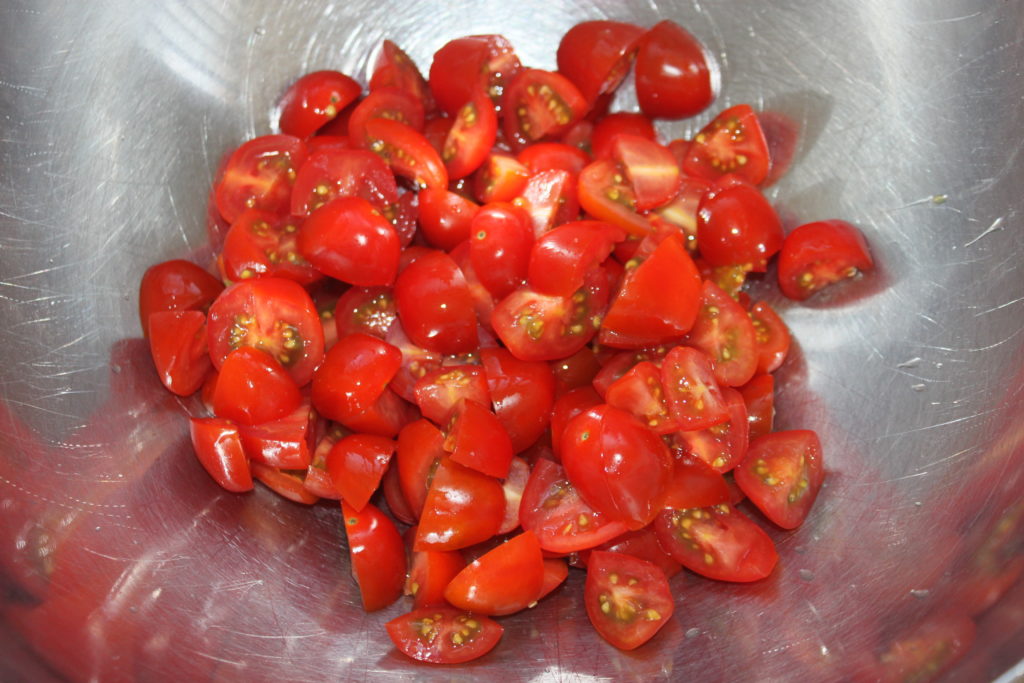
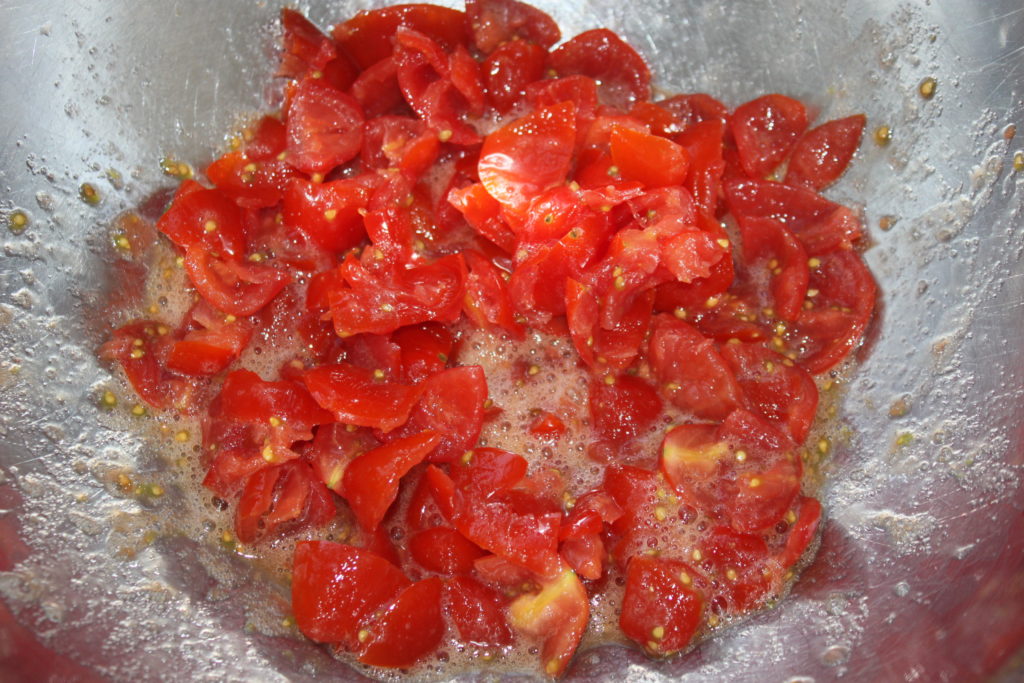
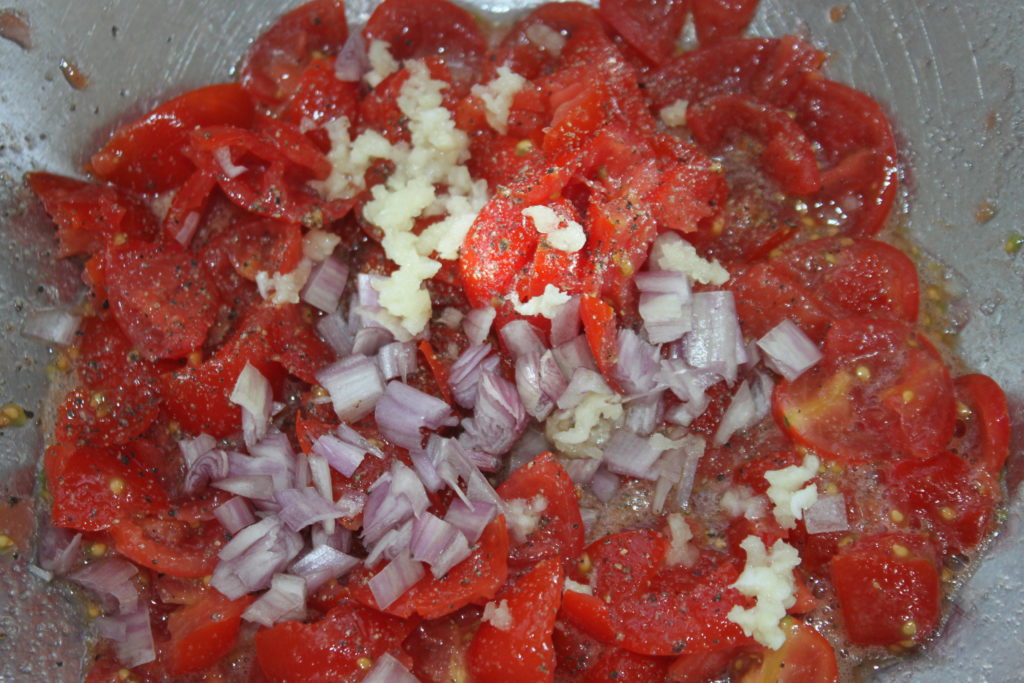
Salt and crush the tomatoes in your hands to extract as much juice as possible. Don’t throw the juice away!
Add the peeled and finely chopped shallot and the finely crushed garlic, and add pepper to taste.
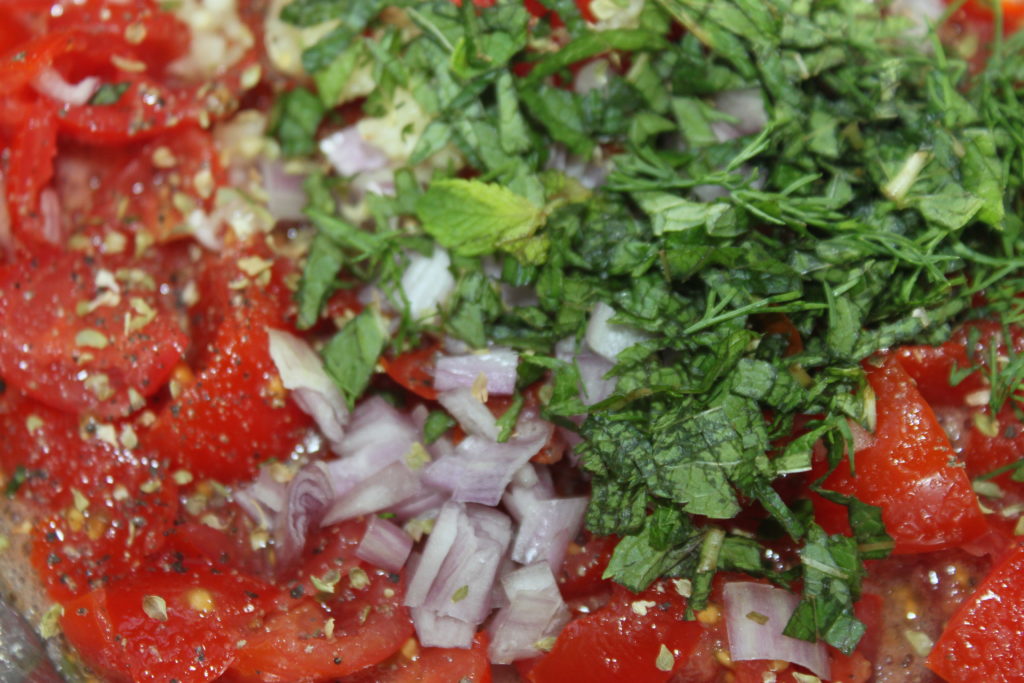
Wash and chop the mint and basil leaves and add them to the tomatoes.
Pour in the flour and adjust to the juice from the tomatoes. If it lacks juice, add a little water as needed. Put the equivalent of one tablespoon at a time.
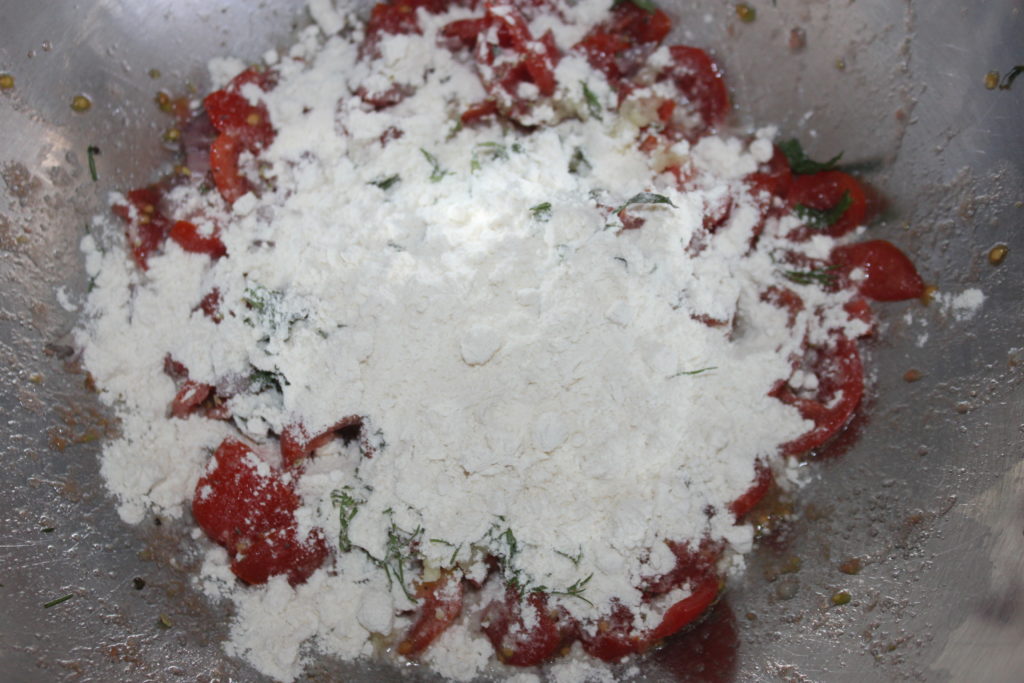
Mix well. The dough should finally be quite fluid.
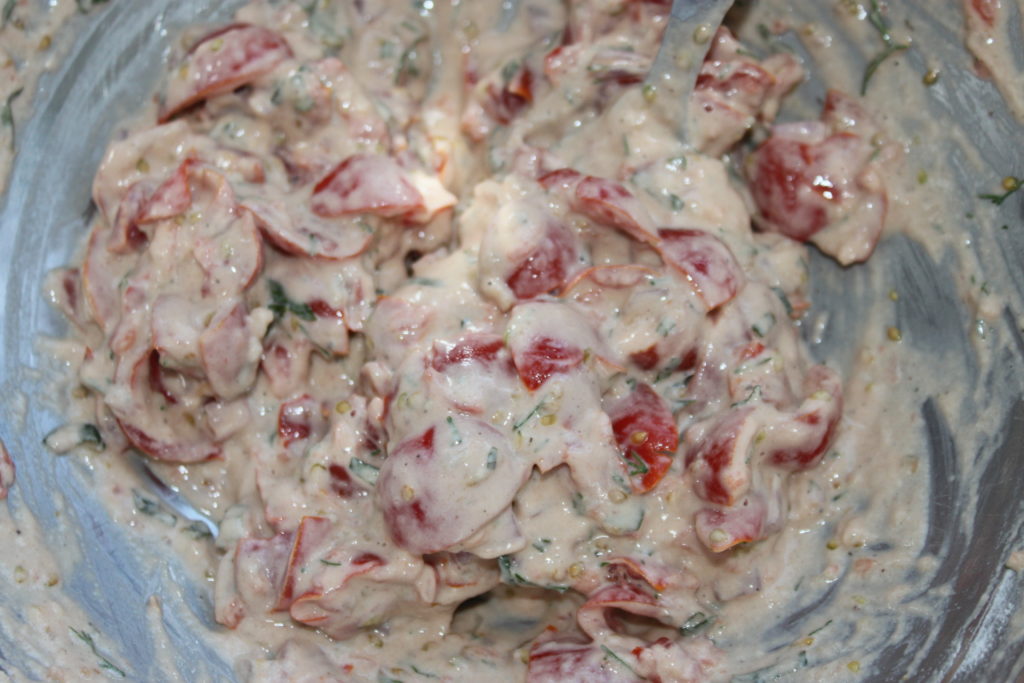
Heat a frying pan with at least 2cm of oil. When hot, fry the equivalent of one tablespoon at a time. As the dough is fluid, it will flatten and make round fritters.
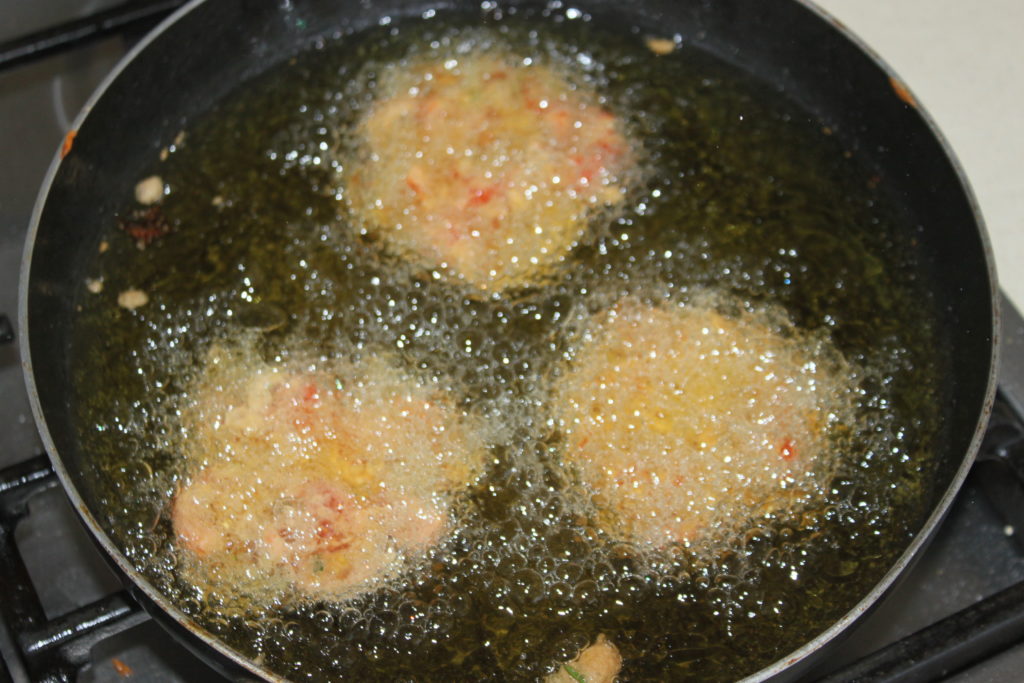
Let cook well and then turn the fritters over until they are golden brown and red.
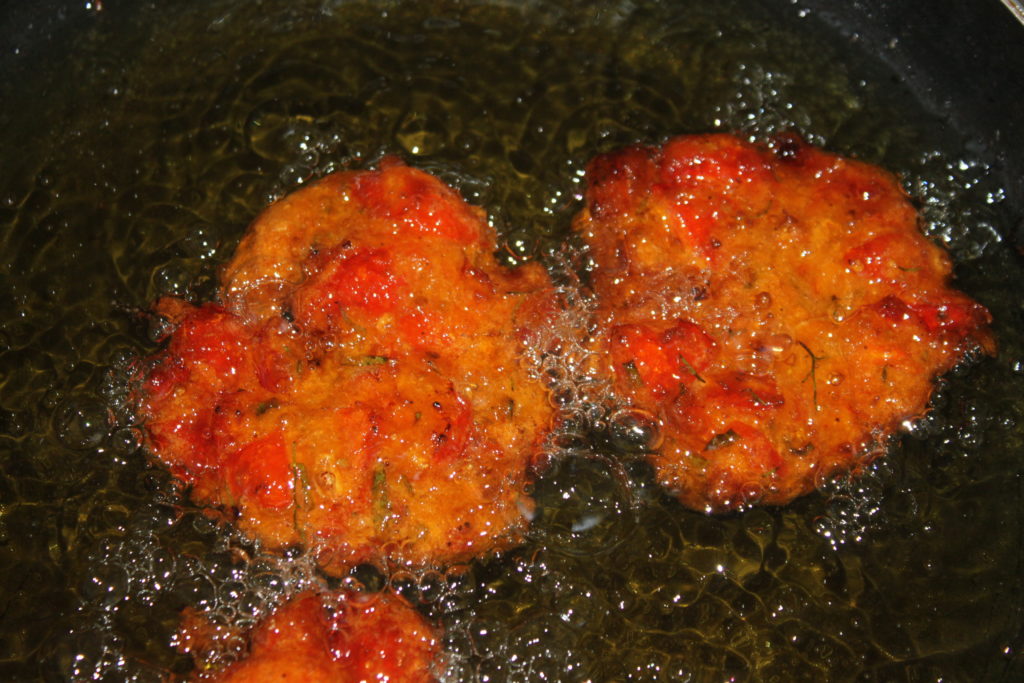
Cook all the doughnuts and then let them rest on a paper towel.
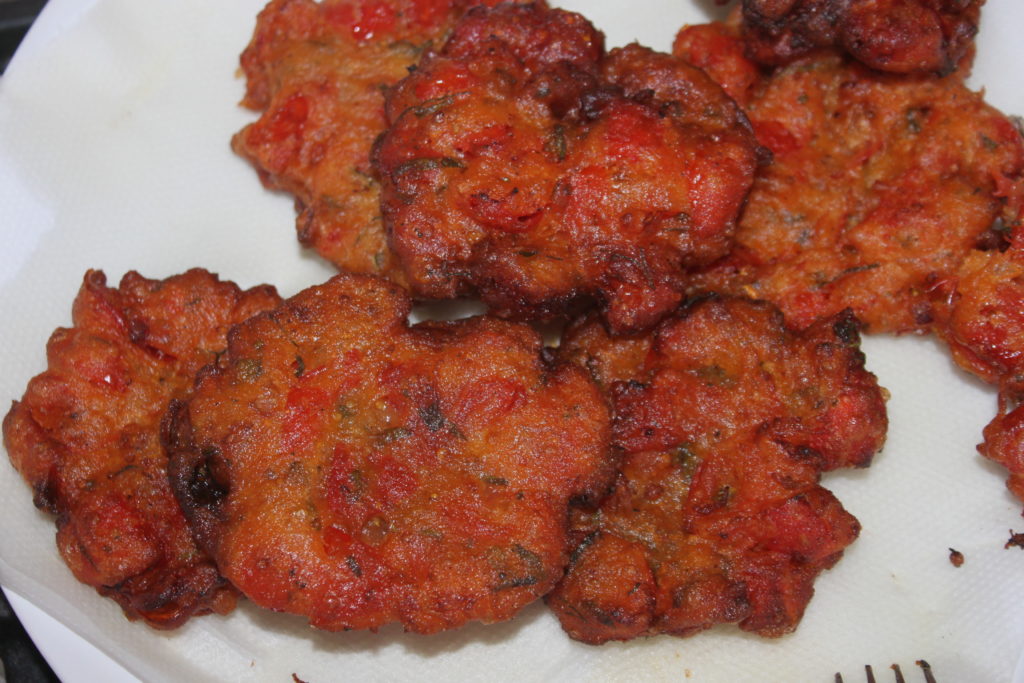
Serve with Greek yogurt salted to taste and garnished with herbs (mint and/or basil). You can reheat them for 10-12 minutes in a hot oven (200°C) and let them regain their crispness in 10 minutes.
Beignets grecs de tomates (domatokeftedes)
Ingredients
- 400 g tomates cerises
- 1/2 c. à café origan
- 1 échalote
- 1 gousse d'ail
- 10 feuilles menthe
- 10 feuilles basilic
- 100 g farine
Instructions
- Lavez et équeutez vos tomates. J'ai pris des tomates cerises plus sucrées que les grosses tomates. Coupez en morceaux, en gros en 4 pour les tomates cerises.
- Salez puis écrasez les tomates dans vos mains pour extraire le jus au maximum. Ne jetez pas le jus !
- Ajoutez l'échalote épluchée et coupée en petits morceaux et l'ail finement écrasé, poivrez à votre goût.
- Lavez et ciselez les feuilles de menthe et de basilic, ajoutez-les dans les tomates.
- Versez la farine et adaptez au jus rendu par les tomates. Si cela manque de jus, ajoutez un peu d'eau au besoin. Mettez l'équivalent d'une cuillerée à soupe à la fois. Mélangez bien. La pâte doit être finalement assez fluide.
- Faites chauffer une poêle avec au moins 2cm d'épaisseur d'huile. Quand elle est bien chaude, faites frire l'équivalent d'une cuillerée à soupe à la fois. La pâte étant fluide, elle va s'aplatir et faire des beignets ronds.
- Laissez bien cuire puis retournez les beignets pour qu'ils soient bien dorés et bien rouges.
- Faites cuire tous les beignets et laissez ensuite reposer sur un papier absorbant.
- Servez avec du yaourt grec salé à votre goût et agrémenté d'herbes (menthe et/ou basilic). Vous pourrez les réchauffer 10-12 minutes à four chaud (200°C) puis les laissez reprendre leur croustillant en 10 minutes.
Nutrition

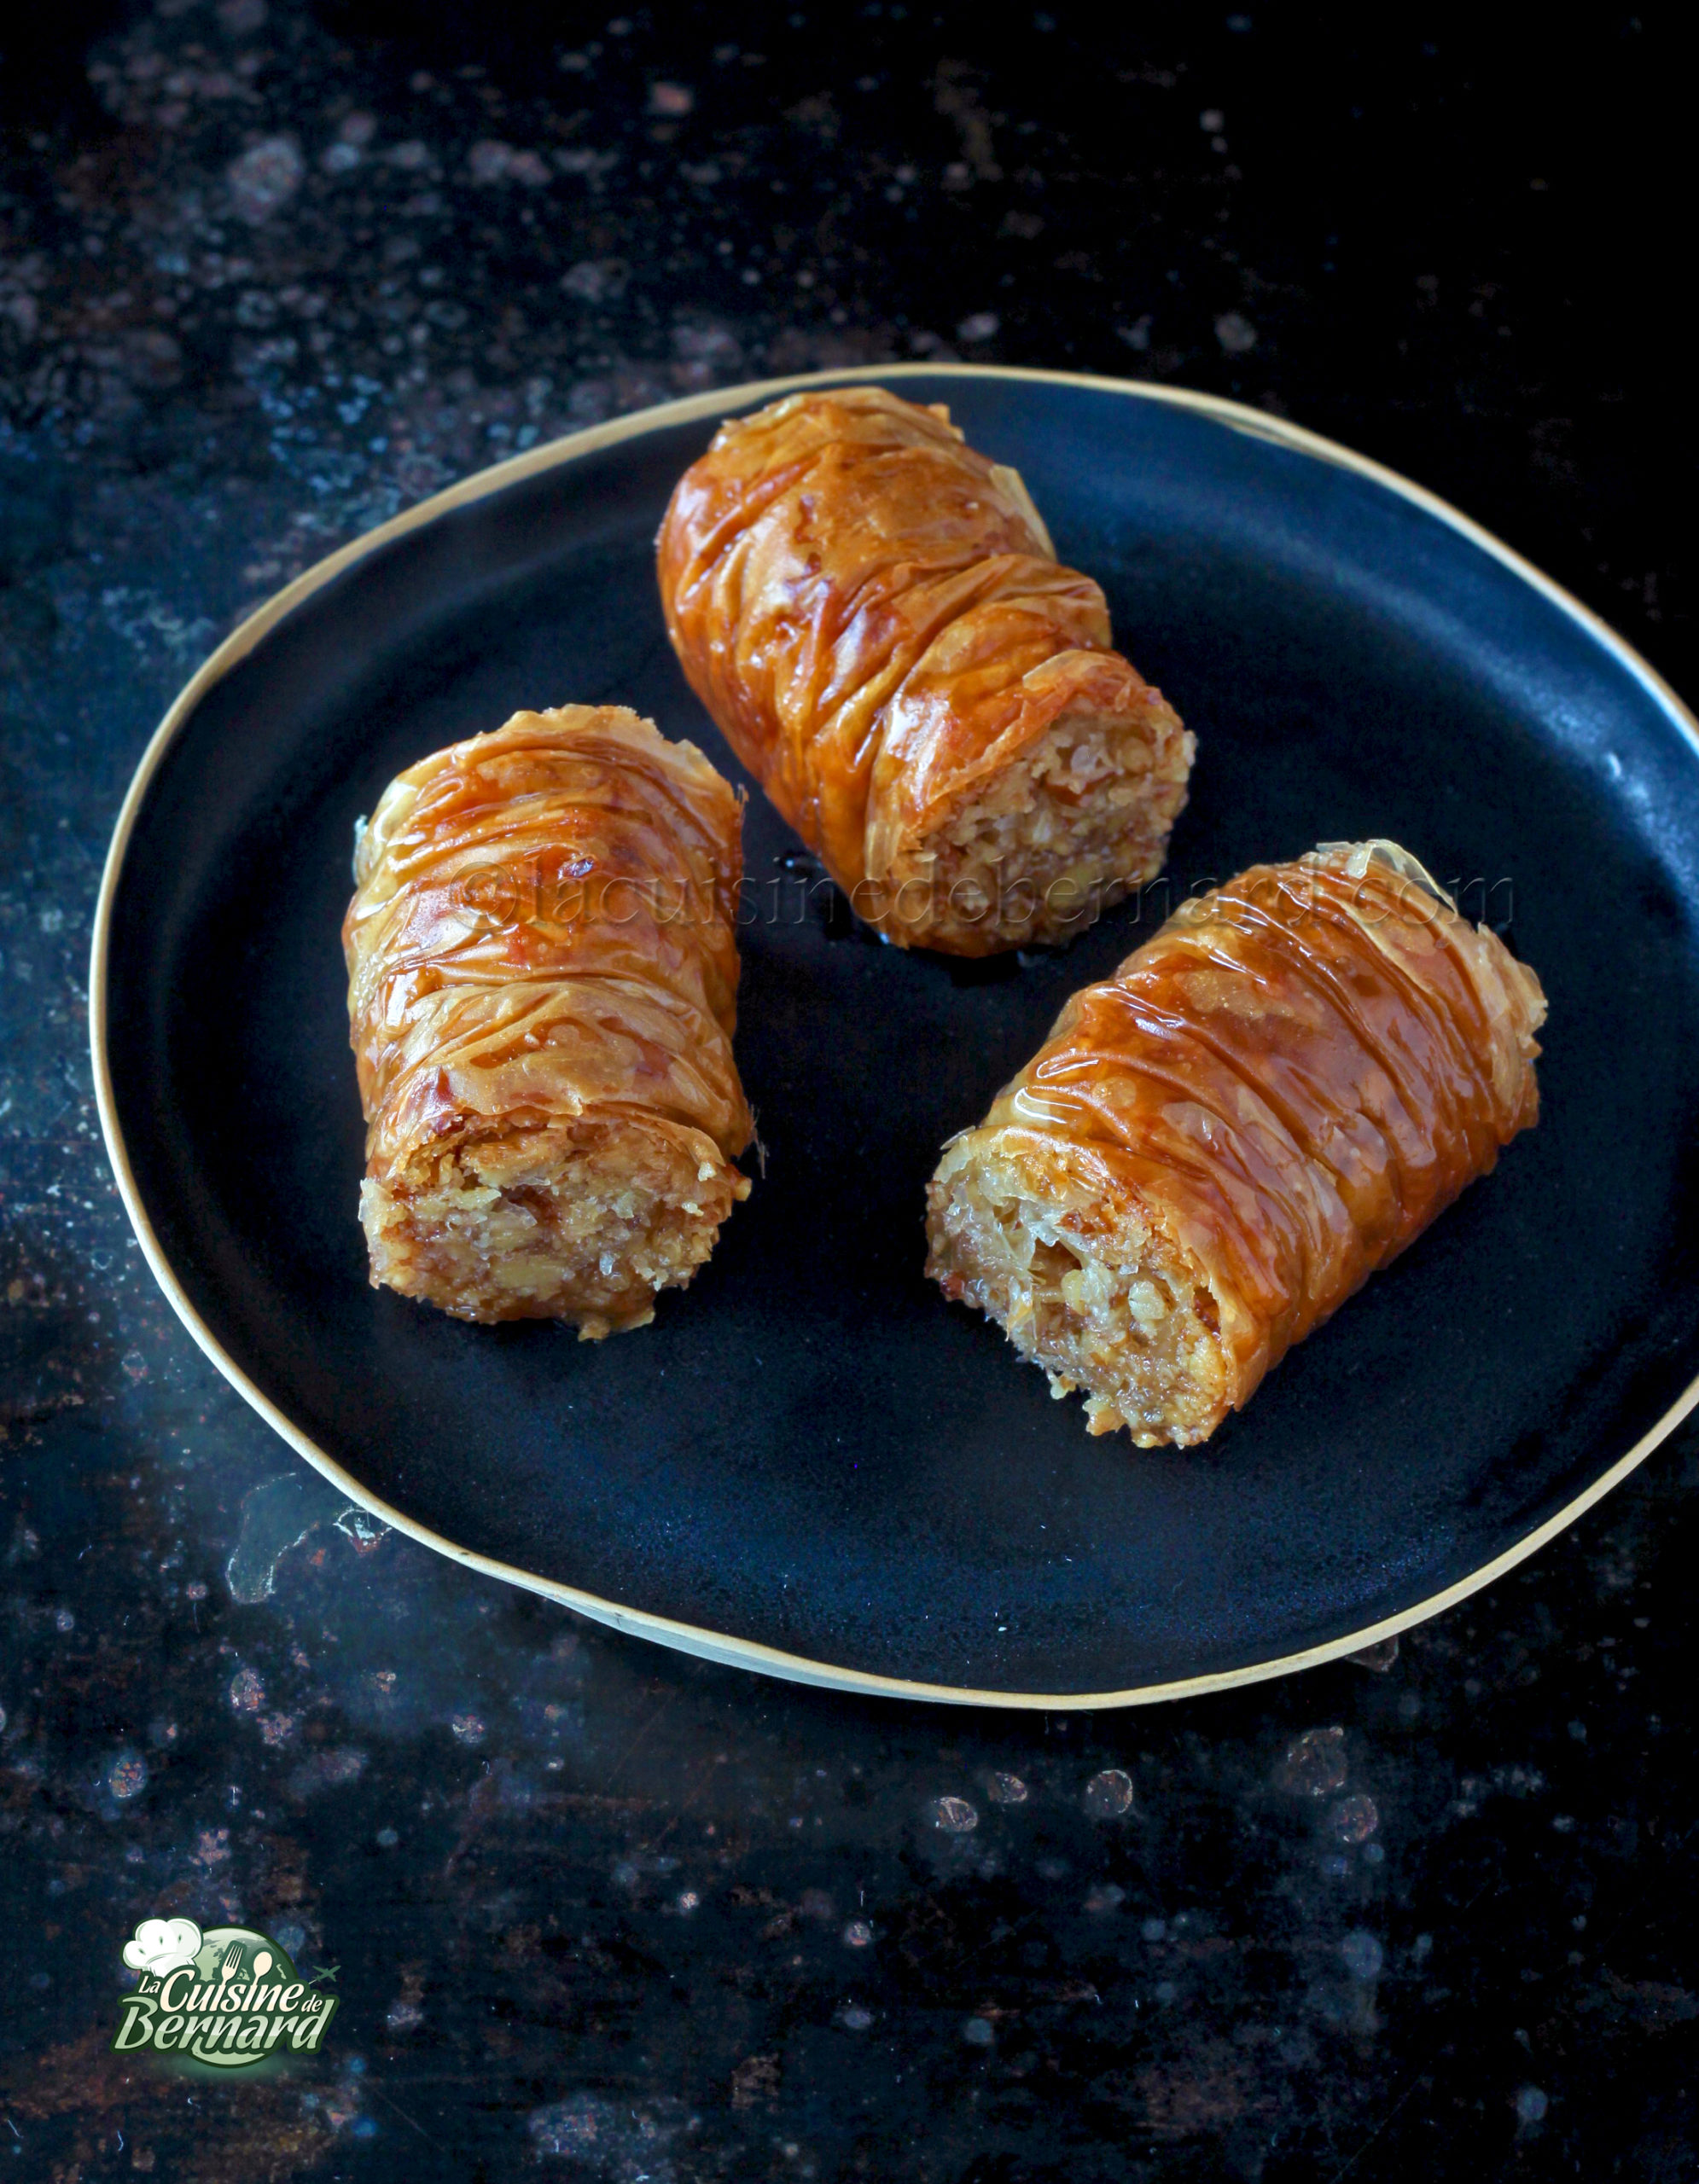
After returning from Greece, where I ate a different baklava almost every day, I felt like making the rather Armenian version again (but also found in Greece and Turkey), with that crumpled texture that gives a wonderful crispness. You can of course put any dried fruit you like (almonds, pistachios, hazelnuts, cashews). This little sweetness is very easy to make and will be ready in no time!
Recipe for a 20cm dish:
- 100g of ghee (clarified butter)
- 100g of butter (I used semi-salted)
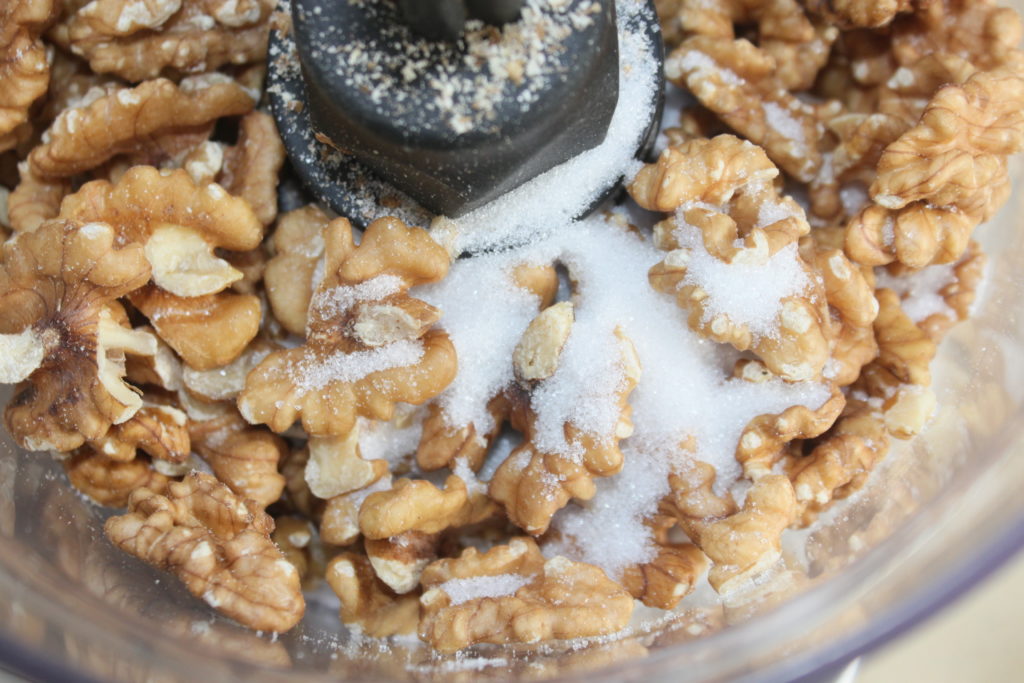
- 250g of nuts
- 30g of sugar
- 12 sheets of filo dough
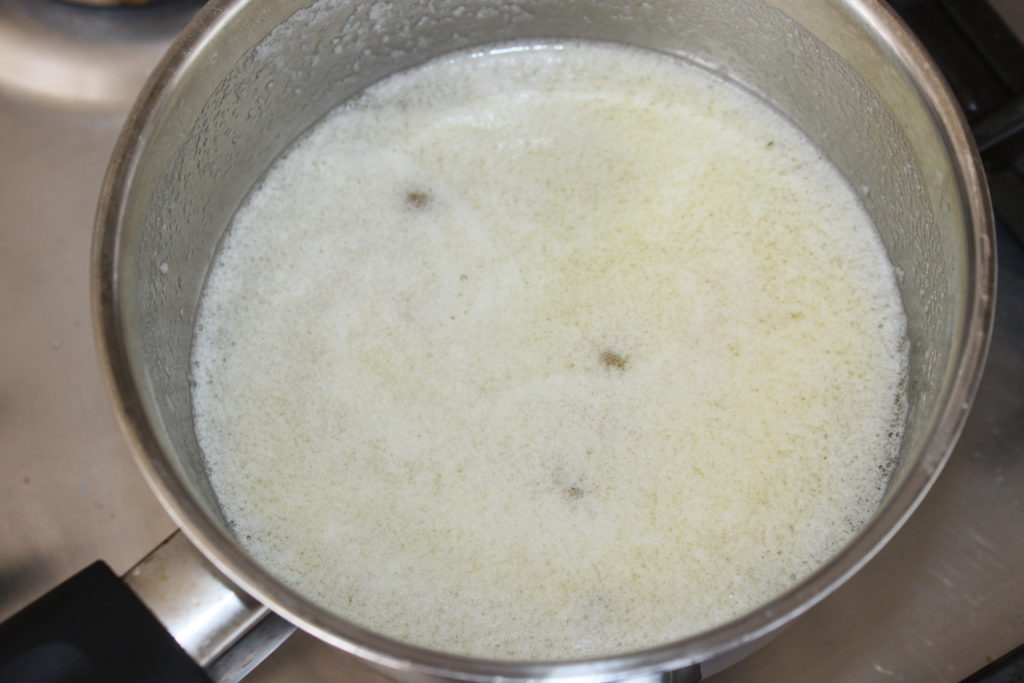
For the syrup:
- 240g of sugar
- 40g of honey
- 130g of water
Melt the butter and ghee in a saucepan. You can take only ghee or only butter. I put half and half with semi-salted butter, which is not necessarily very traditional, but delicious!

Put the nuts and the 30g of sugar together and mix it into a coarse powder.
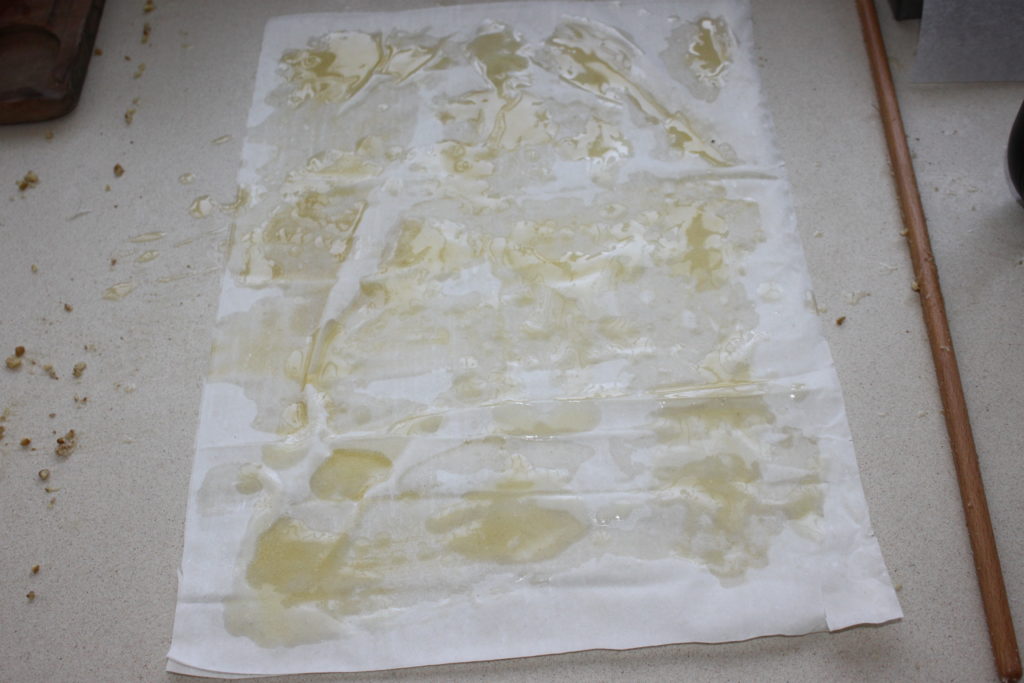
Place a sheet of filo dough on the work surface. Drizzle with melted fat, place a second sheet on top of the first and drizzle again. You don’t have to cover the whole thing with butter, just a few spots.
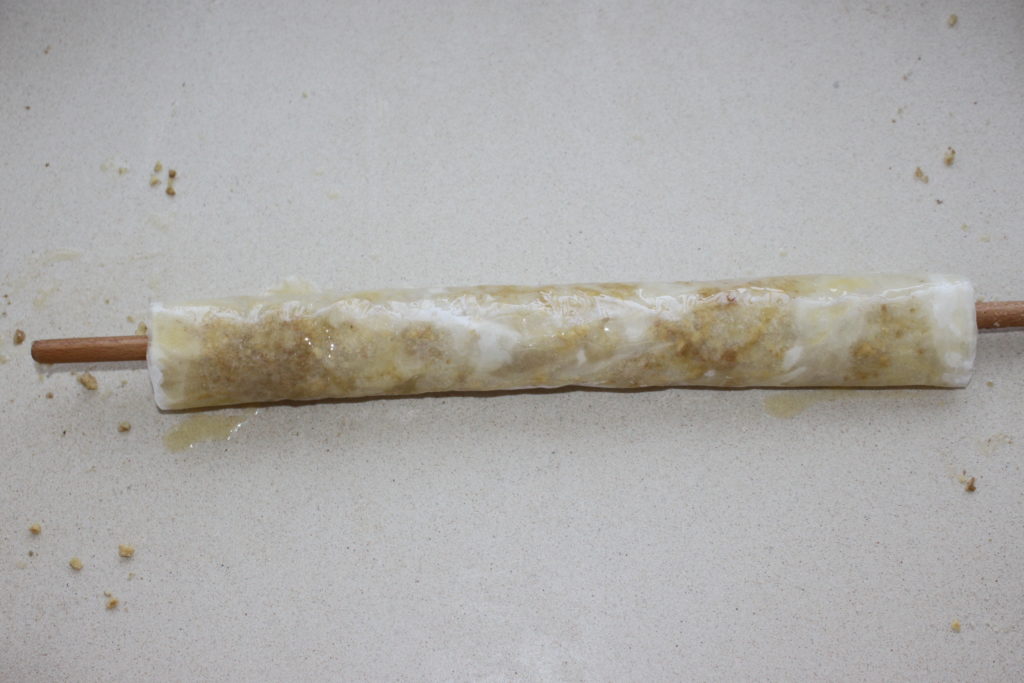
Sprinkle with nuts/sugar. I took here a very thin roll that I bought in Armenia, but you can find a thin wooden stick in hardware stores or at Leroy Merlin!

Roll up the sheet starting on the width side.

Press the dough against a ledge or the wall of the work surface.
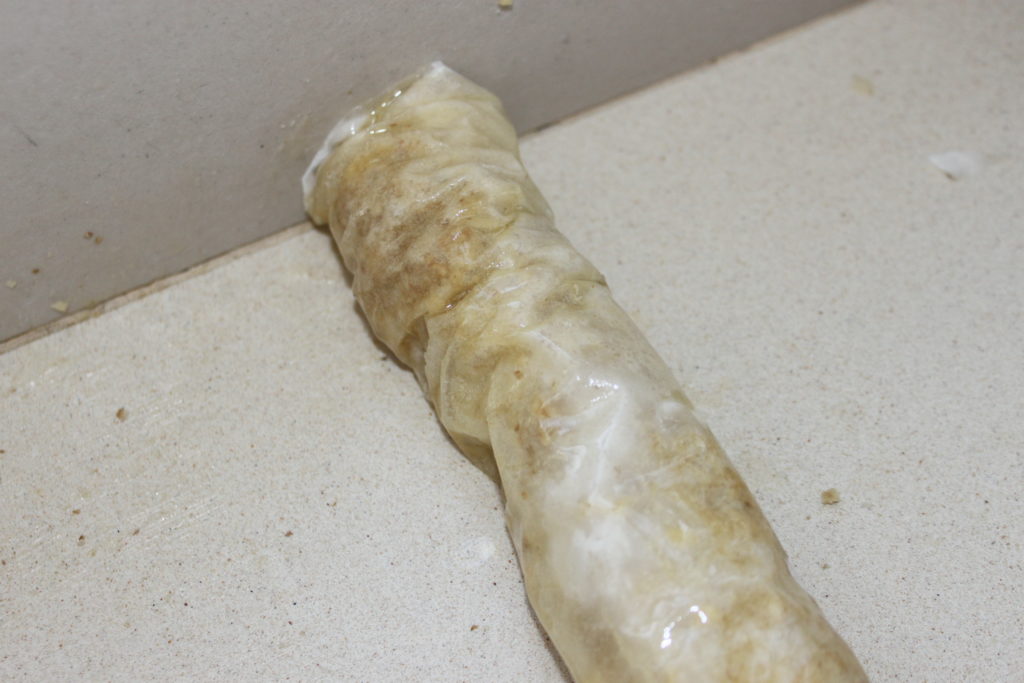
Force the dough to the edge, holding it firmly enough to crumple it.
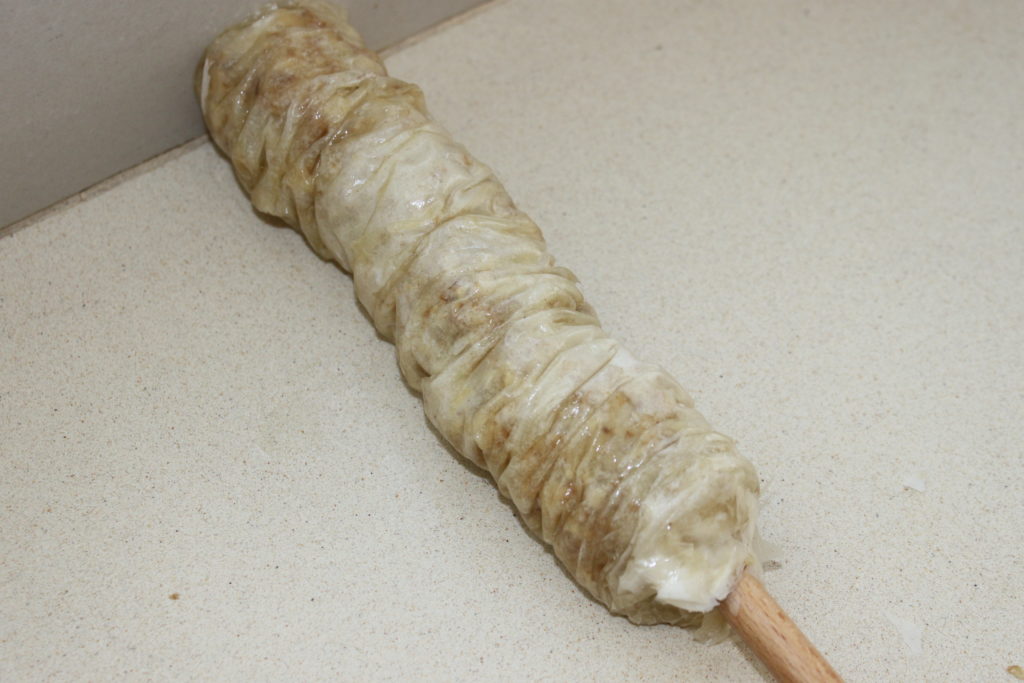
Carefully remove the wooden stick and place in a dish lined with parchment paper.

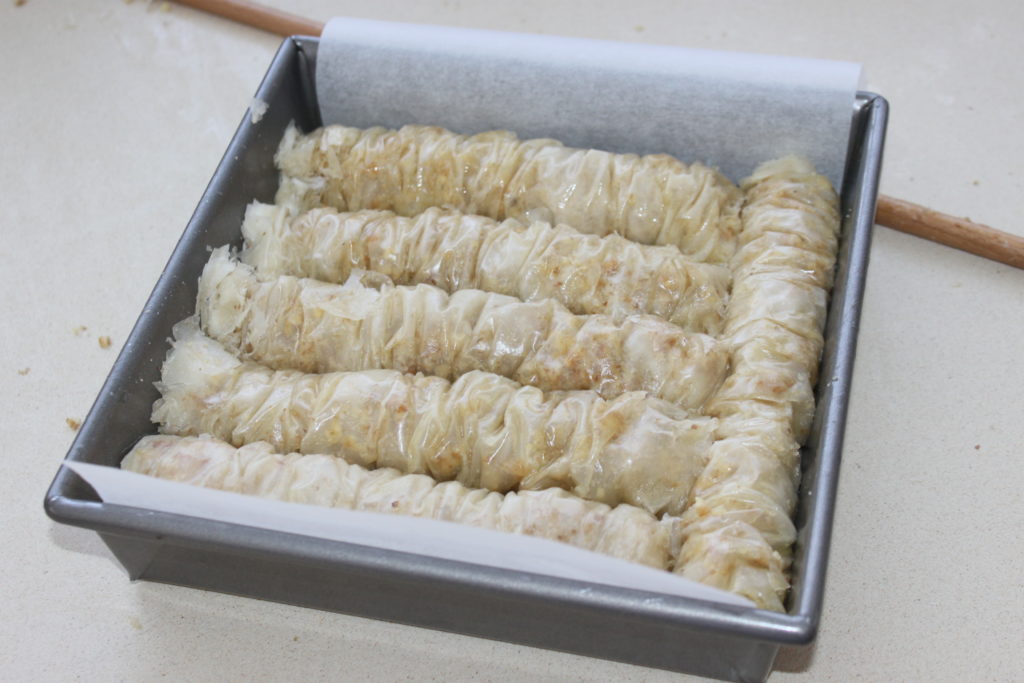
Do the same for the other rolls. I put one in another direction to block the others. So I made 6 rolls in total.
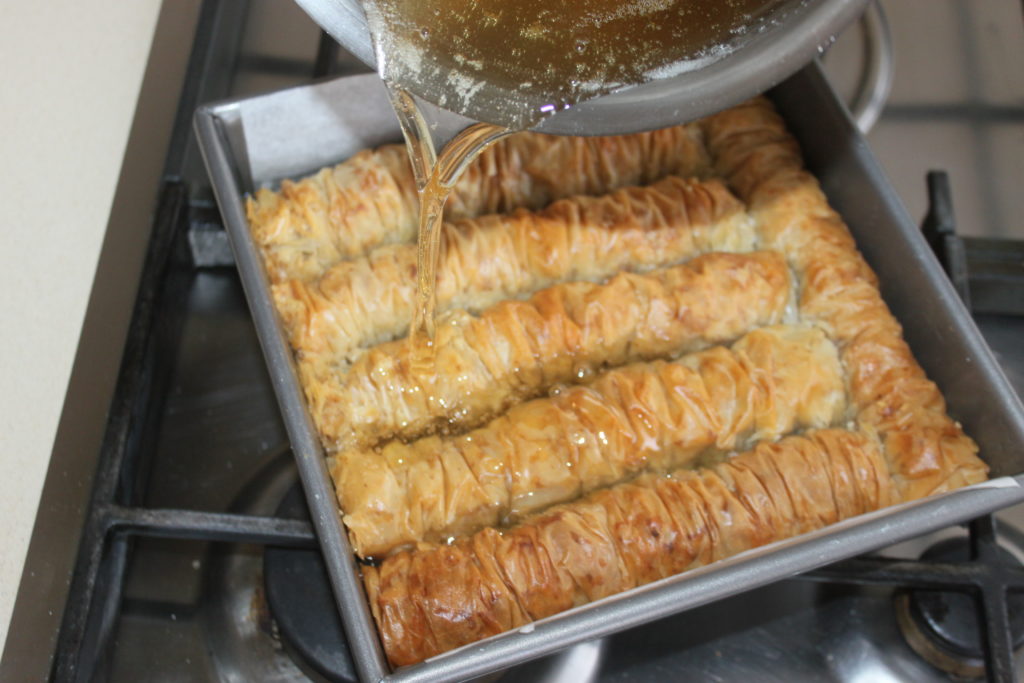
Bake at 175°C for 30 to 35 minutes in a preheated oven on revolving heat. While cooking, make the syrup by bringing all the ingredients to a boil for 10 minutes over low heat. Pour the syrup directly out of the oven, spreading it over the entire surface of the baklava.
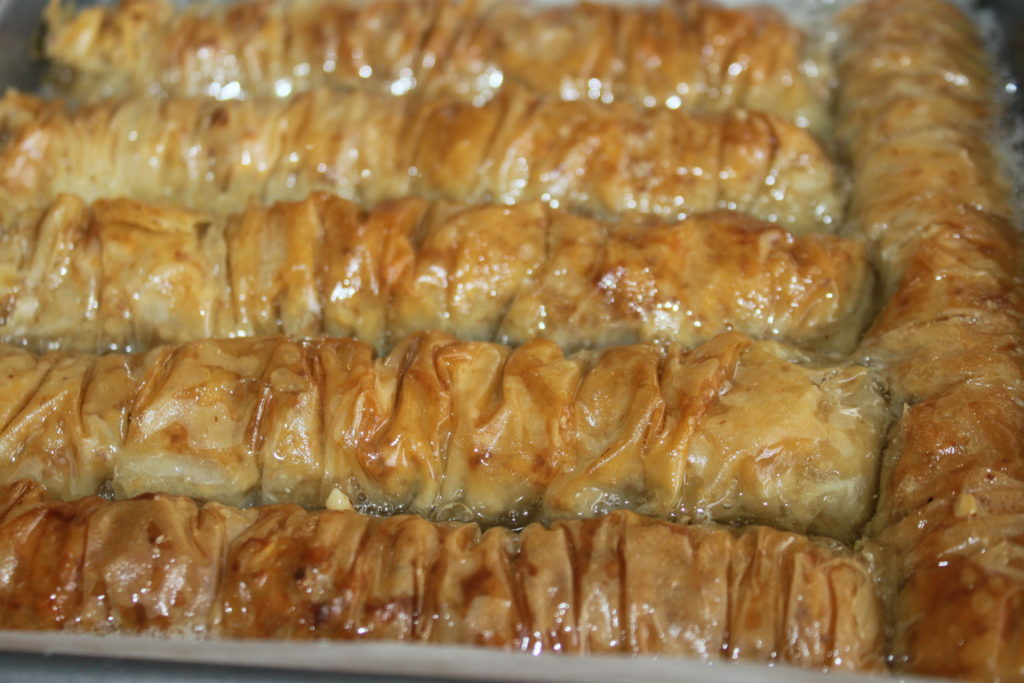
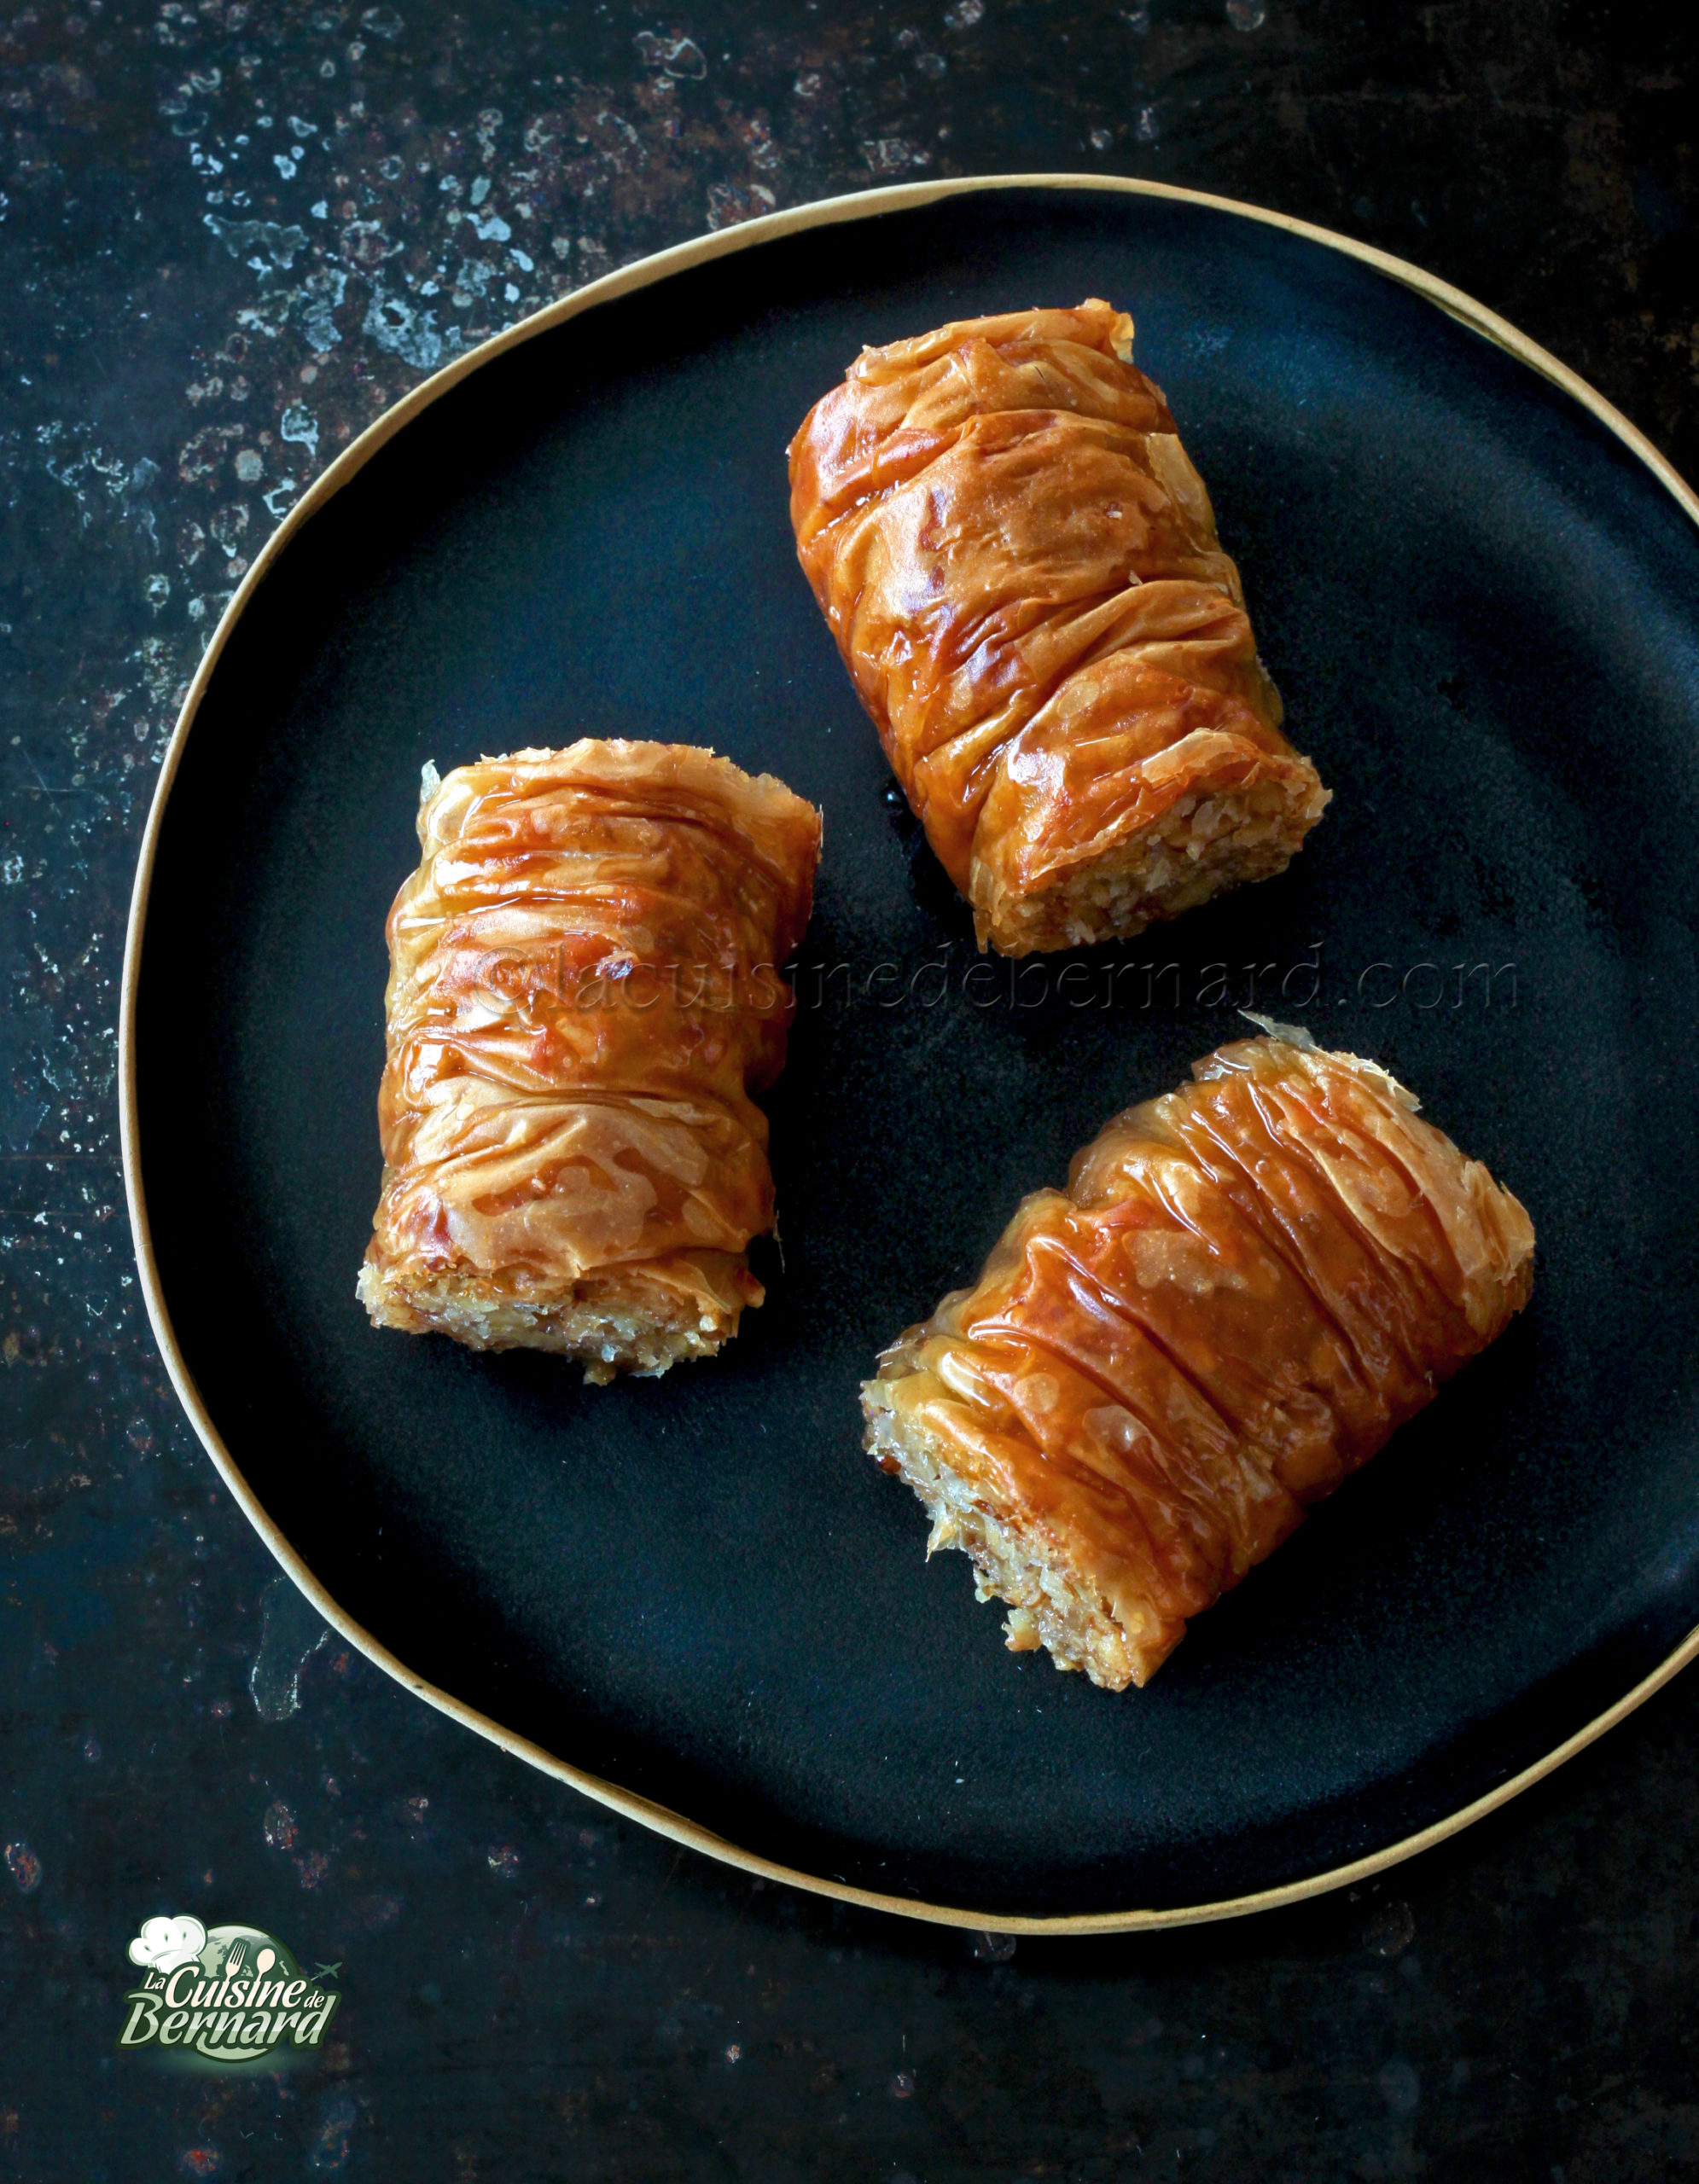
Let cool to room temperature before cutting into pieces and biting into it!

Baklavas aux noix
Ingredients
Pour les baklavas
- 100 g ghee
- 100 g beurre demi-sel ou doux
- 250 g noix
- 12 feuilles pâte à filo
Instructions
- Mettez le beurre et le ghee à fondre dans une casserole. Vous pouvez ne prendre que du ghee ou au contraire que du beurre. J'ai mis moitié moitié et avec du beurre demi-sel, ce qui n'est pas forcément très traditionnel, mais délicieux !
- Mettez les noix et les 30g de sucre ensemble et mixez le tout en une poudre grossière.
- Placez une feuille de pâte à filo sur le plan de travail. Arrosez de matière grasse fondue, placez une deuxième feuille sur la première puis arrosez à nouveau. Il n'y a pas besoin de couvrir entièrement de beurre, juste par endroits.
- Parsemez de noix/sucre. J'ai pris ici un rouleau très fin que j'avais acheté en Arménie, mais vous pouvez trouver une fine baguette de bois dans les quincailleries ou chez Leroy Merlin !
- Enroulez la feuille en commençant sur le côté de la largeur.
- Plaquez la pâte contre un rebord ou le mur du plan de travail. Forcez la pâte vers le rebord, en tenant assez fermement pour la friper. Retirez délicatement la baguette de bois puis placez dans un plat de 20cm de côté garni de papier sulfurisé.
- Faites de même pour les autres rouleaux. J'ai mis un dans un autre sens pour bloquer les autres. J'ai donc fait 6 rouleaux au total.
- Mettez à cuire à 175°C pendant 30 à 35 minutes dans un four préchauffé sur chaleur tournante. Pendant la cuisson, faites le sirop en portant à ébullition tous les ingrédients pendant 10 minutes sur feu doux. Versez le sirop directement à la sortie du four en le répandant sur toute la surface des baklavas.
- Laissez refroidir à température ambiante avant de couper en morceaux et de mordre dedans !
Nutrition


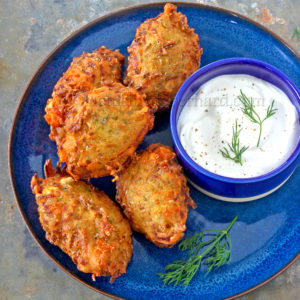
As promised, I am back on the blog with new recipes after several trips. I went to Greece, which I loved a few years ago, and I really wanted to make these zucchini and feta fritters again, full of flavor, with dill and mint. They’ll be delicious crisp and warm, with a simple, fresh, lightly salted Greek yogurt. The contrast is fantastic!
Recipe for about 20 doughnuts:
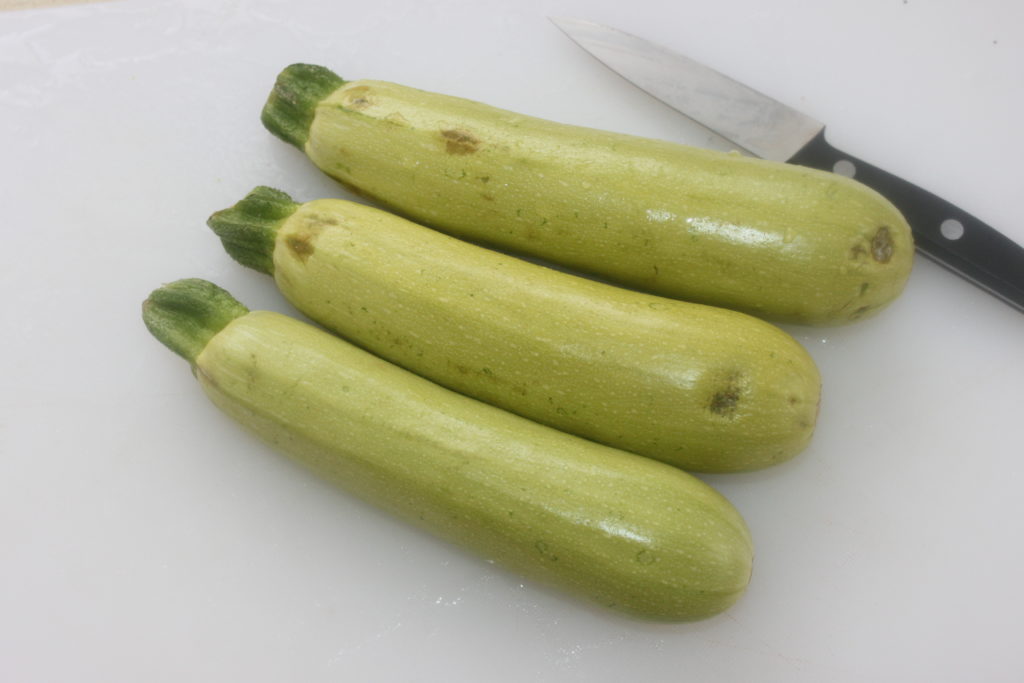
- 3 zucchinis (white or green), I got 550g of grated flesh
- 180g of feta cheese
- 1 tablespoon of olive oil
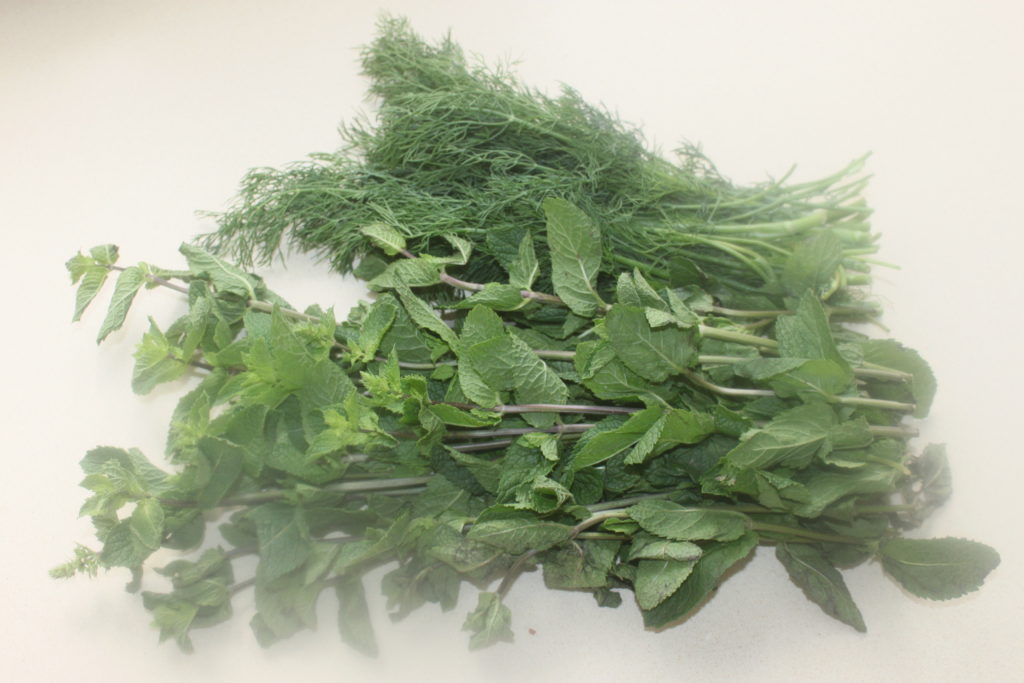
- a few sprigs of dill
- a few mint leaves
- 180g of flour (to be adapted)
- 1/2 teaspoon baking powder
- salt pepper
- oil for frying
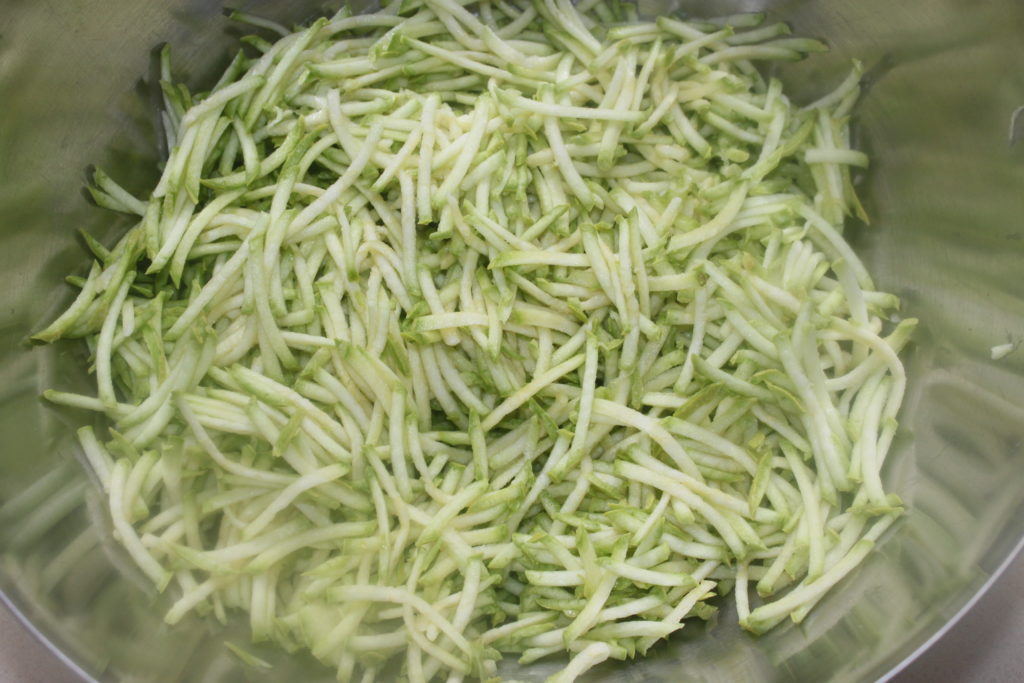
Wash the zucchini and cut off the ends. Grate the zucchini. With 3 zucchinis not too big, I obtained 550g of grated flesh.
I took my blender with the shredding tool (usually for carrots, but here for zucchini), with the rather large blades. Pour the flesh into a container.
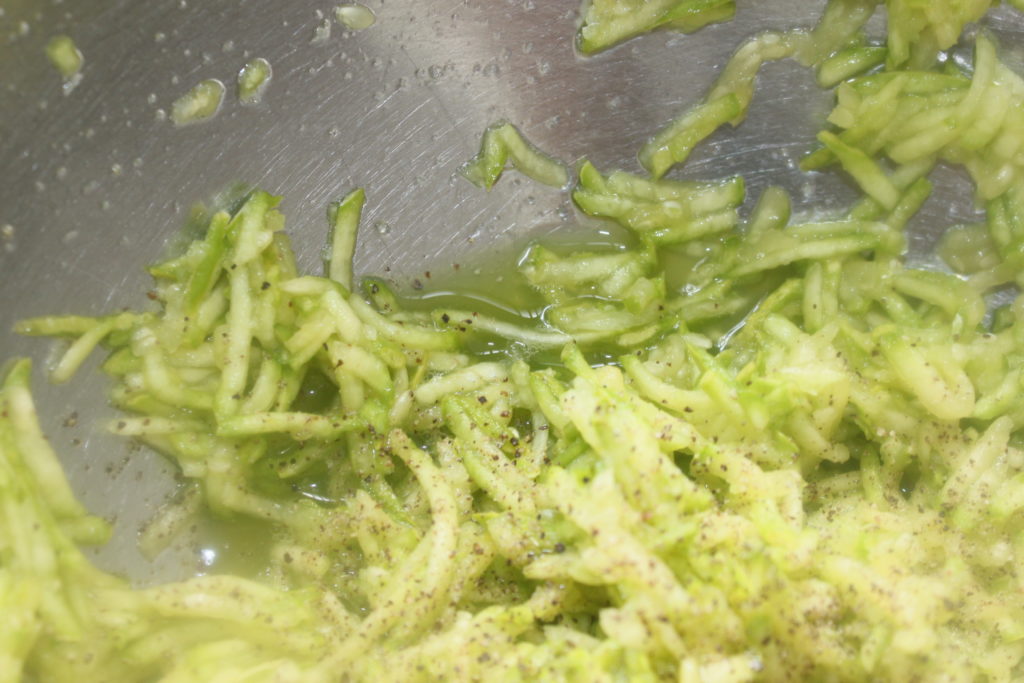
Salt the zucchini a little and then squeeze them in your hands so that the juice comes out.

There is still a good amount of it. It all depends on your zucchini.
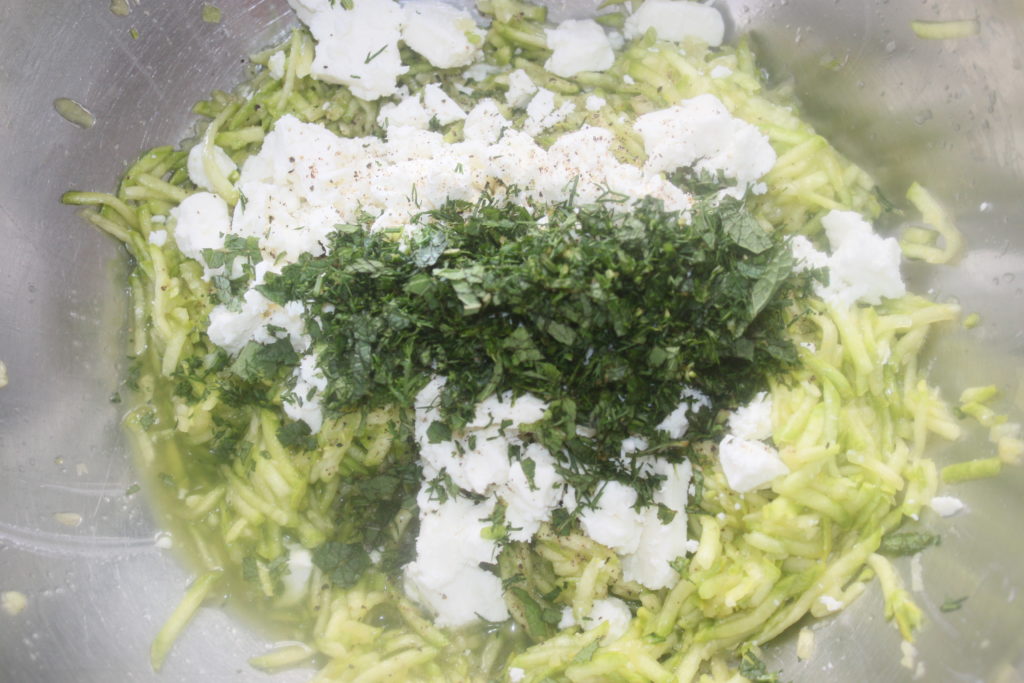
Cut the feta cheese into pieces.

Put it in the container with the tablespoon of olive oil, add more salt (stay reasonable!) and pepper to taste.
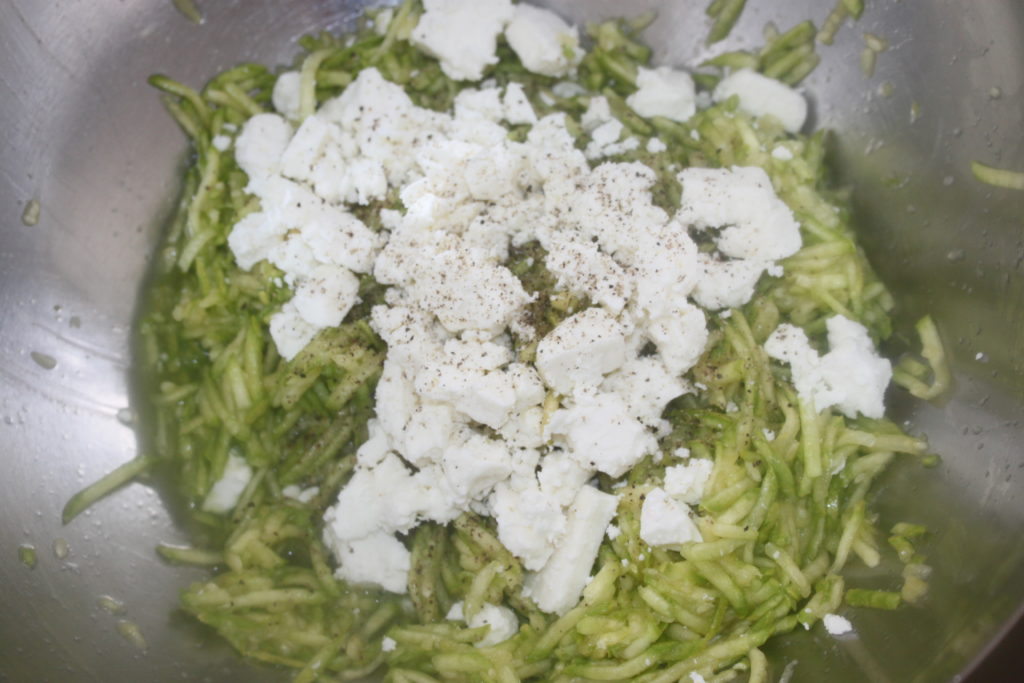
I obviously did not use all the herbs in the picture. I took some mint leaves (a dozen) and 4-5 sprigs of dill.
Chop finely with a knife and pour into the container.
Add the flour. The quantity will depend on the juice returned by the zucchini.
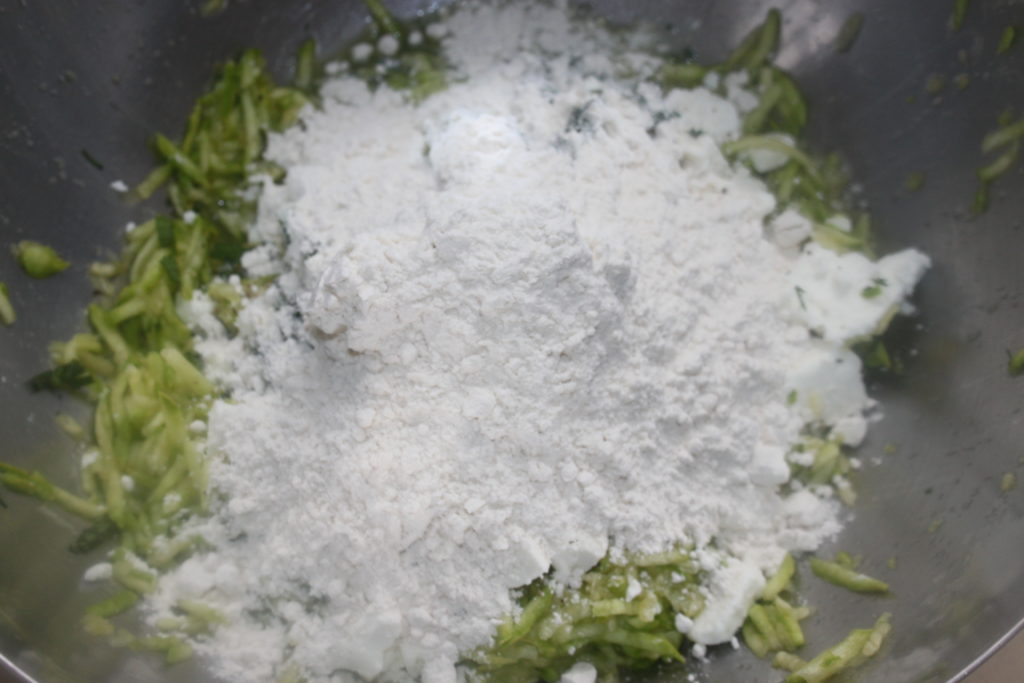
Put in just enough flour to make the dough sticky.
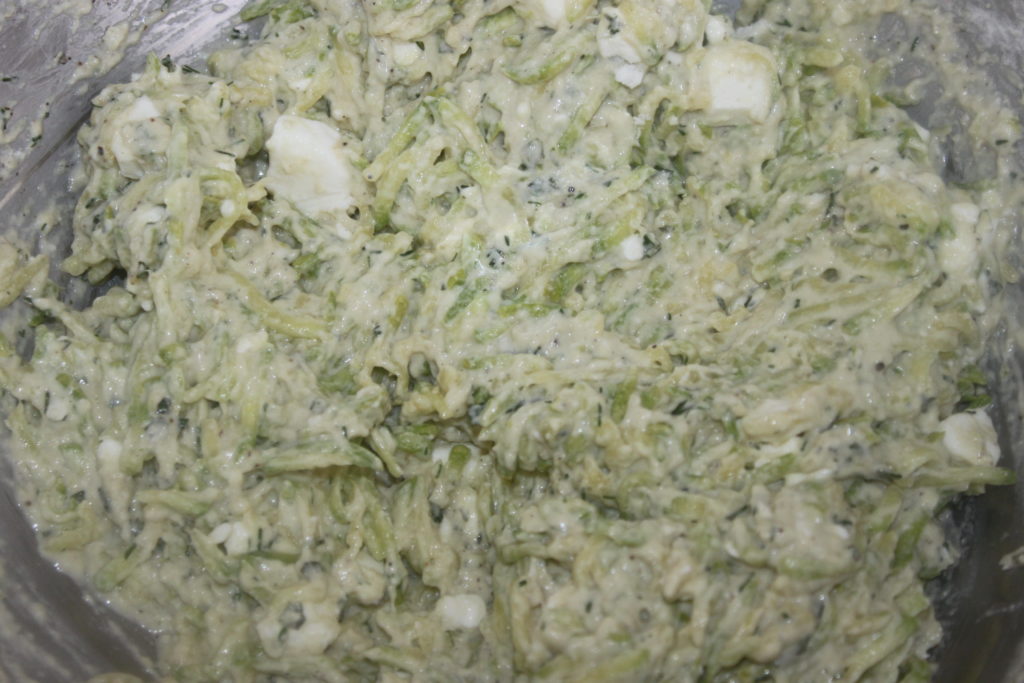
Heat a pan with at least 3-4 cm of oil (sunflower, rapeseed for cooking) to 180°C. Scoop a tablespoon of paste and with another spoon, pour into the hot oil.
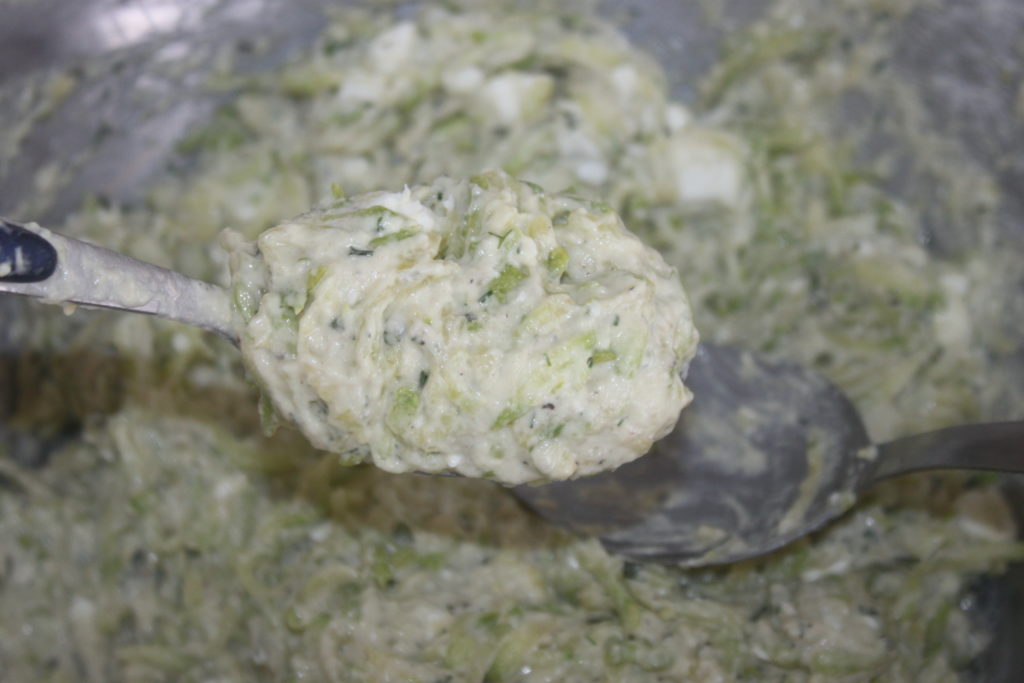
You can use as much as you can.
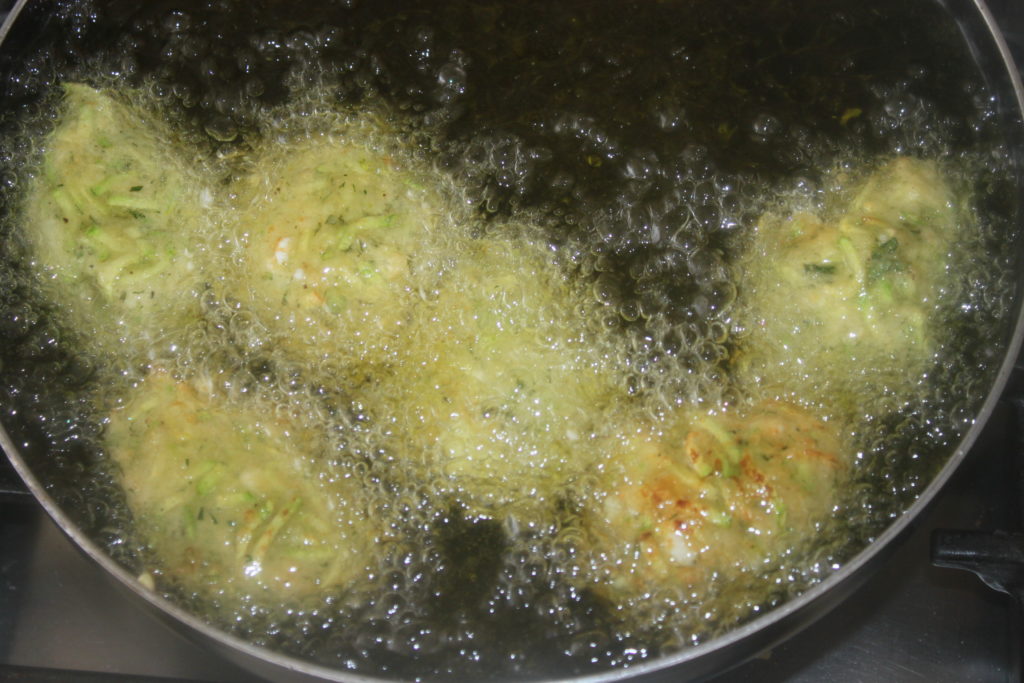
The feta cheese makes its peek, but won’t come out too much, nor will it stop the cooking. Turn the doughnuts over regularly to ensure they are golden brown.
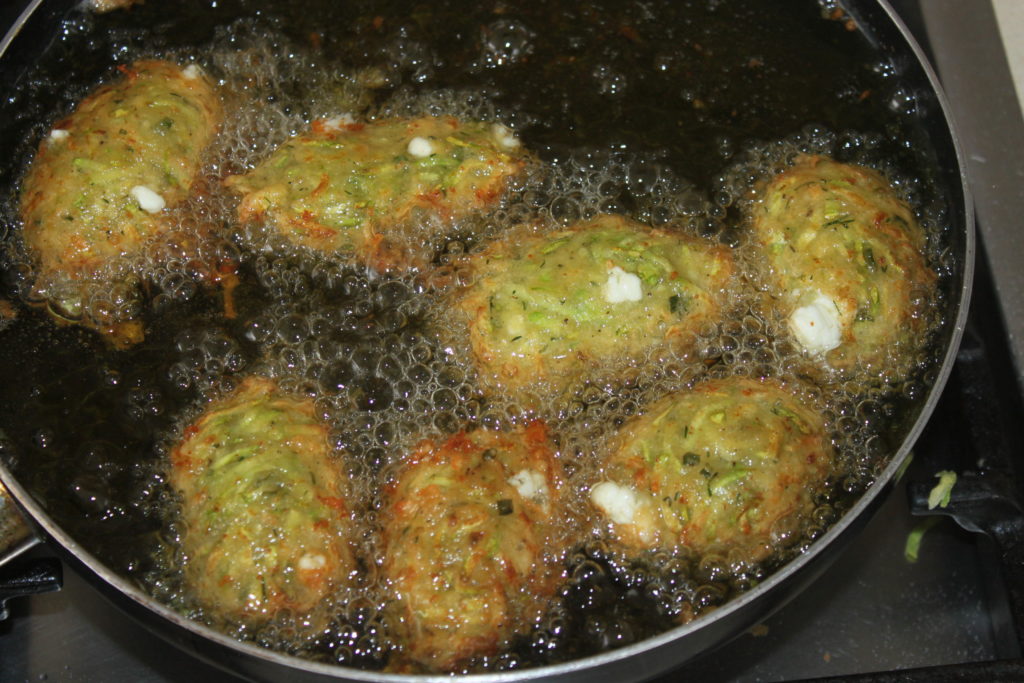
Take them out as you go on a paper towel.
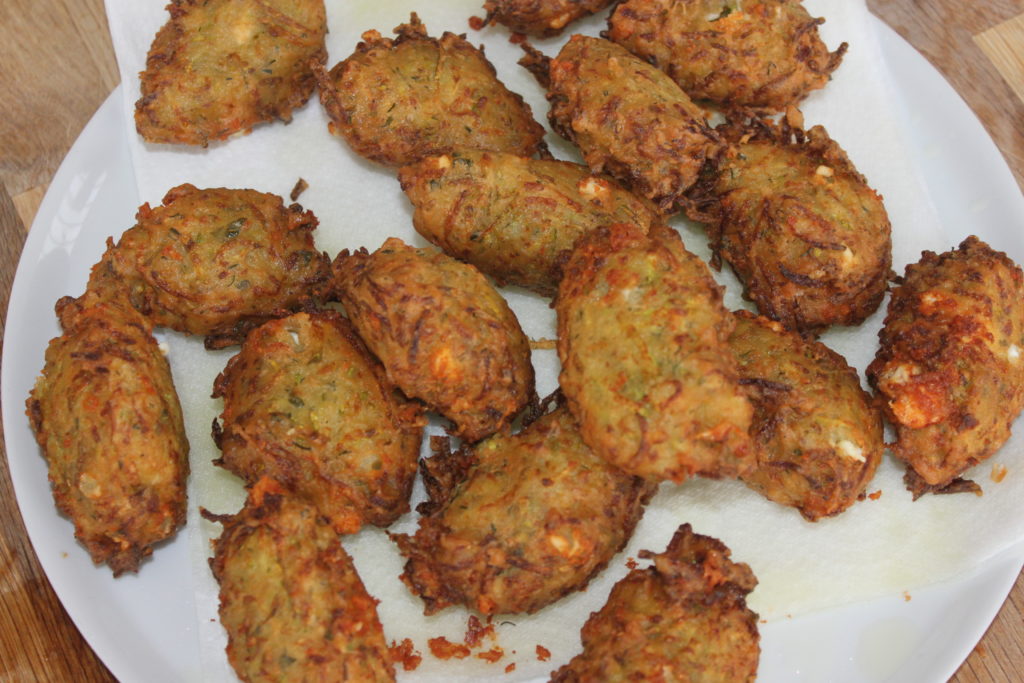
Serve with a Greek yogurt in which you can put a little olive oil, dill or chopped mint, and salt to taste. You can also reheat them for 8-9 minutes in a hot oven and let them regain their crispness in 10 minutes.

Beignets grecs de courgette et feta, kolokythokeftede
Ingredients
Pour la pâte
- 3 courgettes Chair râpée
- 180 g feta
- 1 c. à soupe huile d'olive
- 5 branches aneth
- 12 feuille menthe
- 180 g farine
- 1/2 c. à café levure chimique
- sel, poivre
Pour la friture
- 1 litre huile
Pour servir
Instructions
- Lavez les courgettes et coupez les extrémités. Râpez les courgettes. Avec 3 courgettes pas trop grosses, j'ai obtenu 550g de chair râpée.
- J'ai pris mon mixeur avec l'ustensile pour râper (en général les carottes, mas ici pour les courgettes), avec les lames assez grosses. Versez la chair dans un récipient.
- Salez un peu les courgettes puis pressez-les dans vos mains pour que le jus sorte. Il y en a tout de même une bonne quantité. Tout dépend de vos courgettes.
- Coupez la feta en morceaux. Mettez-la dans le récipient avec la cuillerée à soupe d'huile d'olive, salez davantage (restez raisonnables !) et poivres à votre goût.
- Hachez finement les herbes au couteau et versez dans le récipient.
- Ajoutez la farine. La quantité va dépendre du jus rendu par les courgettes.
- Mettez juste assez de farine pour que cela donne une pâte qui doit rester collante.
- Mettez une poêle avec au moins 3-4 cm d'épaisseur d'huile (tournesol, colza pour la cuisson) à chauffer à 180°C. Prélevez une cuillerée à soupe de pâte et avec une autre cuillère, versez dans l'huile chaude.
- La feta fait son coucou, mais ne va pas sortir trop, ni empêcher la cuisson. Retournez régulièrement les beignets pour qu'ils soient bien dorés. Sortez-les au fur et à mesure sur un papier absorbant.
- Servez avec un yaourt grec dans lequel vous pourrez mettre un peu d'huile d'olive, d'aneth ou de menthe ciselée, et à saler à votre goût. Vous pourrez aussi les réchauffer 8-9 minutes à four chaud puis les laissant reprendre leur croustillant en 10 minutes.